You might be wondering how to send contact form data to WhatsApp from your WordPress site. The good news is that it is actually very easy and simple to do. All you need to do is install a plugin called FormyChat, connect your WhatsApp account to it, and the plugin takes care of the rest for you automatically.
FormyChat is a powerful lead collection plugin that helps your customers connect with you through WhatsApp. Think of it like this: when a visitor lands on your website and wants to talk to you, they can click a single button and send you a message on WhatsApp right away. No extra steps, no confusion.
This way, you can collect all the information that users fill in on your contact form and have it sent directly to your WhatsApp account in seconds. FormyChat is designed to be simple, powerful, and beginner-friendly. It puts WhatsApp communication right at the front of your website so your visitors can reach you as quickly as possible.
- Step 1: Install FormyChat
- Step 2: Create a Floating Widget and Set Up Your WhatsApp Number
- Step 3: Customize icons, CTA, Form, and Form Behavior
- Step 4: Customize the greeting Pop-up
- Step 5: Configuring the Triggers and Targeting
- Top Features of FormyChat
How to send contact form data to WhatsApp using WordPress Contact Form?
In this guide, we will be using the default contact form that comes built into FormyChat. However, if you already have a different form plugin on your website, you do not need to worry. FormyChat works with many popular form plugins, including Contact Form 7, Gravity Forms, WP Forms, Fluent Forms, Forminator, Formidable, and Ninja Forms. You can choose whichever one fits your needs best.
The steps below are simple and easy to follow. If you prefer learning by watching, we also recommend checking out our tutorial video for a quick walkthrough.
Step 1: Install FormyChat
Installing FormyChat is as easy as installing any other WordPress plugin.
At first, go to your WordPress dashboard and type FormyChat in the searchbox.
Once you find the FormyChat plugin in the search results, click the “Install Now” button.

Then what you have to do is, you need to activate the plugin in order to use the plugin.

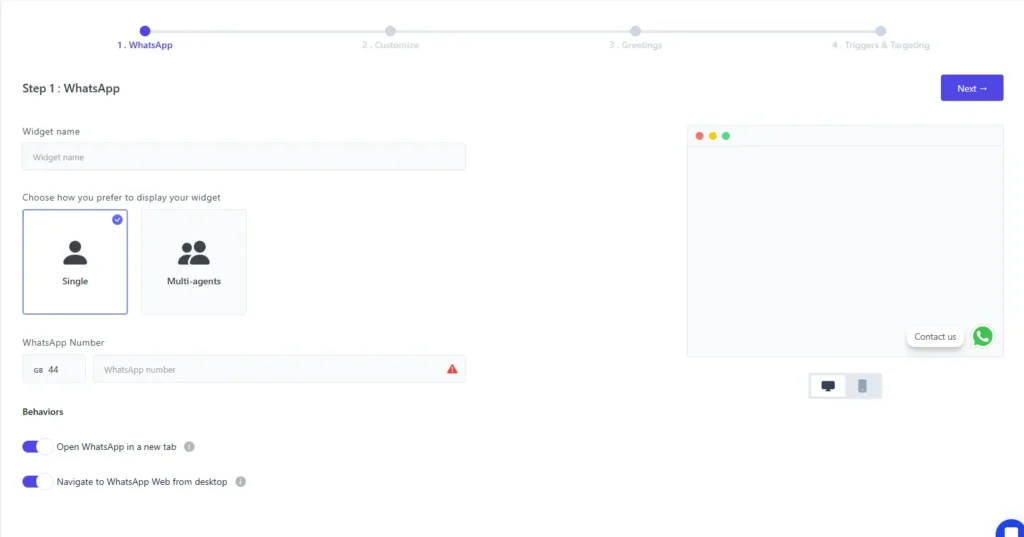
Step 2: Create a Floating Widget and Set Up Your WhatsApp Number
After you have installed and activated FormyChat, the next step is to create what is called a “Floating Widget.” A floating widget is a small button or icon that stays visible on your website as visitors scroll through your pages. It is usually placed in the bottom corner of the screen. When someone clicks on it, a contact form pops up for them to fill in.

To get started, click on the “Create Floating Widget” icon in the FormyChat dashboard. This will open up a settings page where you can enter your WhatsApp phone number and write custom messages that visitors will see.
On this page, you will see two options: Single Agent and Multi Agents. Here is what each one means:
- Single Agent: This option lets you add only one WhatsApp phone number. This means that all contact form submissions from your website will be sent to that one number. This is a great choice if you are running a small business or if you are the only person who handles customer messages.
- Multi Agents: This option is for when you have more than one person on your team who needs to receive messages. For example, if your business has a Marketing team and a Support team, you can add a different WhatsApp number for each department. When a visitor fills in the form, they can choose which team they want to contact, and the message will be sent to the correct number. This keeps things organized and makes sure the right person gets the message.
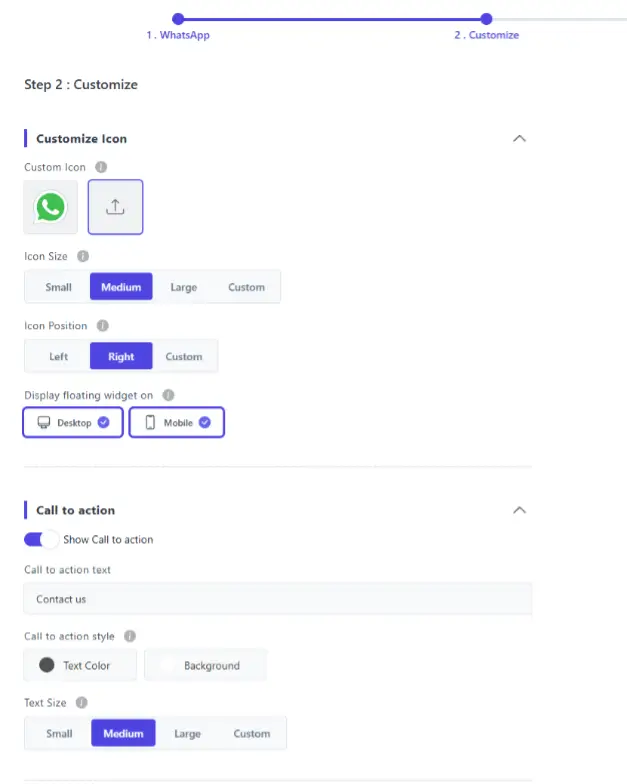
Step 3: Customize icons, CTA, Form, and Form Behavior
This step is very important because it is where you get to make the floating widget match the look and feel of your website. There are a lot of options here, so let us walk through them one by one.
Customize Icon: You can change the icon that appears on your website. You can also change the size of the icon and choose whether you want it to sit on the left side or the right side of the screen. You can also decide where the floating widget shows up. For example, you might only want it to appear on desktop computers, or only on mobile phones, or on both. You can control this from the settings.
CTA (Call to Action) Button: A CTA button is the button that tells visitors what to do next. In this case, it encourages them to send you a message. You can change the text on this button to say whatever you want. You can also change its color and size to match your website design.
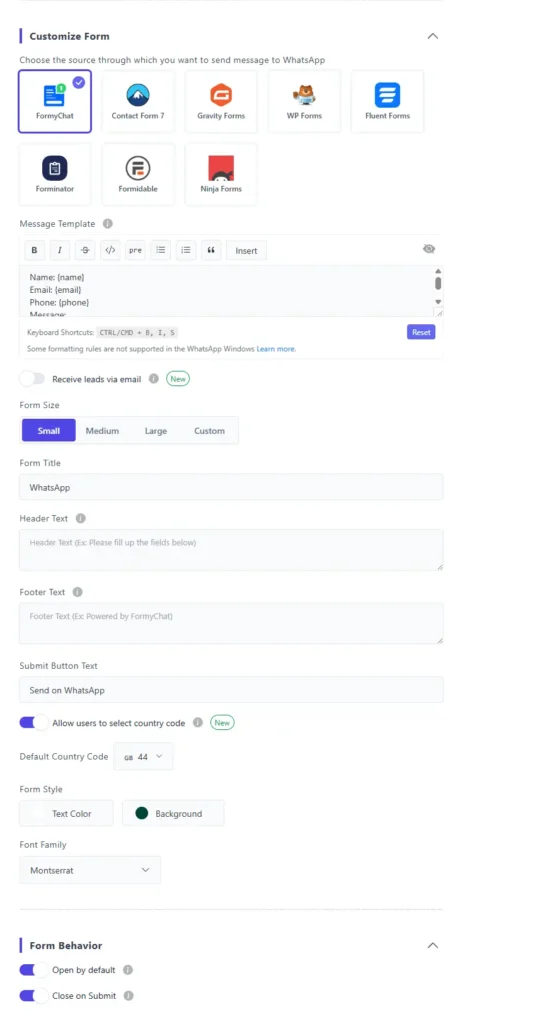
Customize Form: As we mentioned earlier, FormyChat works with many different form plugins. In this section, you can choose which form plugin you want to use. Once you select one, FormyChat will automatically use that form to collect information from your visitors and send it to your WhatsApp.
You can also customize how the form itself looks. This includes changing the message template (the text that gets sent to WhatsApp), the size of the form, the title that appears at the top, the header text, the footer text, and more. All of these options are there so you can make the form look and feel like it belongs on your website.
Form Behavior: You can further customize how the form will behave. Whether the form should open by default or close once someone submits the form information.
All these options are there for you to customize the form according to your needs and brand preference.
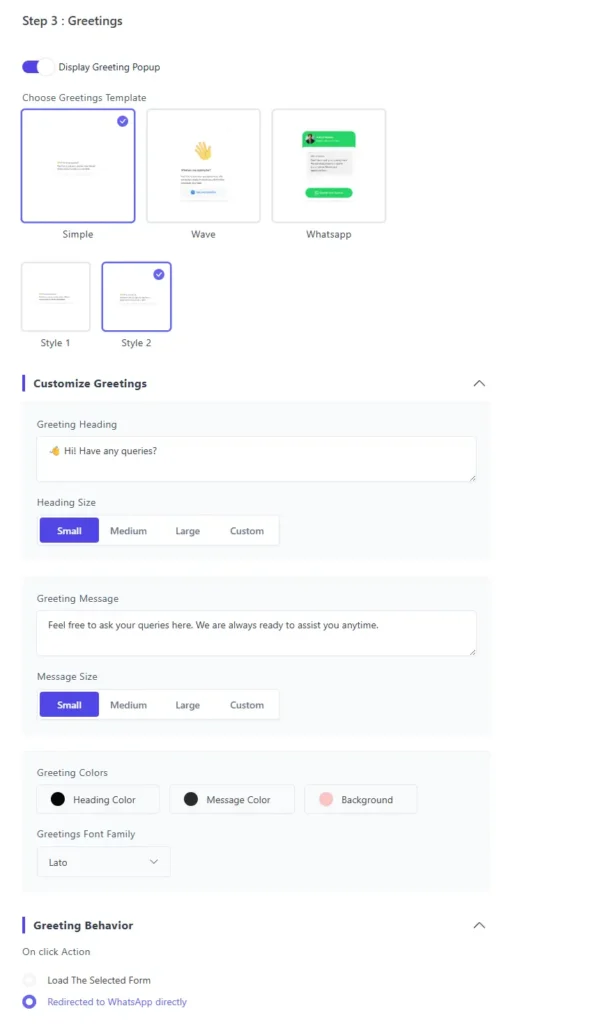
Step 4: Customize the greeting Pop-up
The greetings pop-up is a small message that pops up on your website to welcome visitors when they first arrive. Think of it as a friendly “Hello!” that grabs their attention and lets them know they can reach out to you. This helps set a good first impression and encourages visitors to interact with your site.
In the settings for this feature, you can choose from multiple pop-up styles to find one that matches your website. You can also write your own greeting message. For example, something like “Hi there! Feel free to send us a message if you have any questions.” On top of that, you can control when and how the pop-up appears, such as how long a visitor has been on the page before the pop-up shows.
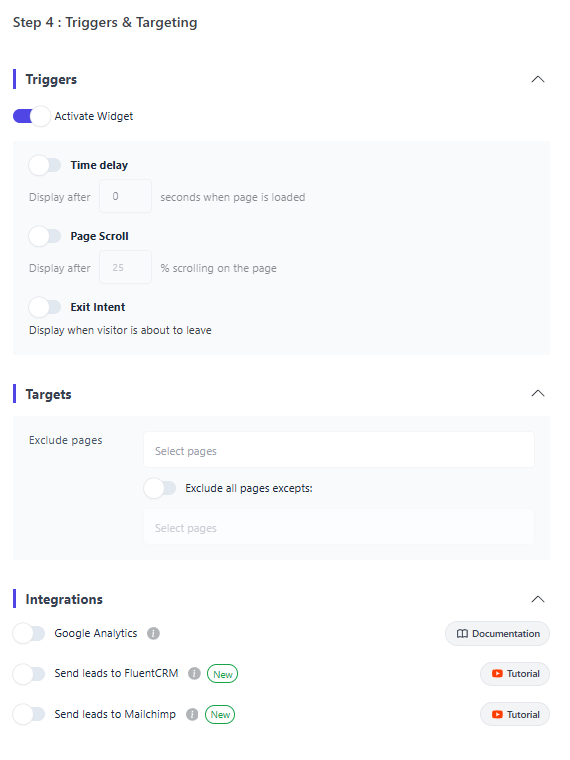
Step 5: Configuring the Triggers and Targeting
This is the final setup step, and it gives you control over when and where the floating widget appears on your website. For example, you might want the widget to show up only on certain pages, like your Contact page or your Products page. Or you might want it to appear on every single page. You decide.
In addition to the trigger and targeting settings, there is also an Integration section. This is where you can connect FormyChat with other useful tools:
Google Analytics: You can turn on Google Analytics integration so that you can track how many people are filling in your form. This helps you understand how well your contact form is working.
FluentCRM: You can connect FluentCRM, which is a tool that helps you manage your leads and customers. When someone fills in your form, their information can be automatically saved in FluentCRM as well.
Mailchimp: If you use Mailchimp for email marketing, you can connect it here, too. This way, the leads you collect can automatically be added to your Mailchimp email list.
Once you have gone through all of these settings and made your choices, click “Save Changes” to apply everything.
Once you visit your website, you will see the floating widget sitting on the screen just as you set it up. When a visitor clicks on it and fills in the form, their message will be sent straight to your WhatsApp account right away.

You can also go back to the FormyChat dashboard and click on the “Leads” button. There, you will be able to see all the messages and information that have been collected from your visitors in one easy-to-read list.

Top Features of FormyChat
FormyChat is one of the easiest WordPress plugins to use. And it does its job well, sending form leads directly to WhatsApp. All leads that are being sent to WordPress are also saved as a lead saved message on your website as well. So you can always trace back where the message originated from.
Let’s take a look at some of the top features FormyChat has to offer,
Merge Tags and Preset Messages
Merge tags are special codes that you can put into your preset messages, such as {url} or {title}. When a visitor sends a message through your form, these codes automatically get replaced with the real information. For example, {url} will be replaced with the actual web address of the page the visitor was on, and {title} will be replaced with the title of that page. This information shows up at the top of every message you receive on WhatsApp, so you always know where the message came from.
Link Your Contact Form to WhatsApp
The main purpose of FormyChat is to connect your WordPress website’s contact form directly to your WhatsApp account. Once it is set up, all of your visitors’ information comes to one place: your WhatsApp. Using a WordPress form to WhatsApp integration like this removes the hassle of checking multiple places for messages and makes it much easier to stay on top of your customer communication.
Embed Your Own Floating Icon
You can easily customize the WhatsApp icon that floats on your website. Visitors simply click on it and fill in their information to send you a message. FormyChat offers three different sizes of icons so you can pick the one that looks best on your site. You can also choose to place the icon on either the left or the right side of the screen.
A Great Customizable Call to Action
You can easily customize the WhatsApp icon that floats on your website. Visitors simply click on it and fill in their information to send you a message. FormyChat offers three different sizes of icons so you can pick the one that looks best on your site. You can also choose to place the icon on either the left or the right side of the screen.
A Personalized Pop-Up Contact Form
You can design the pop-up contact form to match your website’s style. There are many font options available for the header text, footer text, and the submit button. You can also choose the size of the form (small, medium, or large) so it fits nicely with the rest of your site.
An Easy and Simple Setup Wizard
FormyChat’s setup wizard is designed to be the most beginner-friendly way to set up a contact form. You do not need any technical knowledge to use it. The wizard walks you through each step clearly and simply. You can also set up the widget behavior with just one click. For example, you can choose whether WhatsApp opens in a new tab after someone submits the form, or whether the form just closes on its own.
WhatsApp Web for Desktop Users
If your visitors are using a desktop computer instead of a phone, they can still send you a message. FormyChat supports WhatsApp Web, which means visitors can fill in the form, and it will open WhatsApp Web directly on their desktop browser. They can then complete and send the message from there without needing a phone in hand.
Custom Size
You can make your contact form as small and simple as you want, or as large and detailed as you need. The size of the form is completely up to you, and the Ultimate version of FormyChat gives you full control over this.
Custom CSS Feature
Every website has its own look and feel, and your FormyChat widget should match it. The Custom CSS feature gives you full control over how your widget looks without needing to touch any code manually.
With Custom CSS, you can personalize the colors, fonts, spacing, and layout of your floating widget and contact form. So if your website uses a specific brand color or font style, you can make the FormyChat widget look like it was built right into your site.
Sorting, Filtering, and Searching
If you have a lot of leads, it can be hard to find a specific one. That is why FormyChat includes a search box at the top of your leads page. You can type in a name or any other detail to quickly find a particular visitor. You can also sort your leads in different orders and use filters to narrow down the results to exactly what you are looking for.
Easily Export Your Leads as a CSV File
Sometimes you need to take your lead data out of the website and use it somewhere else. FormyChat makes this easy. There is an Export button at the top right corner of your leads page. Simply click it, and all of your lead data will be downloaded as a CSV file. A CSV file is a type of file that can be opened in programs like Microsoft Excel or Google Sheets, making it easy to work with your data outside of your website.
Google Sheets Integration
With the Google Sheets integration feature, you can automatically send your collected lead data straight to a Google Sheet. This means that every time someone fills in your form, their information is saved in Google Sheets in real time. This is a great way to keep your leads organized and easy to access from anywhere.
CRM & Mailchimp Integration
FormyChat does not just send leads to WhatsApp. It also lets you forward that same data to your favorite marketing and CRM tools. This means you can manage and follow up with your leads without doing any extra work.
With the FluentCRM integration, every lead that comes through your form is automatically saved inside FluentCRM. FluentCRM is a tool that helps you organize your customers and communicate with them over time. So instead of just receiving a WhatsApp message, you now have a full record of that lead stored in one place for future follow-ups.
If you use Mailchimp for email marketing, you can connect it to FormyChat as well. Every time a visitor fills in your contact form, their information is automatically added to your Mailchimp email list. This way, you can send them newsletters, promotions, or updates without having to manually copy and paste their details.
WooCommerce Integration
If you run a WooCommerce store, FormyChat makes it even easier for your customers to reach you. With the WooCommerce integration, a WhatsApp button appears directly on your shop page and product pages. So instead of just browsing, visitors can message you instantly about any product they are interested in.
Conclusion
We have reached the end of this tutorial, and hopefully, you now have a clear understanding of how to send contact form data to WhatsApp using a WordPress contact form.
Collecting leads has always been one of the biggest challenges for marketers. In the past, some tools were too expensive, and others were too complicated to use. But with a plugin like FormyChat, collecting leads becomes much simpler and more manageable. Whether you want to enable a social contact form or use a form to WhatsApp WordPress solution, FormyChat provides an easy way to send WhatsApp messages directly from your site. After reading this article, you should feel confident and ready to start collecting leads on your website with ease.
Frequently Asked Questions
How do I send contact form data to WhatsApp?
You can easily send your contact form data to WhatsApp using the FormyChat plugin. Once it is set up, every time a visitor fills in your contact form, the data is automatically collected and sent straight to your WhatsApp account. No extra steps or manual work required.
How do I add a WhatsApp widget to my WordPress website?
To add a WhatsApp widget, install FormyChat from your WordPress dashboard and create a floating widget from the plugin settings. You can choose the icon style, size, and position, then place it anywhere on your site. Visitors can click it and send you a message with just one tap.
Can I customize the WhatsApp message of FormyChat?
Yes, you can fully customize the WhatsApp message based on your needs. FormyChat lets you edit the message template, use merge tags like {url} and {title}, add line breaks, and even bold certain words. FormyChat Ultimate gives you even more control over preset message customization.
Is FormyChat free to use?
Yes, FormyChat has a free version that includes all the essential features you need to start collecting leads through WhatsApp. However, if you want to level up and use all the options available, unlocking the premium version is always a good idea.
Add your first comment to this post