With a WordPress WooCommerce store, you can sell your digital and physical products worldwide; however, what if you want to take your e-commerce store to the next level?
You can stand out from other online stores by offering personalized product options such as color choice, image swatches, or file upload. So the customers can get more personalized products. Or, you can offer product add-ons with an extra fee or some discount.
You want to use powerful features like extra product options or conditional logic, but the only problem is that these features are not available on WooCommerce by default. And this is where the YayExtra Product Options plugin comes in!
Both the free and pro versions of YayExtra – WooCommerce Extra Product Options plugin allow you to offer your customers many different options for a single product. Also, you can add additional options such as checkboxes, radio buttons, custom image swatches, and date pickers to your product forms. You can also create conditional logic to show different fields and prices depending on the customer’s selection.
Let’s check out some of the thriving features of the YayExtra product options plugin.
YayExtra – WooCommerce Extra Product Options

The YayExtra – WooCommerce Extra Product Options plugin is handy for creating add-on fields to the product forms. You can add these fields individually for each product or create product options and apply it globally in bulk. You can offer image swatches and multiple color selections, allowing customers to add personal engraving characters through a text field.
Moreover, if a customer adds some extra product to the buying list, such as a gift wrapper, or any personal message, you can charge an extra fee by adding a conditional logic field. Here are some more field types that you can add to the product forms.
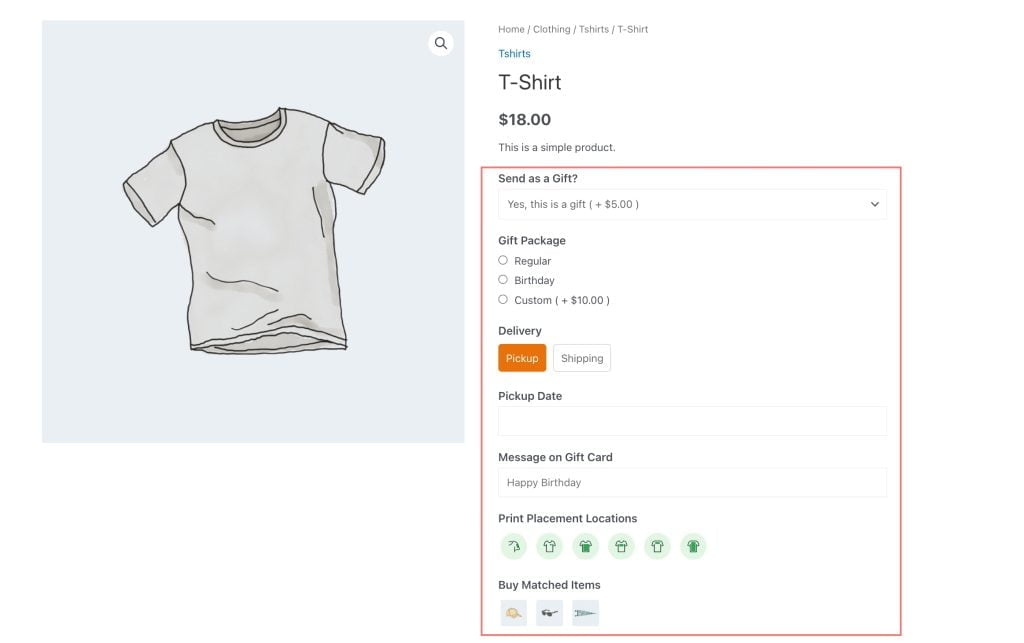
Text filed: Let customers type names, phone numbers, or any personalized message.
Checkboxes: Allow customers to select multiple checkboxes
Radio Button: A multiple-choice field that allows a single selection.
Dropdown List: A list box from which the customer can choose several options.
Swatches: A field type that displays multiple color and image swatches, allowing single or multi-select options, such as fabric types and colors.
Date picker: this field allows customers to pick up any date for delivery, for birthdays, anniversary
File Upload: the image upload field type allows customers to share pictures or any graphic file.
Now, let’s jump to the practical section and see how YayExtra product options plugins can help boost your online sales.
How to install the YayExtra Product options plugin
Installation is easy, just like any other WordPress plugin.
Head over to the plugins section in the WordPress dashboard.
- Click on “Add New”
- Then Click on the “upload plugin” option and then upload the plugin folder.
- Click on Install and then activate.
How to create new options set using YayExtra product options
Now let’s see how we can add product options using the YayExtra product plugin.
Go to “WooCommerce” and then “YayExtra.“
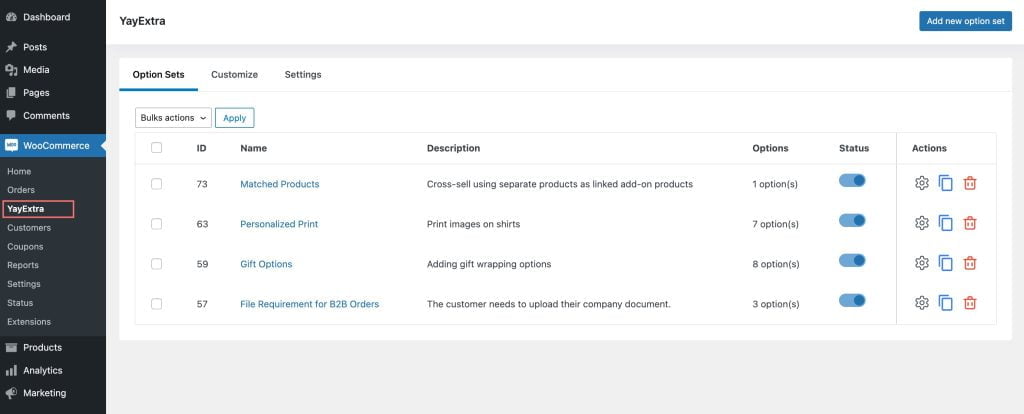
Now click on “Add New option set” to add options such as clothing name, color, and size. After that, click on active, edit your option set name, and then Options.
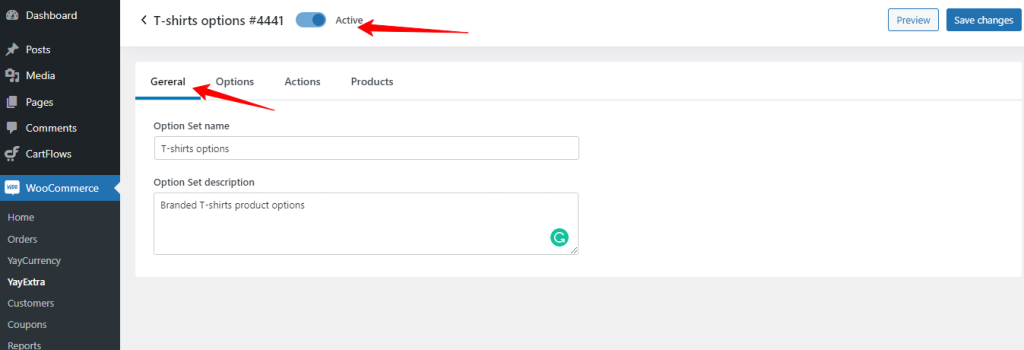
When you click on the options tab, it’ll allow you to edit the option’s name and then option type from the dropdown menu. You can select any field from the given dropdown menu, like text, buttons, swatches, etc. These option sets are moveable. You can drag and drop to any order you prefer.
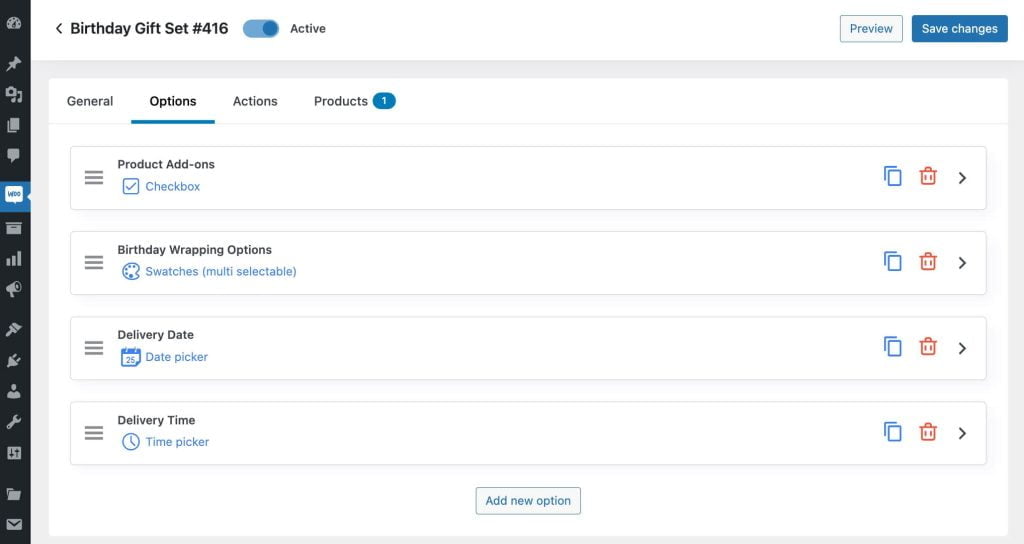
Adding conditions based on User’s action
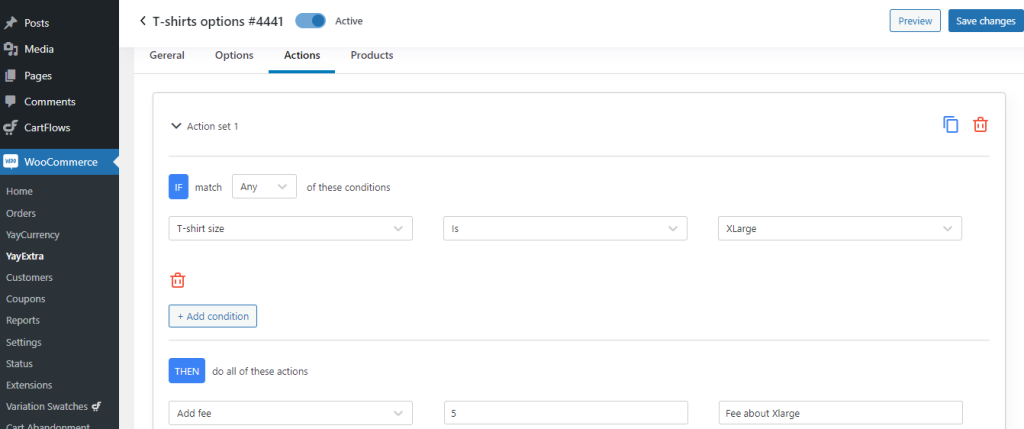
Once you have set all options, you can apply fees or discounts by creating actions triggered based on various conditions. For example, you could create a rule: If customers select the X Large size, charge them an extra $5. To set the conditional logic, you can click on the “Action” tab and then add the rule to be followed.
How to customize product options
Now, let’s find out how to add other custom fields like product sizes, content, order date, Style, and display conditions.
For our test product, we have created five option sets.
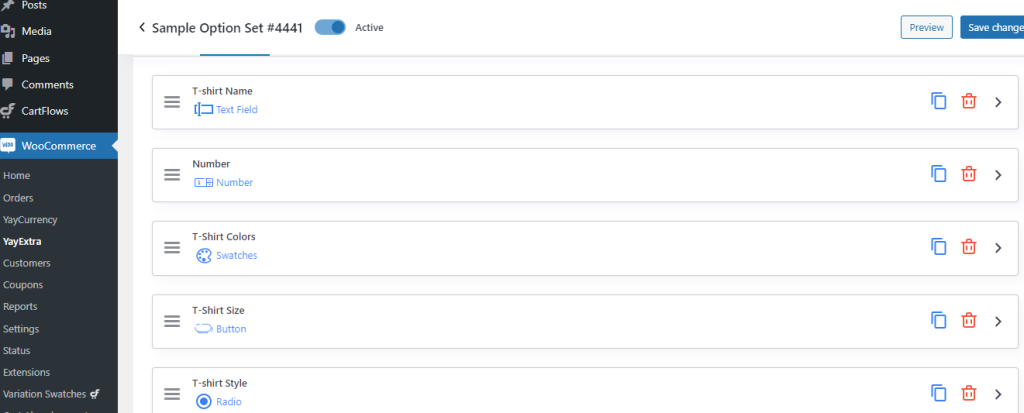
To further customize each option set, we can click on the Option values to customize these options further. Suppose you want to customize swatches; click on the Option value, then “Choose a color” to select your preferred color.
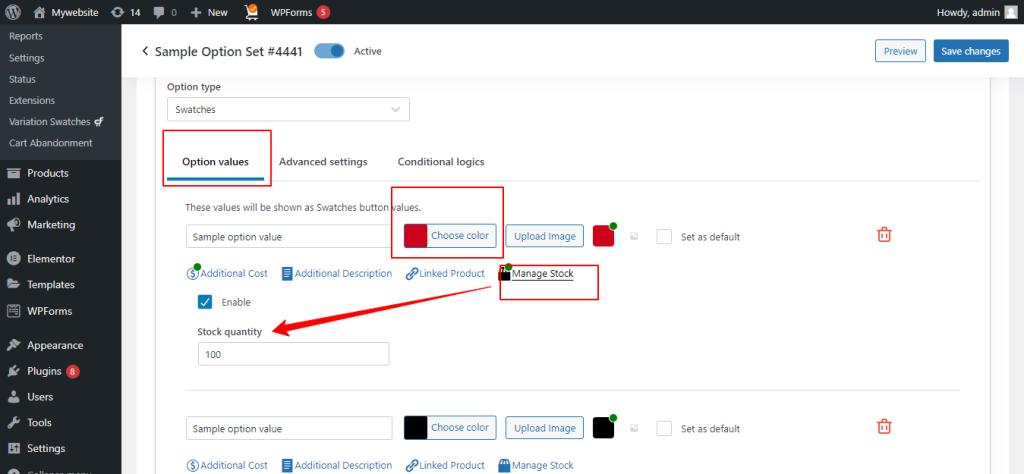
Likewise, you can add additional costs and descriptions and enable the available stock option. This extra inventory extends the original WooCommerce inventory but adds a limit to the number of items available for purchase.
You’ll get seven basic options with the free version, while the pro version lets you add five more advanced options.
- Text
- Number
- Radio button
- Checkbox
- Dropdown list
- Button
- Swatches: single choice color or image (for Pro version) swatches with customizable shapes and stack styles (for Pro version)
Options with the pro version are as follows;
- Button – multi selectable
- Swatches – multi selectable
- File upload
- Time picker
- Date picker
How to enable conditional product options using the YayExtra plugin
Suppose you run a seasonal campaign for Christmas gift wrapping and offer three options.
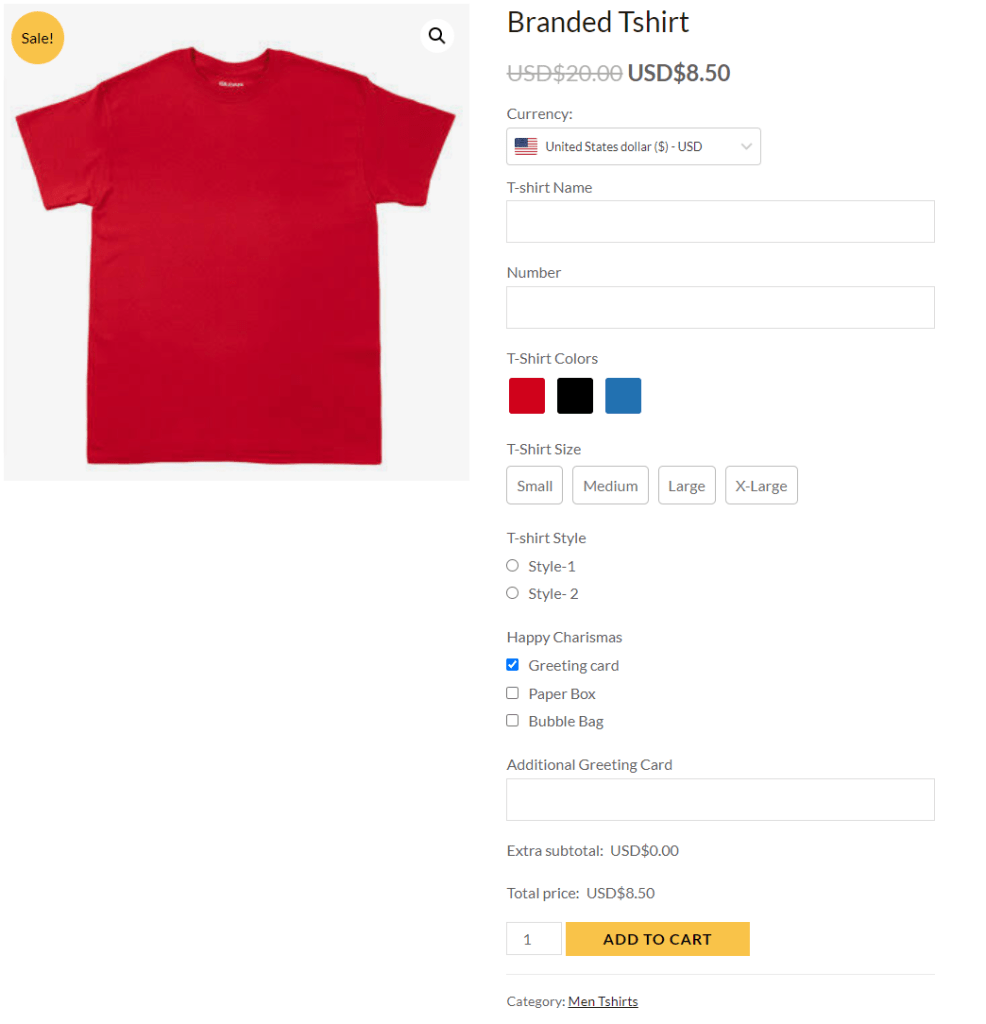
Greeting card: Your customers can include a greeting card with their gift or skip it entirely.
Paper Box: customers can choose a paper box wrapping for their gift.
Bubble Bag: Customers can choose a bubble bag wrapping for their gift.
To create these product options, follow the procedure.
- Go to “Options,” then click “Add new option.”
- Keep the “Option type” as “Checkbox.”
- Now go to “option Values” and start adding fields such as “Greeting Care,” then “Paper Box,” and “Bubble box.”
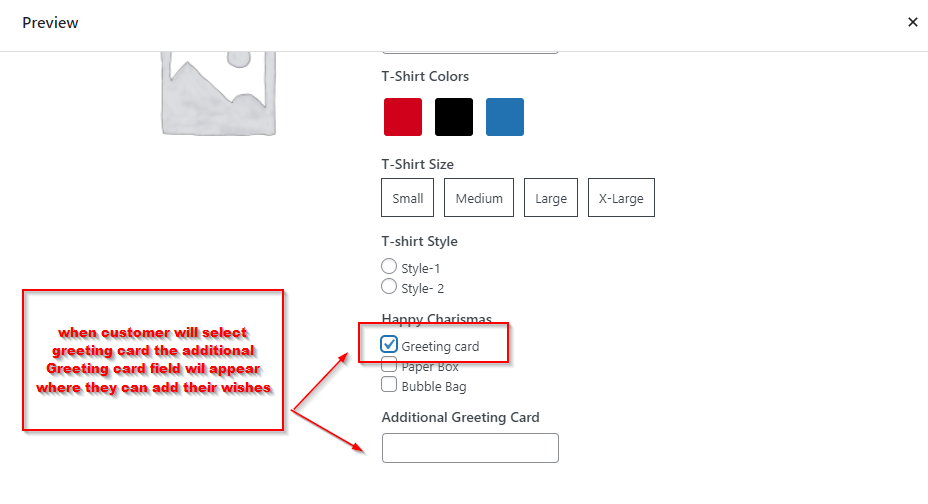
Once these product options are created, we’ll create conditional extra options so that when a customer selects “Greeting Card,” another Additional greeting card field will appear where the customer can write a personalized message.
Follow these steps to create an extra condition option.
Go to the “Option” section and select “Add new option.”
Now, this time select the “Option type” as “Text, ” allowing the customers to add their greetings in the text field.
Click on the “Conditional Logic” tab to add to the setup conditional logic.
- Conditional logic type should be like this; Display when matching any/all”.
- Choose “Happy Charismas” as one of the “Greeting Cards.”
- Now save all of these settings and click on the preview tab to check
Final step: How to assign the option sets to Products
Finally, you have successfully created all your required product options and the custom fields; now it’s time to assign these option sets to the products to publish them.
You can assign the product options in two ways.
- Choose products one by one
- Choose products by Conditions
Choose products one by one
You can select products one by one manually, select an entire category or tag, or you can filter by product.
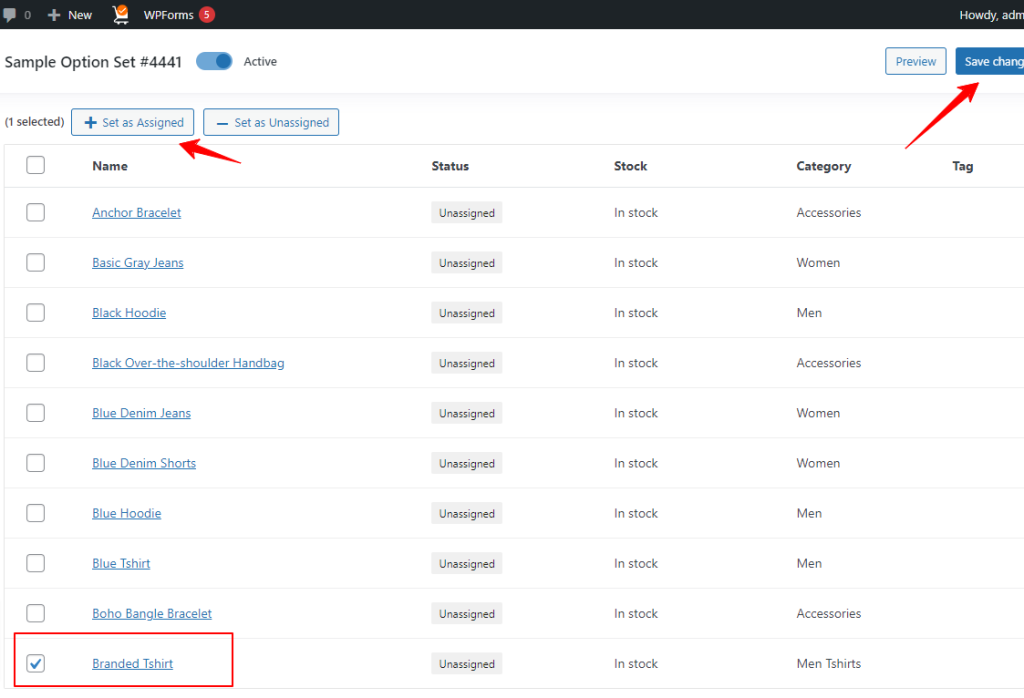
After selecting your products, you have to enable “Set as Assigned” and then “Save” to get these options published.
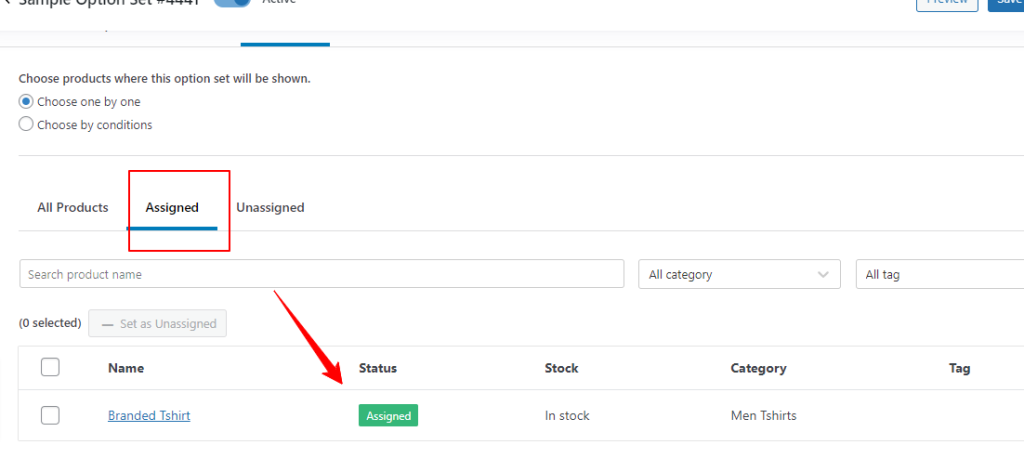
You can check if your options set is assigned to your product by clicking on the “Assigned” tab.
You can click on the product name to check how the product options look in real-time.
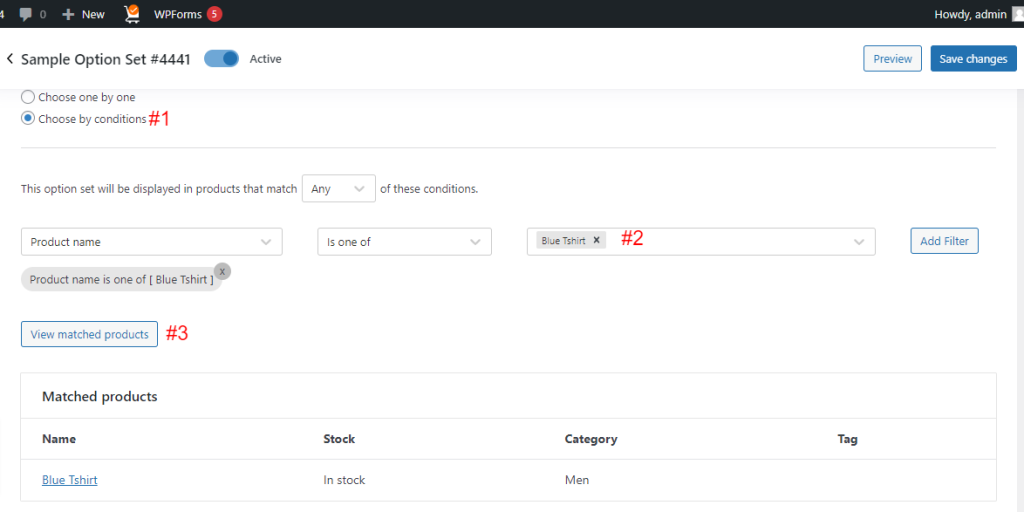
Choose products by Condition
The other option is adding multiple filters to list all relevant product lists. Then add the filter and save the changes. You can check if your required products are matched in the list by clicking on “View matched products.”
Conclusion
You can see how easily you can add extra product options to your WooCommerce store using the YayExtra – WooCommerce Extra Product Options plugin. Hope you have found this tutorial helpful. If you have any further quires about the YayExtra plugin, let us know in the comment section.






Add your first comment to this post