Multi-vendor eCommerce websites are very different from regular eCommerce websites.
Regular eCommerce founders are their own standalone vendors – marketplaces can have thousands of vendors who all contribute to the supply. Entrepreneurs in the eCommerce space are responsible for sourcing products, setting pricing, fulfilling orders, and much more. On multi-vendor marketplaces, these tasks are performed by individual sellers. An eCommerce operator focuses on building a large customer base, while the marketplace entrepreneur looks at building and balancing supply and demand. And so on.
The fundamental difference between online stores and online marketplaces means that multi-vendor platforms require entirely different features from traditional eCommerce sites. Personal profiles, reviews, online payments systems, admin panels, and much, much more. Marketplaces run on a completely different business model too. Most of the revenue goes directly to sellers, with the marketplace owner usually taking a commission on sales.
So, today we will create a multi-vendor eCommerce website with one of the most popular eCommerce platforms in the world – WordPress that will help beginners understand how to create one for themselves. Let’s go.
Table of Content
- How to Create a Multi-vendor eCommerce Website?
- Bonus: Essential Plugins You Need to Grow Your Multi-vendor eCommerce Website
- Conclusion
How to Create a Multi-vendor eCommerce Website?
Let’s see the steps you need to create a multi-vendor eCommerce website with WordPress. But first, these are the things you need to have installed on your site.
- Domain and Hosting
- WordPress
- WooCommerce
- Dokan
- A responsive theme.
Let’s see the steps.
Step 1: Install WordPress
There is two way you can install WordPress,
- One-click installation from your hosting dashboard
- Manual installation
Definitely, the first one is easy as takes only one click to install WordPress. When you are choosing your hosting provider, look for the feature of a one-click WordPress installation. Then all you have to do is go into your hosting dashboard and hit a button that says Install WordPress. Most WordPress hosting providers have this feature.
However, if your hosting provider doesn’t have this feature, you need to manually download the WordPress software from WordPress.org and upload it to your hosting dashboard. You can read this article on how to install WordPress on localhost to get a better idea about installing WordPress manually.
Step 2: Install & Configure WooCommerce
You have installed WordPress on your site. Now it is time to install WooCommerce and start building your eCommerce site. This is a very important part of how to build an eCommerce website with WordPress.
Login to your WordPress dashboard and go to Plugins–> Add New. In the search box type WooCommerce. Then just install and activate the plugin.

Now you need to finish the setup wizard with the necessary details.
Store Details
In the first step of the setup wizard, you will need to enter some basic details about your store’s location, and email address. Carefully fill out all the information.

Industry Details
Next, you have to specify which industry you belong to. If you don’t see your option in the list then choose other.

Product Types
Choose the types of products that you want to sell. Most stores will just want to check the box of the Physical product. If you’re selling digital products, you can select Downloads.

Business Details
You will need to enter some additional business details about your store.

Theme
The setup wizard will tell you to install a theme. If you want to add a premium theme then just skip this section by clicking Continue with my active theme.

After finishing the setup wizard, there are other settings you need to configure. Like,
The fundamental difference between online stores and online marketplaces means that multi-vendor platforms require entirely different features from traditional eCommerce sites. Personal profiles, reviews, online payments systems, admin panels, and much, much more. Marketplaces run on a completely different business model too. Most of the revenue goes directly to sellers, with the marketplace owner usually taking a commission on sales.
Configure Shipping
WooCommerce has its own built-in shipping features. You can set shipping zones for which you can add shipping methods. There are three types of shipping methods, Flat rate, Free shipping, and Local pickup.
Once you add a method, you can enter its cost. However, the built-in shipping feature doesn’t let you change the cost based on the weight/dimensions of a package, which is why you’ll probably want either a table-rate shipping plugin or a real-time rates plugin.
If you want to explore the built-in shipping settings, you can go to WooCommerce → Settings → Shipping.

Emails
Go to WooCommerce → Settings → Emails, you can customize the content of the emails that your store sends to customers and admins, such as the email that a shopper receives after they place an order.

Taxes
WooCommerce has a manual tax option. To enable manual taxes, you need to click the Setup tax option and then select the manual option.
Once you do that, you’ll get a new settings area at WooCommerce → Settings → Taxes. You can also import CSV files for Tax rules.

Step 3: Choose an eCommerce Store Theme
The theme will conclude the format of your Online business store. There are numerous well-known WordPress Online business themes accessible in the WordPress repository. You will track down both free and premium forms of these themes. Likewise, these themes are adaptable. By adding HTML and CSS codes, you can wind up with a plan that seems to be the first design.
But, if you are not a coding pro, you can use the original design. Popular themes like Astra, Hestia, Storefront, eStore, Shopkeeper, etc have the layout to match your requirements.
If you want to select a free theme, just go to Appearance–> Themes and click on Add new. Then, type the theme name, install and activate the theme.

In any case, in the event that you are hoping to utilize a top-notch theme, you really want to transfer the theme on your WordPress dashboard. Download the compressed theme. Then, at that point, drift over ‘Appearance’, then, at that point, click ‘themes’. This will take you through to the theme dashboard. Click the button over the subjects that say ‘Add New’. This will take you to the WordPress theme dashboard.
Click the blue button at the top that says ‘Upload Theme. You will then be prompted to choose the zip file from your computer. Choose your new theme file. You are done.
Once you have installed a WooCommerce theme you can customize its appearance to your own requirements. Just head over to the Appearance » Customize page. This will launch a theme customizer where you can change different theme settings.
Step 4: Install Additional Plugins for SEO & Security
Alongside WooCommerce you need to install additional plugins in order to optimize your site for SEO and ensure security.
For Search Engine Optimization (SEO) you can install the Rank Math plugin. It is a handy plugin that will help you optimize your site for SEO. It will also give you the best possible chance to secure your rank on page one. Also, the plugin will add the essential schema, meta description, and Robots. txt, permalinks, etc to your website as well.
And for security, you can try the Sucuri WordPress security plugin. Although there are free plugins available like Wordfence, it is better to go with a premium plugin like Sucuri. Because you can’t take too many risks regarding the security of your site.
Step 5: Configure Your Payment Methods
WooCommerce has built-in payment methods available. If you go to WooCommerce–> Settings–> Payments, you will find all the payment options available to you. You will find,
- WooCommerce Payments for credit/debit cards
- Direct bank transfer
- Check payments
- Cash on Delivery.
You need to configure them in order to use them on your eCommerce store.

If you want to you can use other third-party payment gateway plugins if needed, which can be helpful if there’s a certain local payment gateway that you want to use.
Step 6: Add & Upload Products
After configuring your theme, now it is time to upload your products to your store. To upload a product, go to Products from your dashboard and click on the Add new button.

For every product you upload, you’ll need the following things:
- Product name
- Price
- Product Description
- Main product image
- Additional product images
- Short product description
- Product category.
Step 7: Activate Dokan to Start the Proces of Building Your Multivendor Marketplace
If you want to build a store for yourself then WooCommerce is all you need. But, for a multi-vendor marketplace, you need to be using Dokan.
So go ahead and install Dokan. You don’t need to install WooCommerce separately. It will be installed automatically when you are installing Dokan.

There are some advanced features to design your store like an expert. If you want to apply that you must add the pro version of Dokan on your website. Dokan Starter begins with $149 and has lots of packages that will suit your preferences.
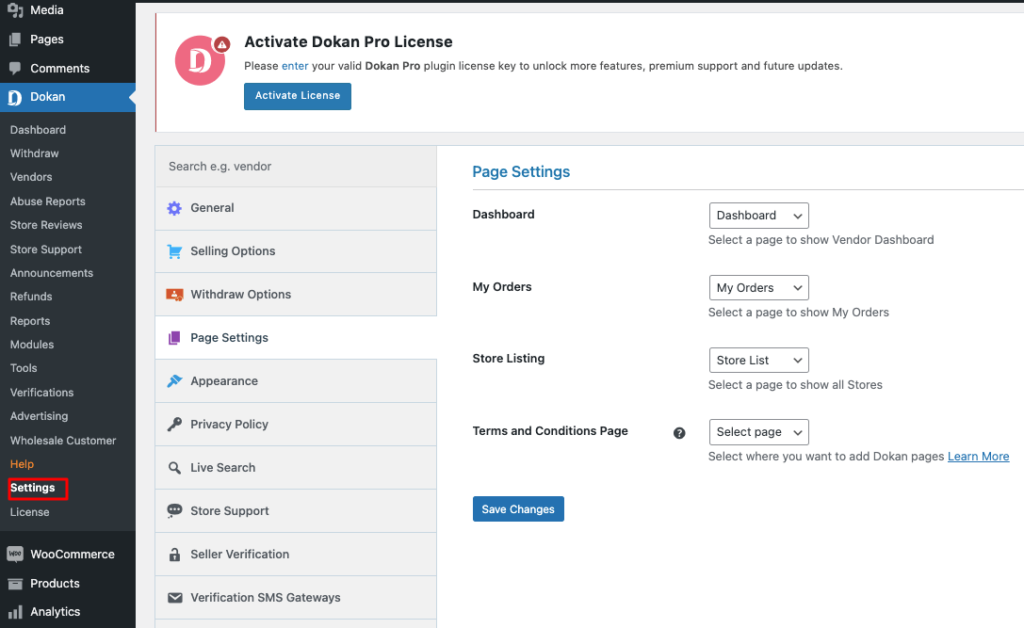
Step 8: Customize Basic Settings of Dokan
Before configuring the basic settings, install and activate both Dokan and Dokan Pro. Now navigate to, WP Admin–> Dokan–> Settings.
From here you have to set up some crucial terms and conditions. Your management will allow the vendors to use the marketplace properly. So-
- Set up store category
- Allow sellers to display their products
- Create necessary tags
- Choose the new product status
- Select withdrawal methods
- Set minimum withdrawal limit
- Set commission terms and rates.
Don’t forget to click the Save Changes button before leaving the page. Or you will lose all your setups.
Step 9: Allow Vendors to Sign Up on Your Marketplace
After adding all the basic and essential functionalities, invite vendors to sign up for your marketplace.
Navigate to WP Admin–> General–> Settings and enable the Anyone can register option. So, vendors can now fill up the registration form to sign up in your marketplace.
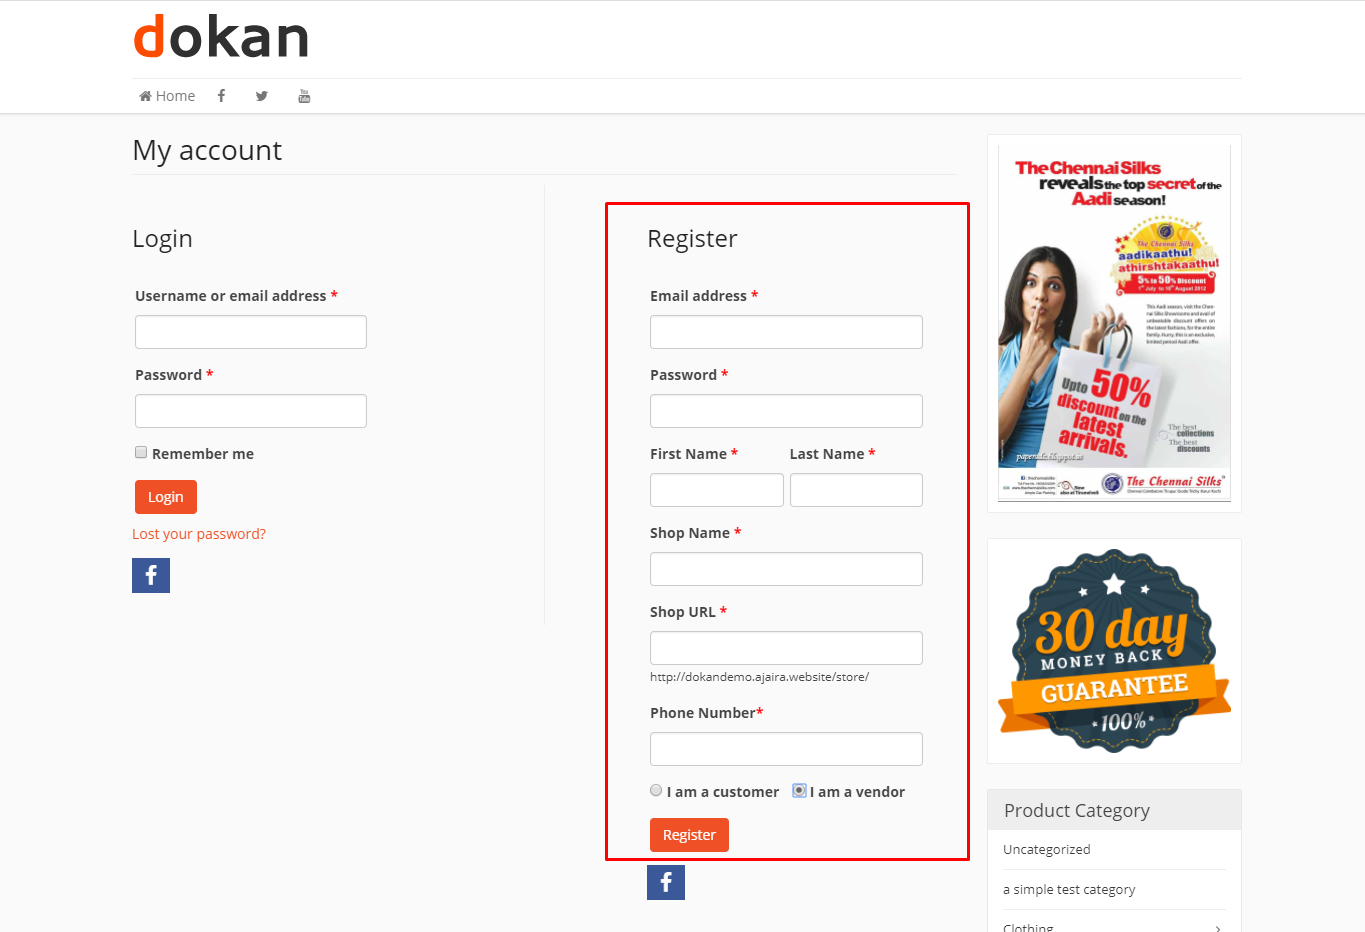
There are options for crafting the registration form according to your theme with essential fields. After approving the vendors your store list will look like this from the front.
Step 10: Publish Your Marketplace!
Your multi-merchant eCommerce website is prepared to begin selling. All you really want is an advanced procedure for your commercial center so that individuals who are keen on selling utilized vehicles will join. At the point when the store and item is prepared the shop page will look like the underneath picture to be protected from programmers, you might have to introduce security plugins. In addition, for smooth and quick stacking sites look at the best-caching plugins.
Bonus: Essential Plugins You Need to Grow Your Multi-vendor eCommerce Website
Now that you have created a multi-vendor eCommerce website, the next step is to promote your website, so that more sellers and customers can find it.
Following are a few of our absolute favorites and must-have tools that we recommend:
Stock Sync with Google Sheet for WooCommerce:
Stock Sync for WooCommerce with Google Sheet is one the most advanced inventory management system with two-directional sync with Google Sheets. With this stock manager plugin, you can edit almost everything from your linked spreadsheet, and it gets auto-updated on your main eCommerce site. In addition, it helps your customers be engaged with your updated site with inventory updates.
Features:
- Easily export products to Google Sheet
- Support for variable product
- Update almost everything
- Auto-sync with a two-directional path
- Manually edit or remove products from the sheet
- One-click manual sync button.
Stock Notifier for WooCommerce:
Back in Stock Notifier for WooCommerce enhances the functionality of your online store. It keeps track of your product’s stock and sends instant WhatsApp messages as WhatsApp in-stock notifications to the customers.
Features:
- WhatsApp gateway
- Validation of international phone numbers
- Advanced waitlist plugin
- Custom messages
- Available shortcodes
- Call to action
- SMS customization
- WooCommerce and other multivendor support
- Different types of product options
- Product visibility
- Multivendor Settings.
Chat Widgets for Multivendor Marketplaces
Chat Widgets for Multivendor Marketplaces is specially designed to be compatible with the best multi-vendor marketplaces on WordPress like Dokan, WCFM Marketplace, and WC Marketplace. This live chat plugin is all about offering excellent customer service. Stay in touch with your customer through every step of their buyer journey with your brand.
Features:
- Click to chat channels
- Location of chat widget
- Call to action text
- Display triggers
- Attention effects
- Pending messages icon
- Customizable chat icons
- Different button designs
- Widget size
- Widget customization
- Channel customization.
All in One SEO for WordPress
The best WordPress SEO plugin on the market that comes with built-in support for WooCommerce SEO. It’s used by over 3 million websites to rank higher in Google. There’s a free version that you can use as well if you’re on a budget.
MonsterInsights
It is the best Google Analytics plugin for WordPress that allows you to setup enhanced eCommerce tracking. This helps you track the performance of products so you can see what’s working on your site.
Conclusion
WordPress has opened a new door for general people like us to make our dreams of creating our own online businesses true. You can be the next Jack Ma with your very own version of Alibaba and AliExpress.
All you have to do is find an amazing multi-vendor eCommerce website idea and use WordPress to create your marketplace. If you face any issues, do let us know.
Add your first comment to this post