For a beginner instructor, the world of developing online courses can seem overwhelming. Even though creating courses may be your specialty, building a website for them could make you want to turn around.
Fear not as we can help you set up an eLearning site with minimum effort. We are aware that many people may lack the resources or coding skills necessary to build an eLearning website on their own.
That is where WordPress comes in. Little needs to be said about WordPress, one of the most popular CMS (Content Management System) tools around the world. WordPress lets us have a large number of nifty tools and theme packs. Assisting us in setting up a site by simply dragging and dropping elements without much need for coding.
For this article, we are going to go through a comprehensive view of tools that will let us create an eLearning site in WordPress with an LMS (Learning Management System).
What Do We Need to Start Off?
We are going to talk about three main elements in this article:
- Robust LMS plugin – Tutor LMS
- Attractive theme – Tutor Starter
- Easy to use meeting plugin – Jitsi Meet
This may seem like a small list of tools to arm ourselves with, but trust us they will be more than enough.
Making the Right Plugin Choice
To create an eLearning site in WordPress we need to be careful about the plugin that we use. WordPress has a plethora of plugins available for users. We need an LMS that gives us the biggest bang for our buck.
So how do we determine if a plugin is right for us? An LMS plugin should offer us the essential features that we need to get started:
- Functional course building
- Easy to create quizzes
- Interactive video lessons
- Student interaction with email
- Easy payment integration
- Content Drip
- Certificates with a Certificate Builder
- Theme starter pack integrations
- And many more
Taking into consideration all these requirements, we suggest using Tutor LMS. Tutor LMS has in store all this and more without breaking the bank. With top-of-the-line features and amazing support, Tutor LMS is perfect to start off your eLearning journey. We’re going to be demonstrating the pro version of Tutor LMS in this article, while Tutor LMS does have a free version the pro gives a lot more functionality.
Installing the LMS Plugin
Now that we have decided on our choice of plugin let us go ahead and start setting it up.
To install Tutor LMS navigate first to the WordPress admin panel. Note that this is the installation of the free version of Tutor LMS. Follow these steps for the free version installation:
- Go to the WordPress site Dashboard.
- Navigate to Plugins > Add New.
- Type “Tutor LMS” in the search field.
- Find Tutor LMS from the search list and click “Install Now.”

To install the pro version of Tutor LMS, navigate to Plugins > Add new > Upload Plugin. Simply upload the zip file of Tutor LMS Pro and hit activate.
We need both the free and pro versions of Tutor LMS installed simultaneously for it to work as intended. You can follow the tutorial video to navigate the installation and license activation of Tutor LMS Pro. With all that finished, we can go on to the next stage.
Designing The Website
Once we have installed our LMS plugin, we now need to choose a theme for the online course website.
The design needs to attract consumers and help provide the authority needed to encourage people to sign up for courses.
Following that, our suggestion for the theme would be Tutor Starter. This theme not only is free but it was also made to be used with Tutor LMS. That makes life a whole lot easier for you.
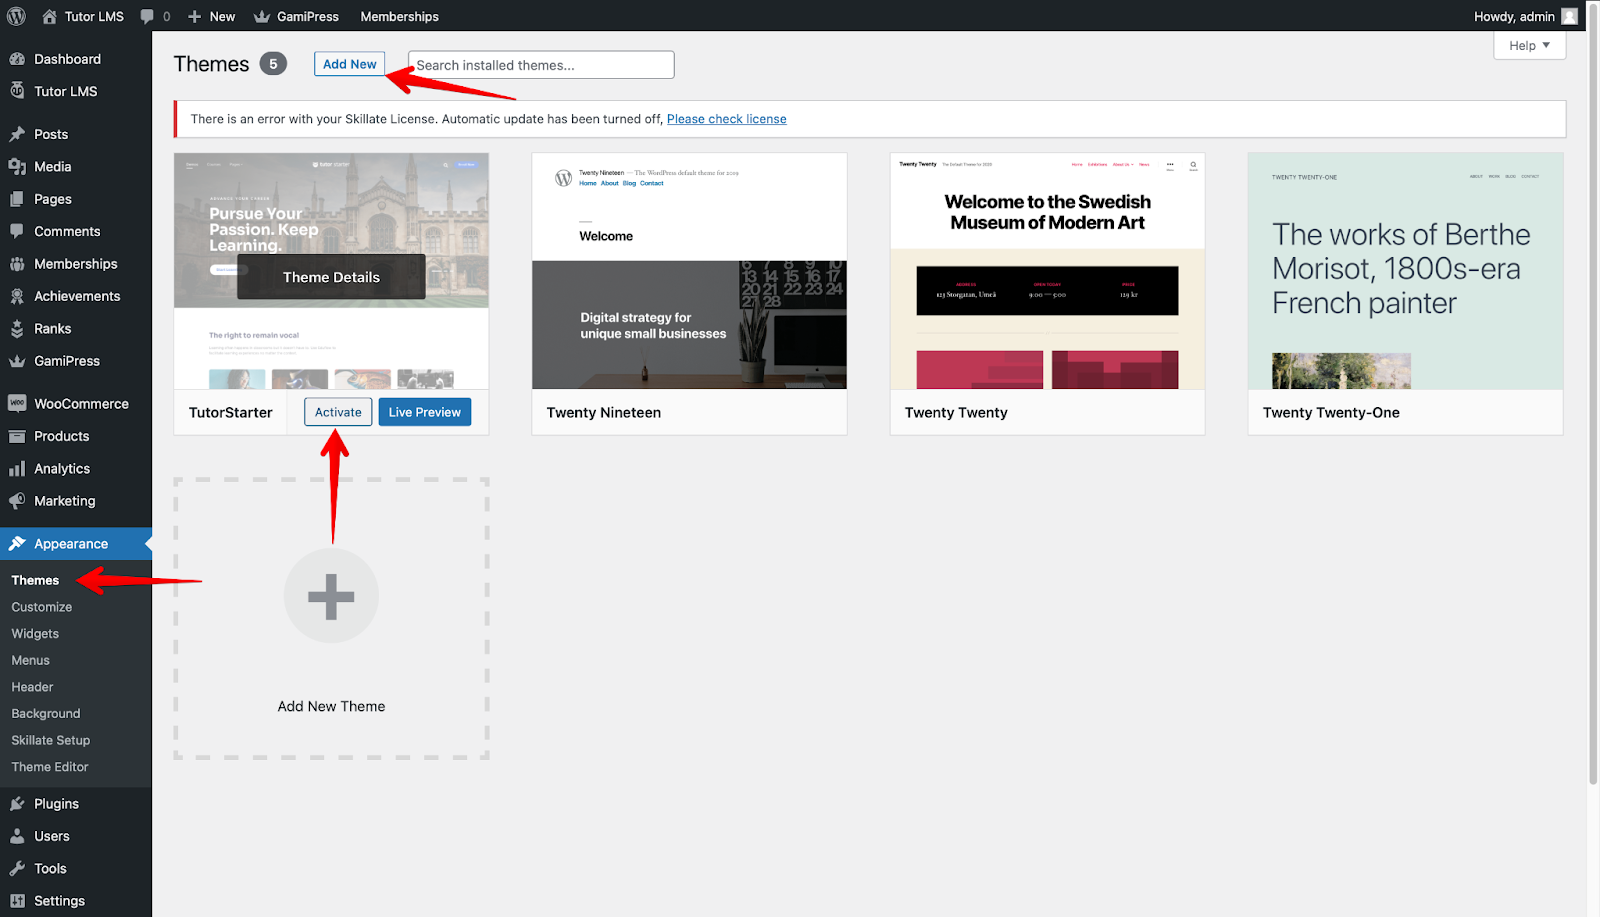
To install Tutor Starter from the WordPress admin panel, find the Appearance tab. From there, click on Add New and search for “Tutor Starter”. Go ahead and hit install and activate.
We need to add one more plugin before we can start utilizing Tutor Starter properly. In the same way, we installed the other plugins, navigate to Plugins > Add new, and search for TutorMate. TutorMate is a companion demo importer plugin for the Tutor Starter theme so go ahead and install and activate it.
We are now geared up and ready to go. Let’s add a starter pack from Tutor Starter to our WordPress site. From the WordPress admin panel, go to Tutor Starter > Starter sites. Here we can find 4 unique demo starter sites for different types of sites. The neat thing about starter sites is that they will load up our site with some pre-built content so we can see what’s what.

We can even preview the site before choosing to import it. When we have decided which site to import, simply click the Import button. This will bring up this popup.
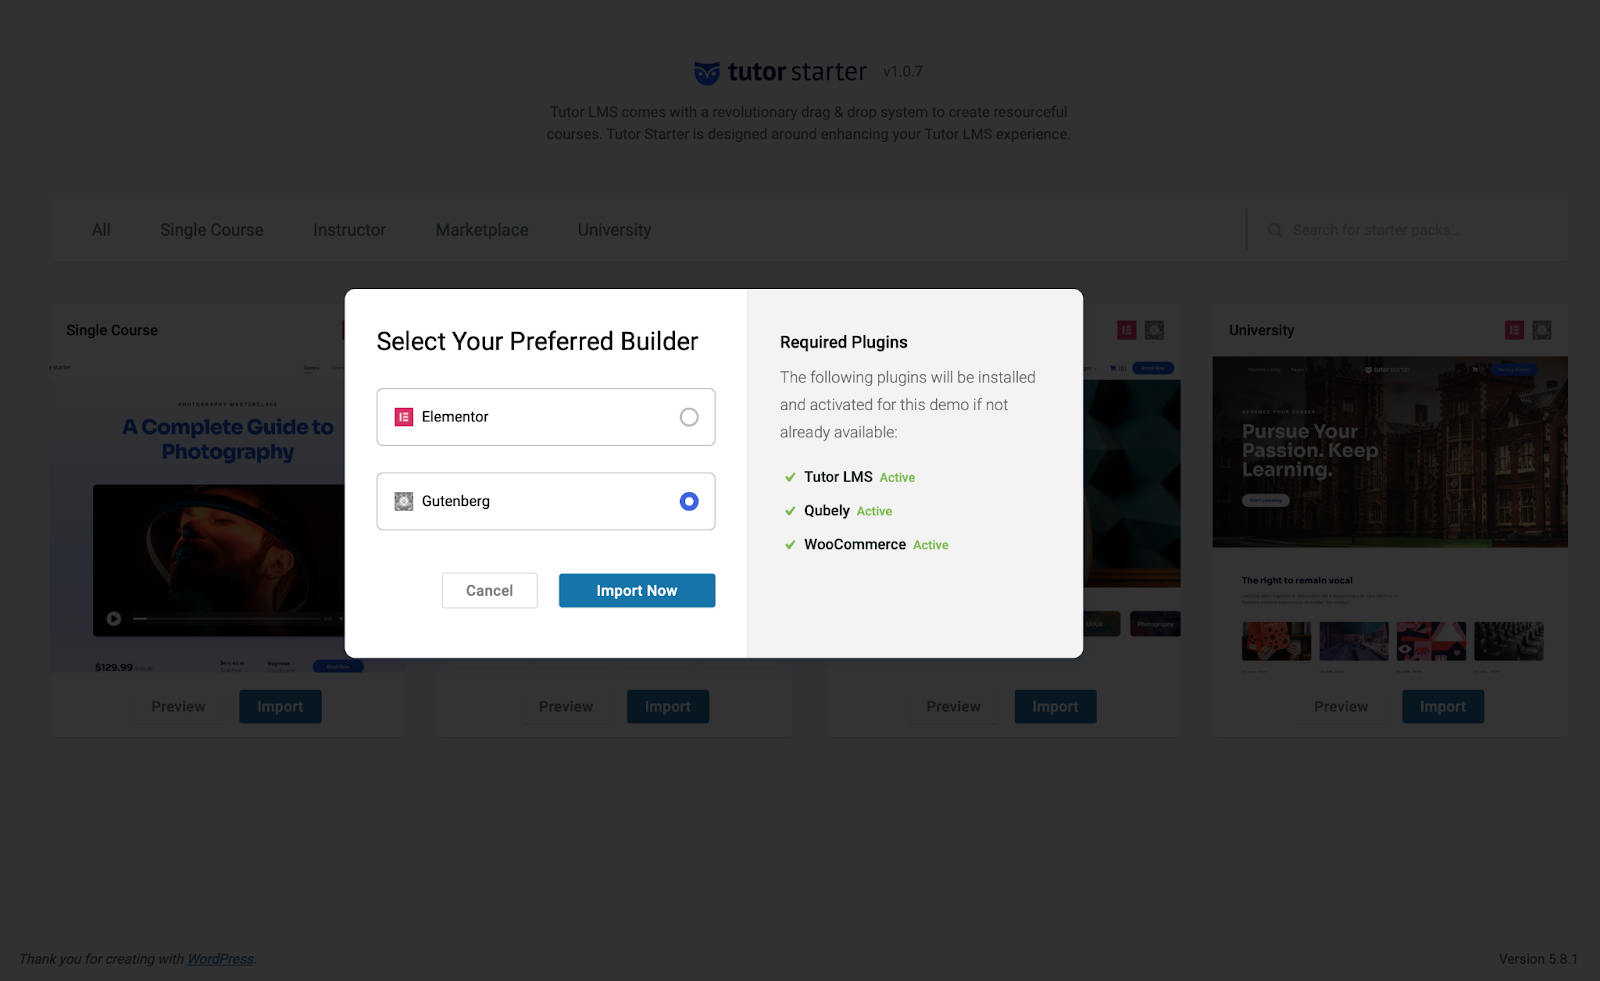
From here, we can choose to launch with Elementor or Gutenberg page builder. For this article, let’s go ahead and run it with Gutenberg. Luckily, Tutor Starter shows us which plugins/add-ons are missing when we try to make this installation. So if we are missing Qubely and WooCommerce, they will be automatically installed and activated. Since we had already installed and activated Tutor LMS, we would see it is active.
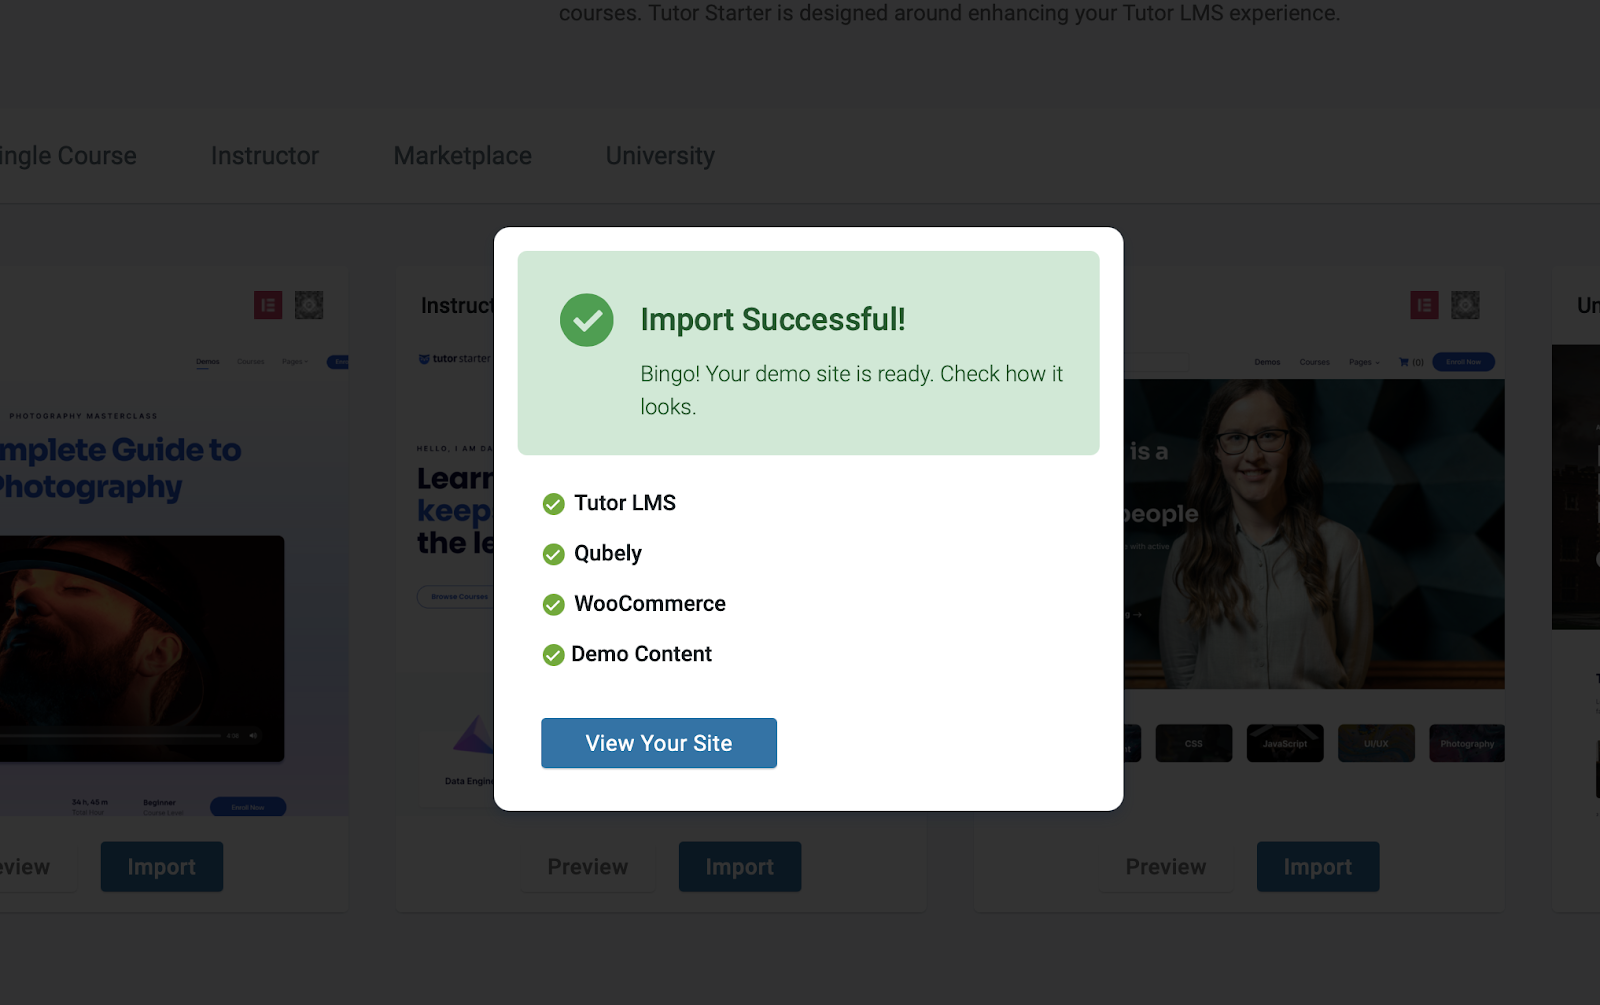
Once the import is complete, click the “View your site” button to see our page.
Create eLearning Courses With Tutor LMS
Now that we have our plugin and theme ready, it’s time to start creating content for the LMS website! Let’s go over how we can add, edit and sell courses to the world. To set up courses, navigate to WpAdmin > Tutor LMS > Courses.
From the courses menu, click Add New to add a new course to the site.
After that, we are brought to the Backend Course Builder. We can enter the course name, add a course description, a video if necessary, and much more in this section. Give the course a descriptive title and subtitle to help readers understand what they are enrolling in.
We can also set how many students can enroll for the course and determine a difficulty level for our course content.
There is also a featured image section that we can utilize to let students know what the course is about.

With the help of Tutor LMS Pro, we can quickly and easily construct courses graphically using the drag-and-drop Frontend Course Builder.
So we gave our course a description and titles, but the course is far from complete. The next step would be to add lessons and quizzes to give it real substance.
Create Great Courses for Students
A crucial aspect of our course involves evaluating our students through effective quizzes. Quizzes are designed to help learners retain the knowledge they have acquired.
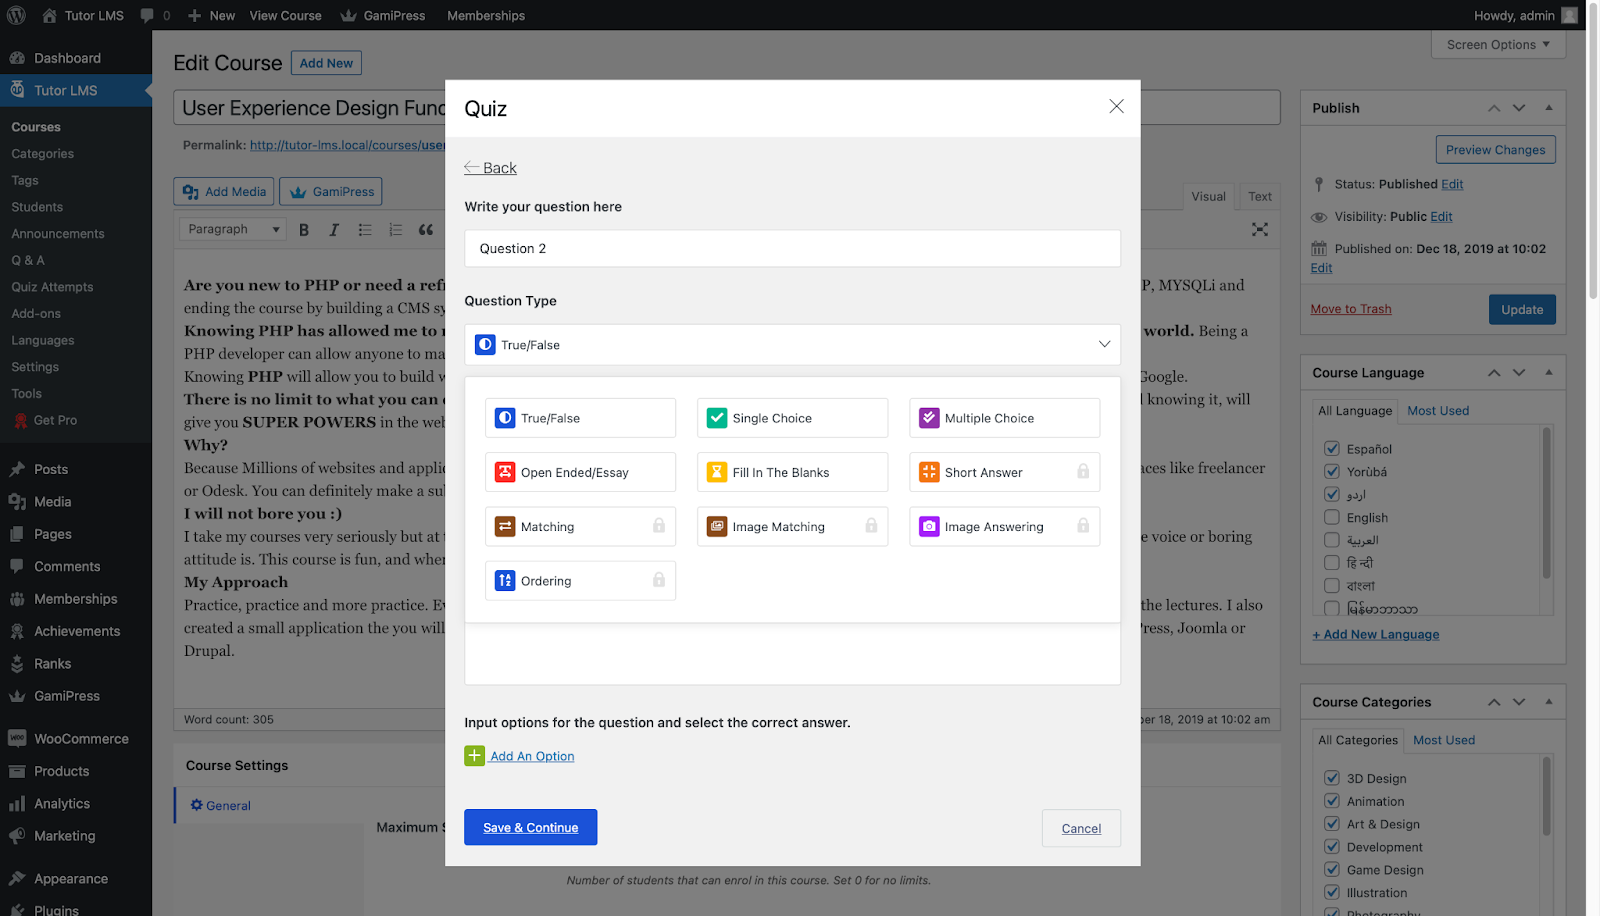
To achieve this, we can utilize the powerful Quiz Builder provided by Tutor LMS, which offers 10 different quiz types and extensive customization options. One notable feature is the ability to set limits and timers for quizzes, along with an auto-grading system that provides instant feedback to students. This allows them to conveniently take quizzes at their own pace, with grades displayed automatically.
Now, let’s address the question of how we can get started. Here are the steps:
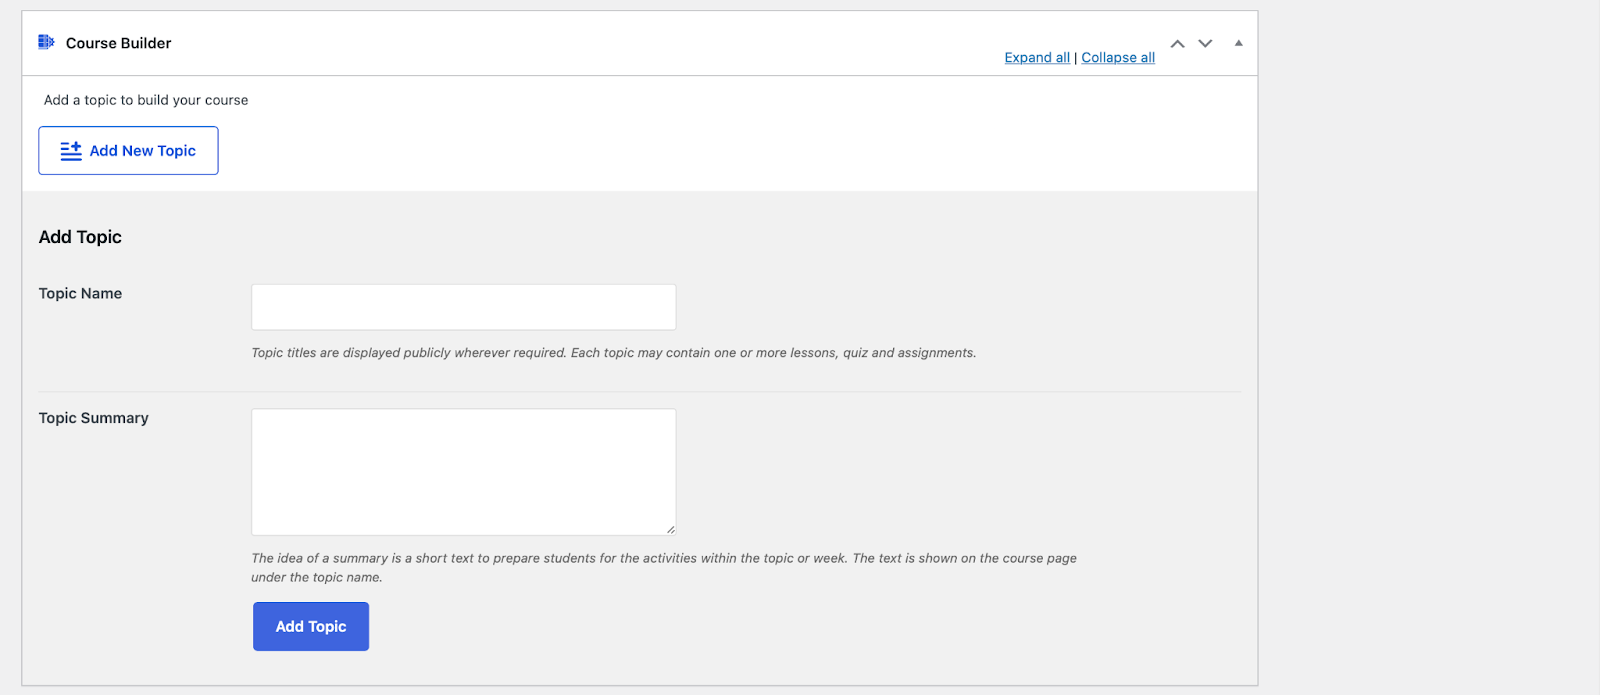
Step 1: Adding a New Topic
To initiate the quiz creation process, we need to add a topic to our course.
We navigate to the course creation page and:
- Scroll down to find the Course Builder section.
- Within the Course Builder, click on “Add New Topic” to create a new topic.
- Then, click on “Add Topic” to proceed to the next phase.
Step 2: Creating a Lesson
Following the creation of the Topic we can now have lessons for our course.
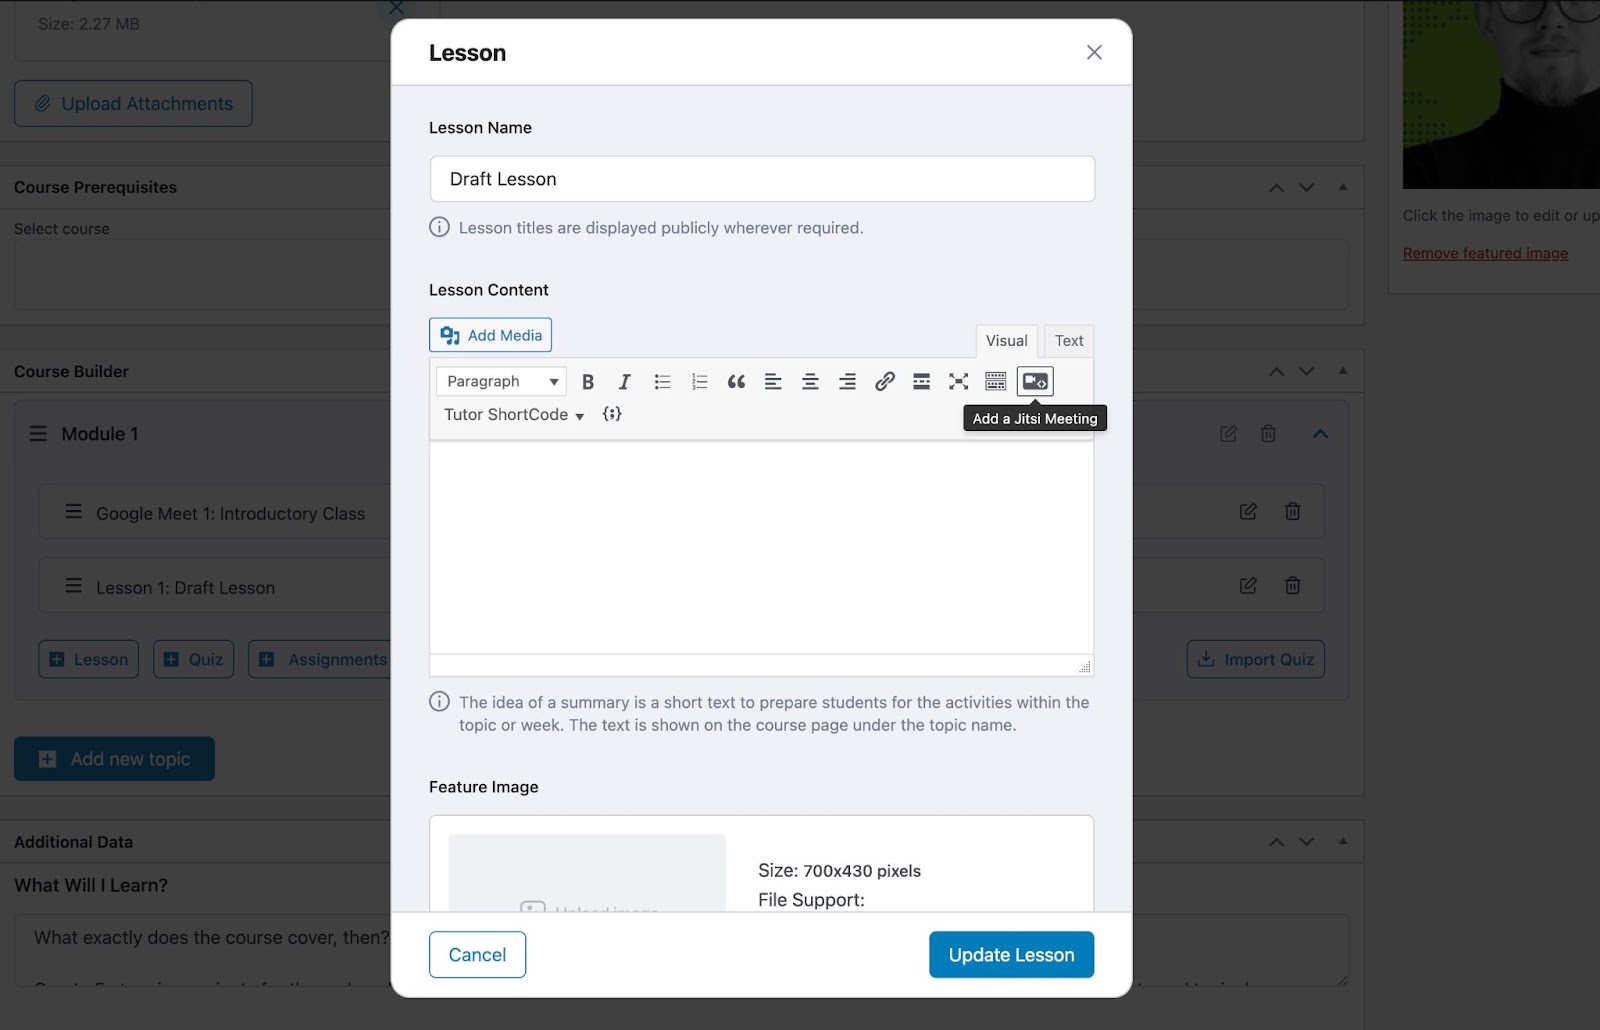
To create a lesson, click on the topic we have created, and you will now see a new Lesson button.
Click on that, and we will see a pop-up window where we can add the lesson details.
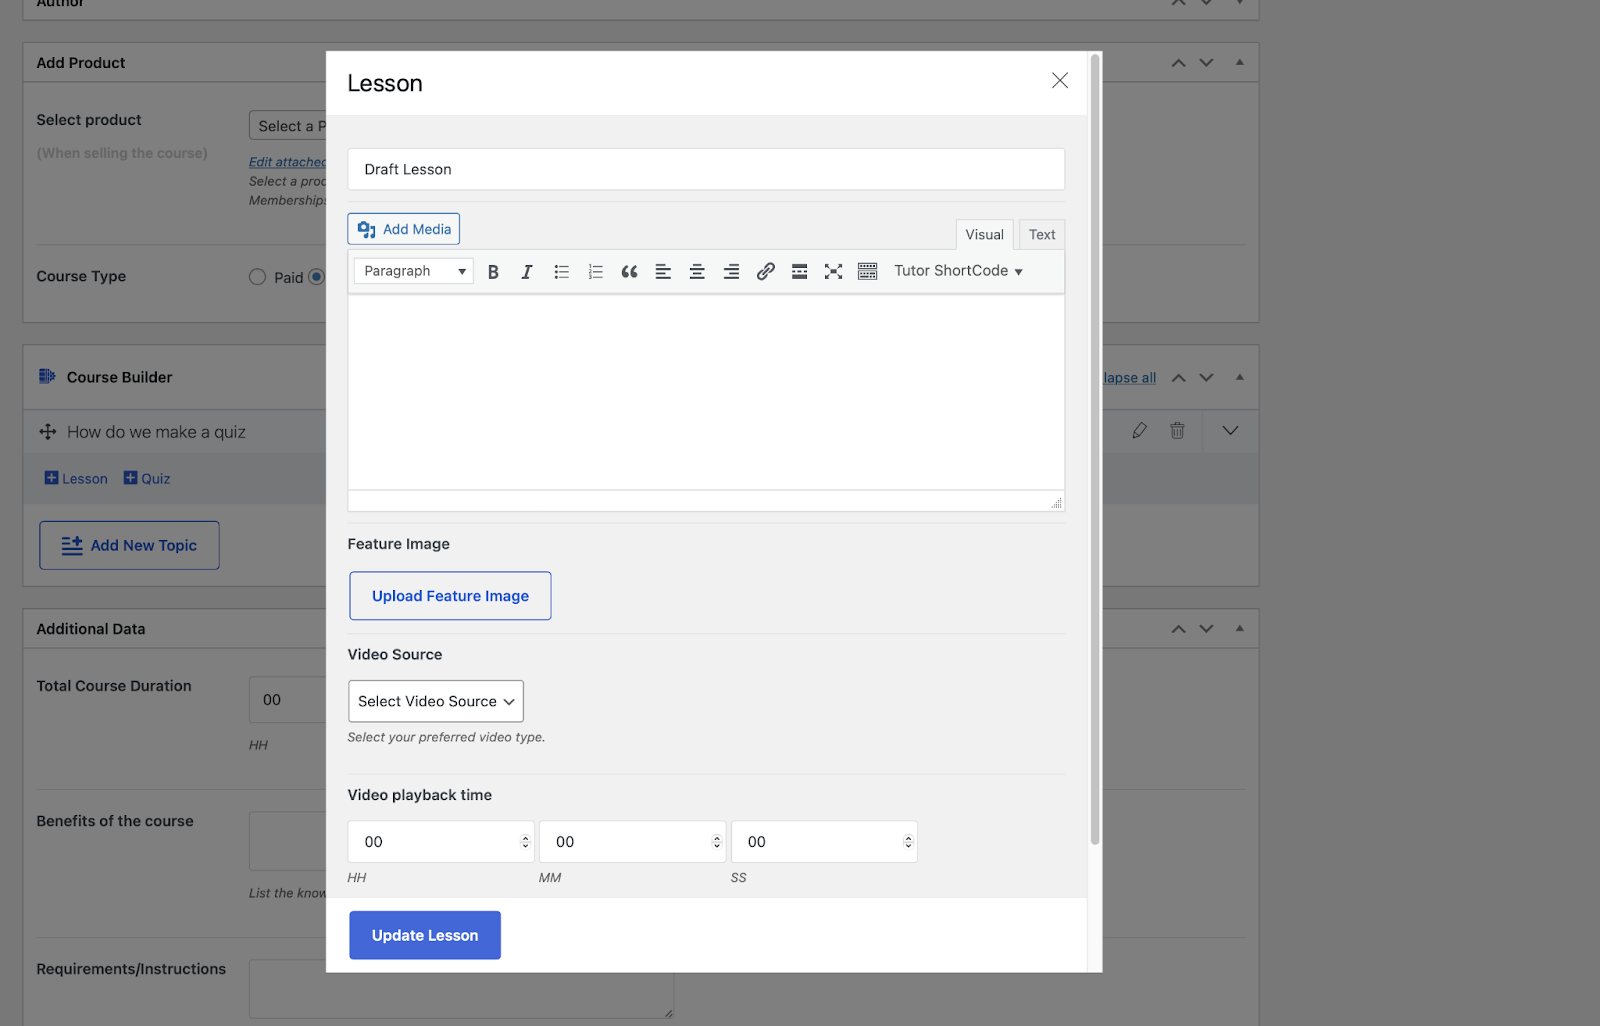
Lessons are the most content-dense part of a course. This is where one would upload educational texts and videos for students. A lesson works best when it is actually taught by someone, so instead of uploading texts or pre-recorded videos for students we recommend setting up meetings with the class. So how do we go about doing that?
For meetings, we are going to use Jitsi Meet. Jitsi Meet is a wonderful plugin that makes hosting webinars or live classes easy and simple. The plugin seamlessly integrates with popular WordPress features, such as WooCommerce, LMS, multi-vendor functionality, email marketing tools, and booking plugins.
Create Meetings with Jitsi Meet
To start off we need to install and activate the Jitsi Meet plugin just like any other plugin. From the WordPress admin dashboard navigate to Plugins > Add New and search for Jitsi Meet.
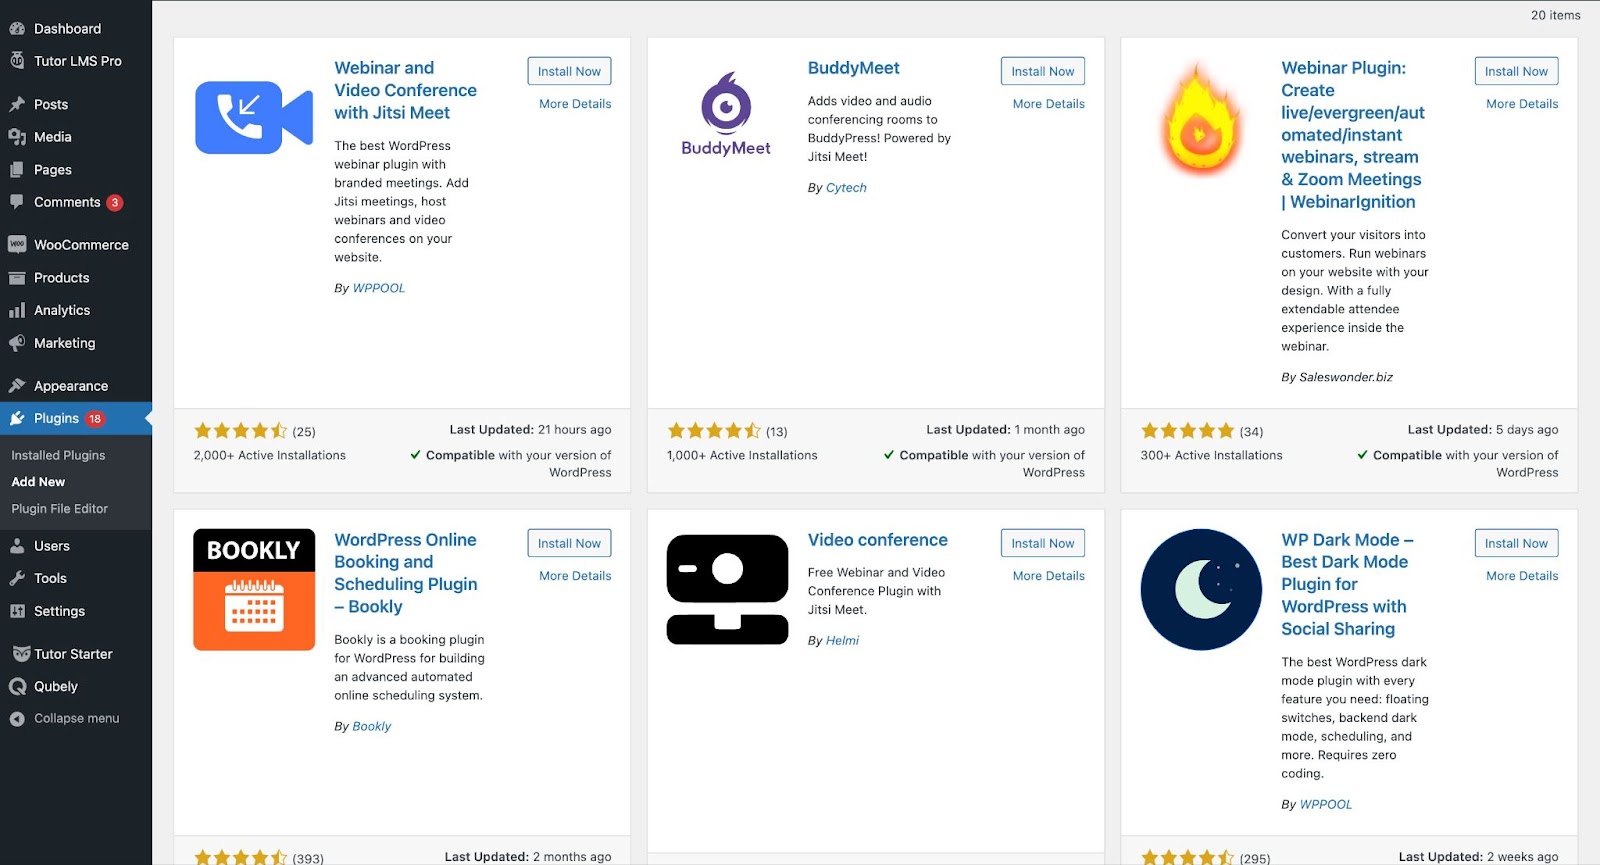
Click to install and activate the webinar and video conference with the Jitsi Meet plugin. Once you’ve installed the plugin we need to activate the pro or ultimate version of Jitsi Meet. Luckily we have a wonderful video on how to activate the Jitsi Meet Premium version. Follow along with the video to have the pro version up and running.
Finally, with everything set up, it’s time to create a meeting.
Navigate to WordPress Dashboard > Jitsi Meet Ultimate > Meetings. Click Add New and configure your meeting to your liking.
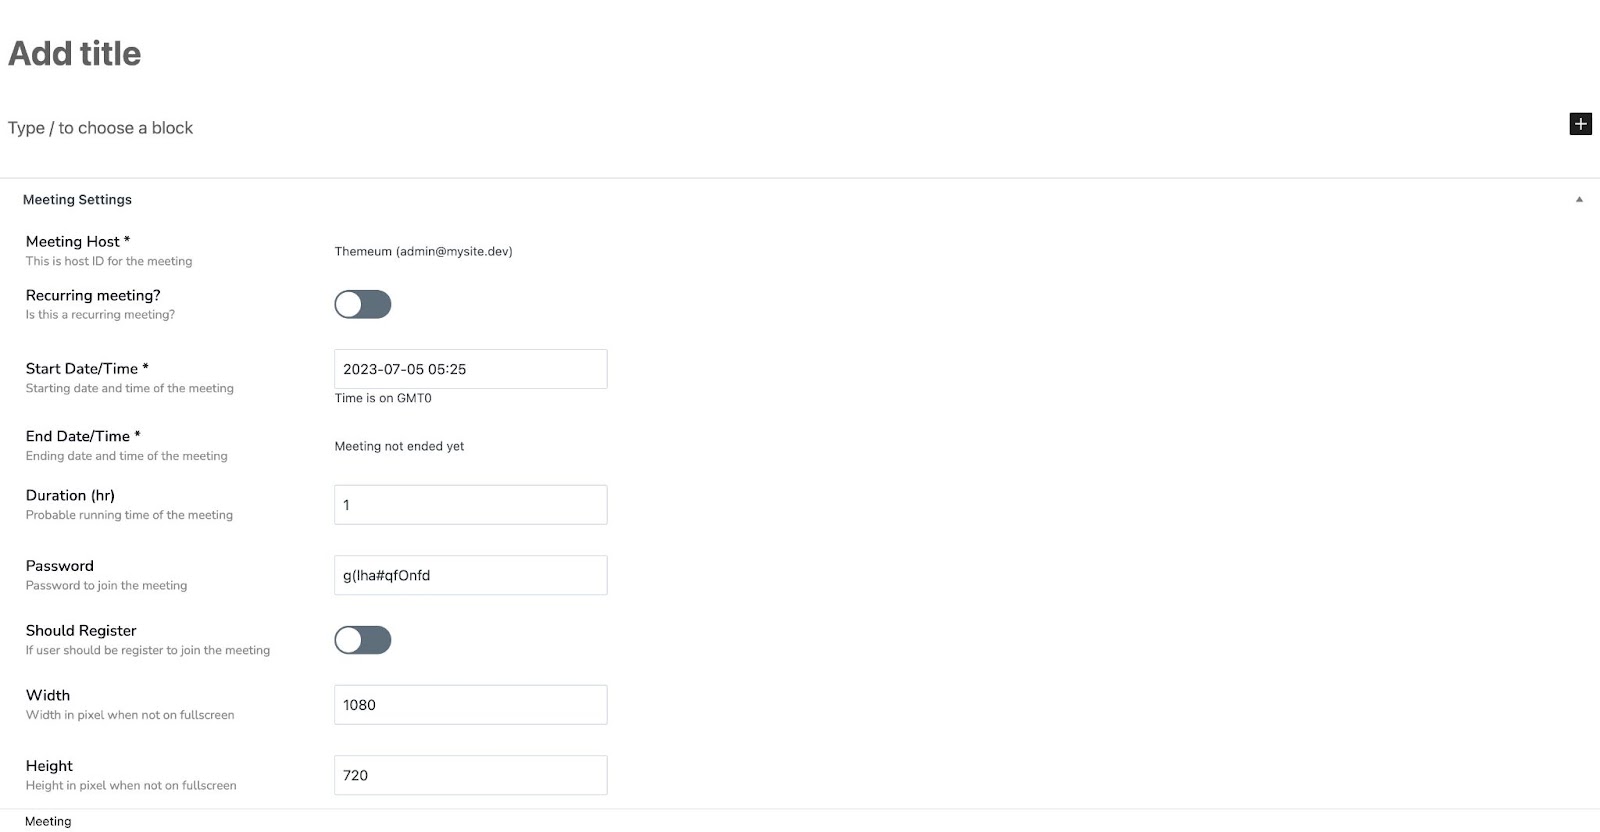
There are a tonne of customization options available. If you want to create a meeting for your regular lessons, make sure to be clear about that in the title of the meeting. Once you’re happy with the details, hit publish and your meeting will be created. You’ll be brought back to the meeting list and you can notice a shortcode is now generated for your meeting. This is to embed the meeting in your Tutor LMS lesson.
With the meeting now ready we just have to add it to our Tutor LMS lesson. In the lesson content section, you’ll now find a new button to add the Jitsi Meeting. Adding a meeting here will link the meeting that you created before in the Jitsi Meet Plugin.
The meeting will now show up as course content for students when they enroll in the course.
Read this tutorial to get a more in-depth overview of Tutor LMS and Jitsi Meet.
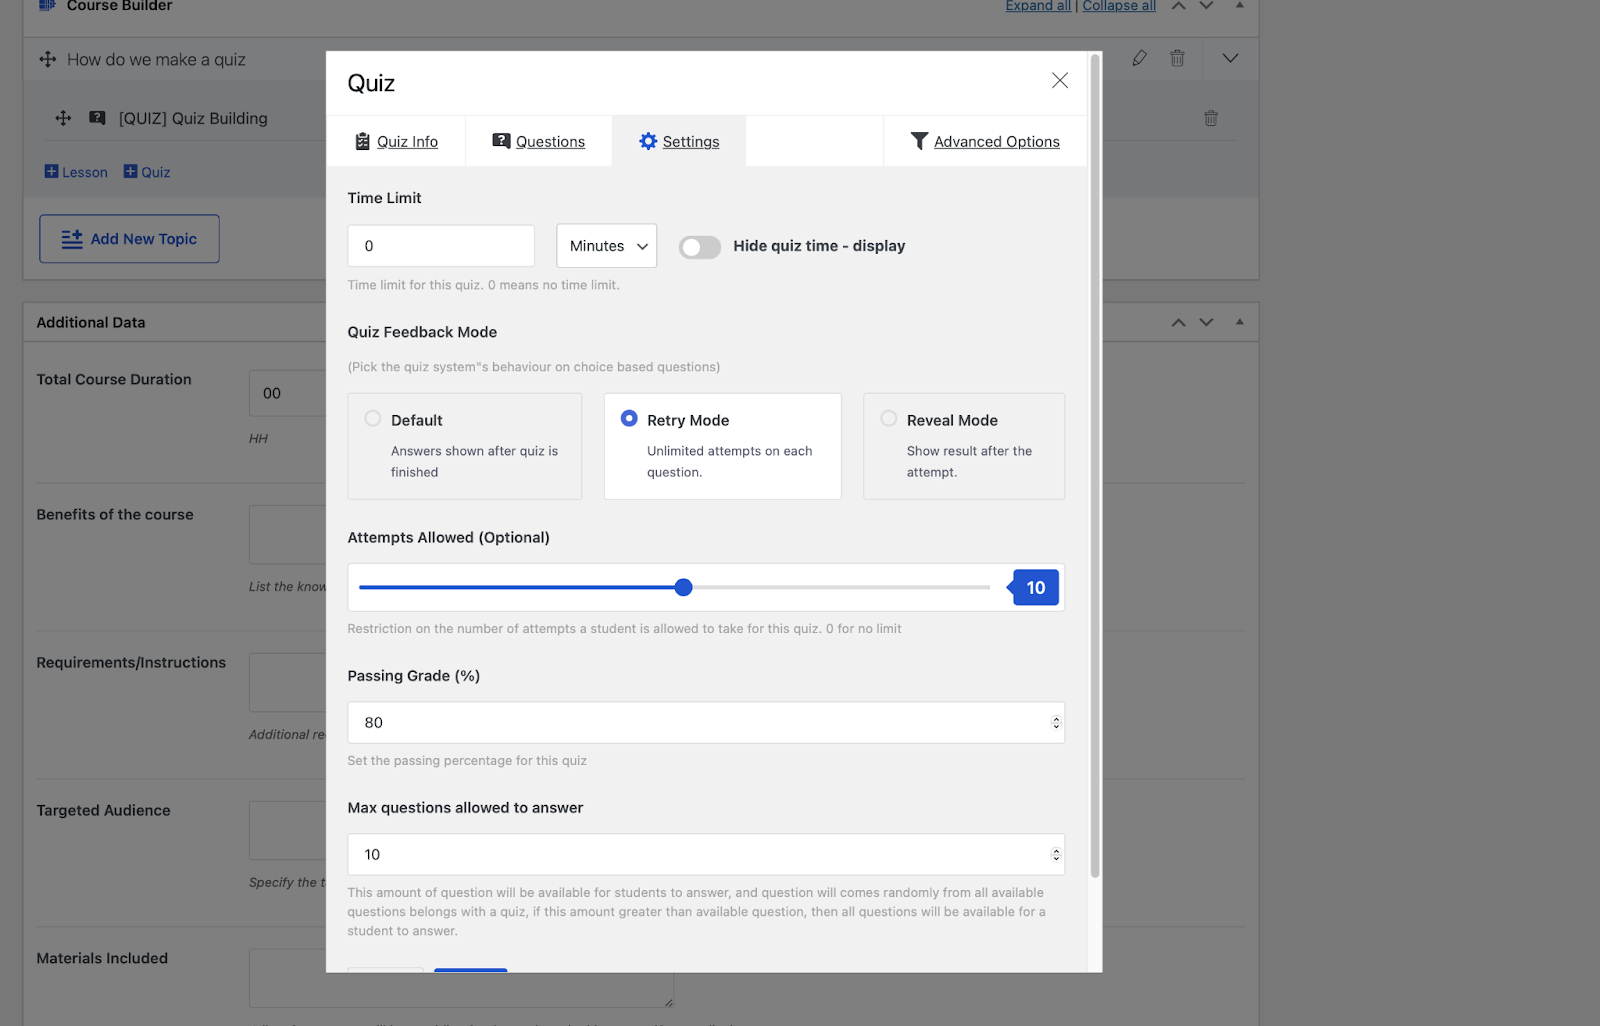
Step 3: Creating a Quiz
After the lesson is set up, we can finally start creating a quiz. Click on the topic you want to add a quiz to, followed by a click on the Quiz button.
First, we need to set a name and description (if you like) for the quiz.
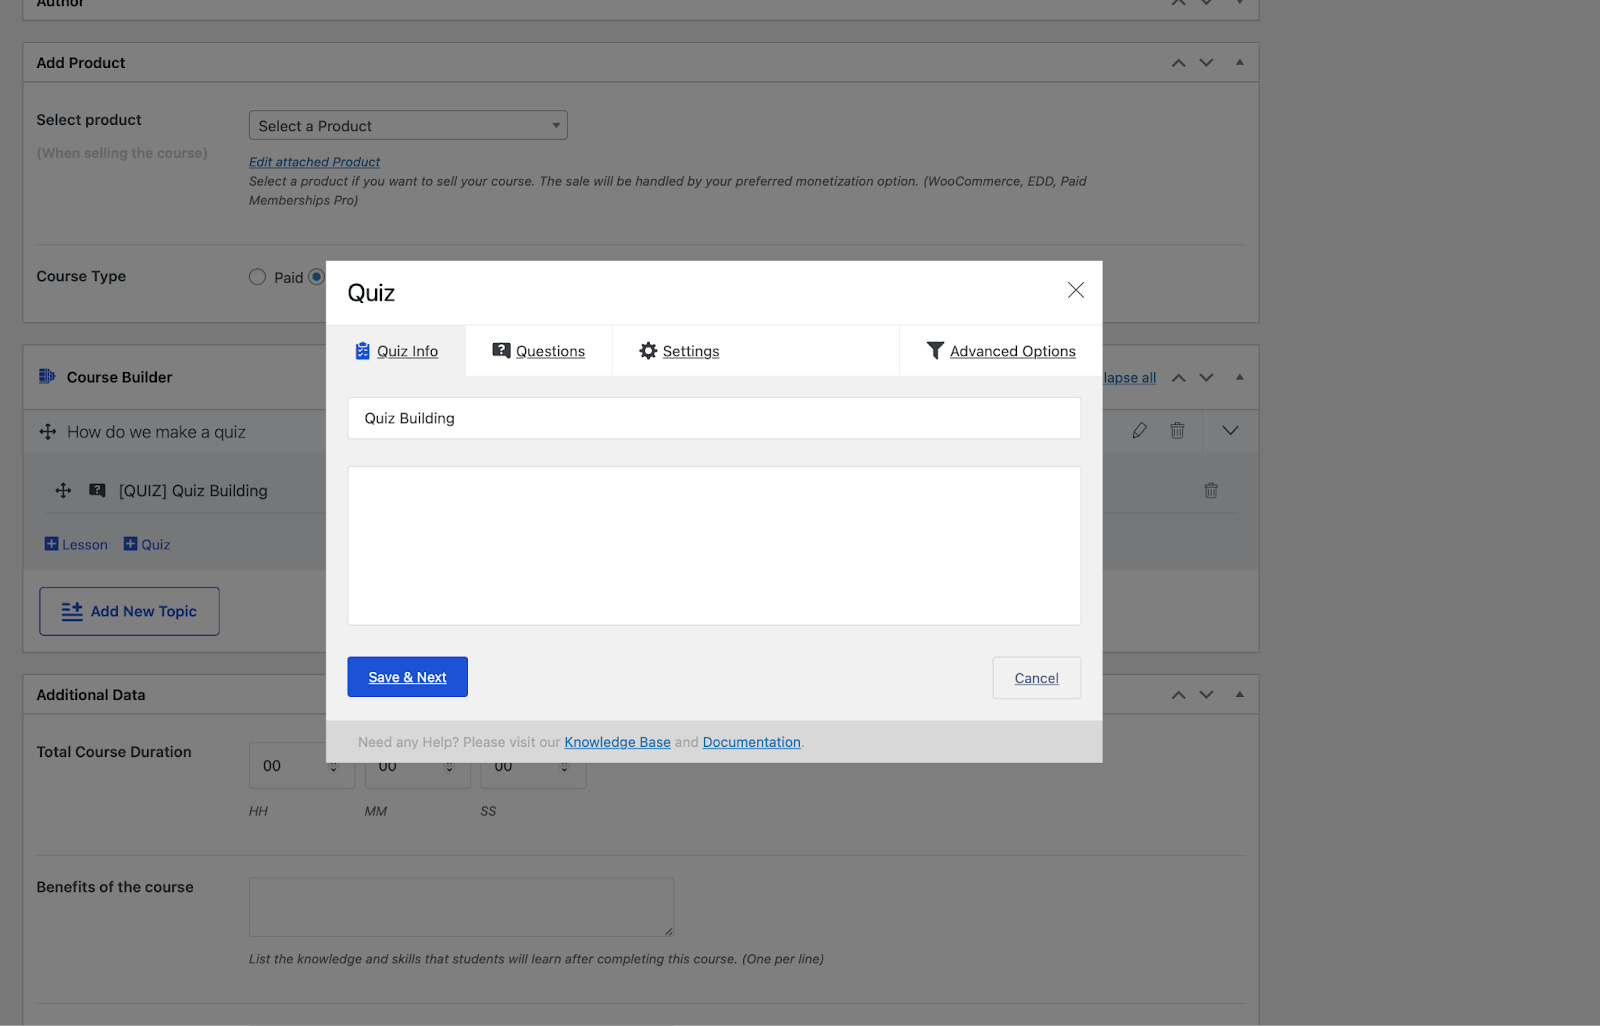
Click Save & Next to go to the next step.
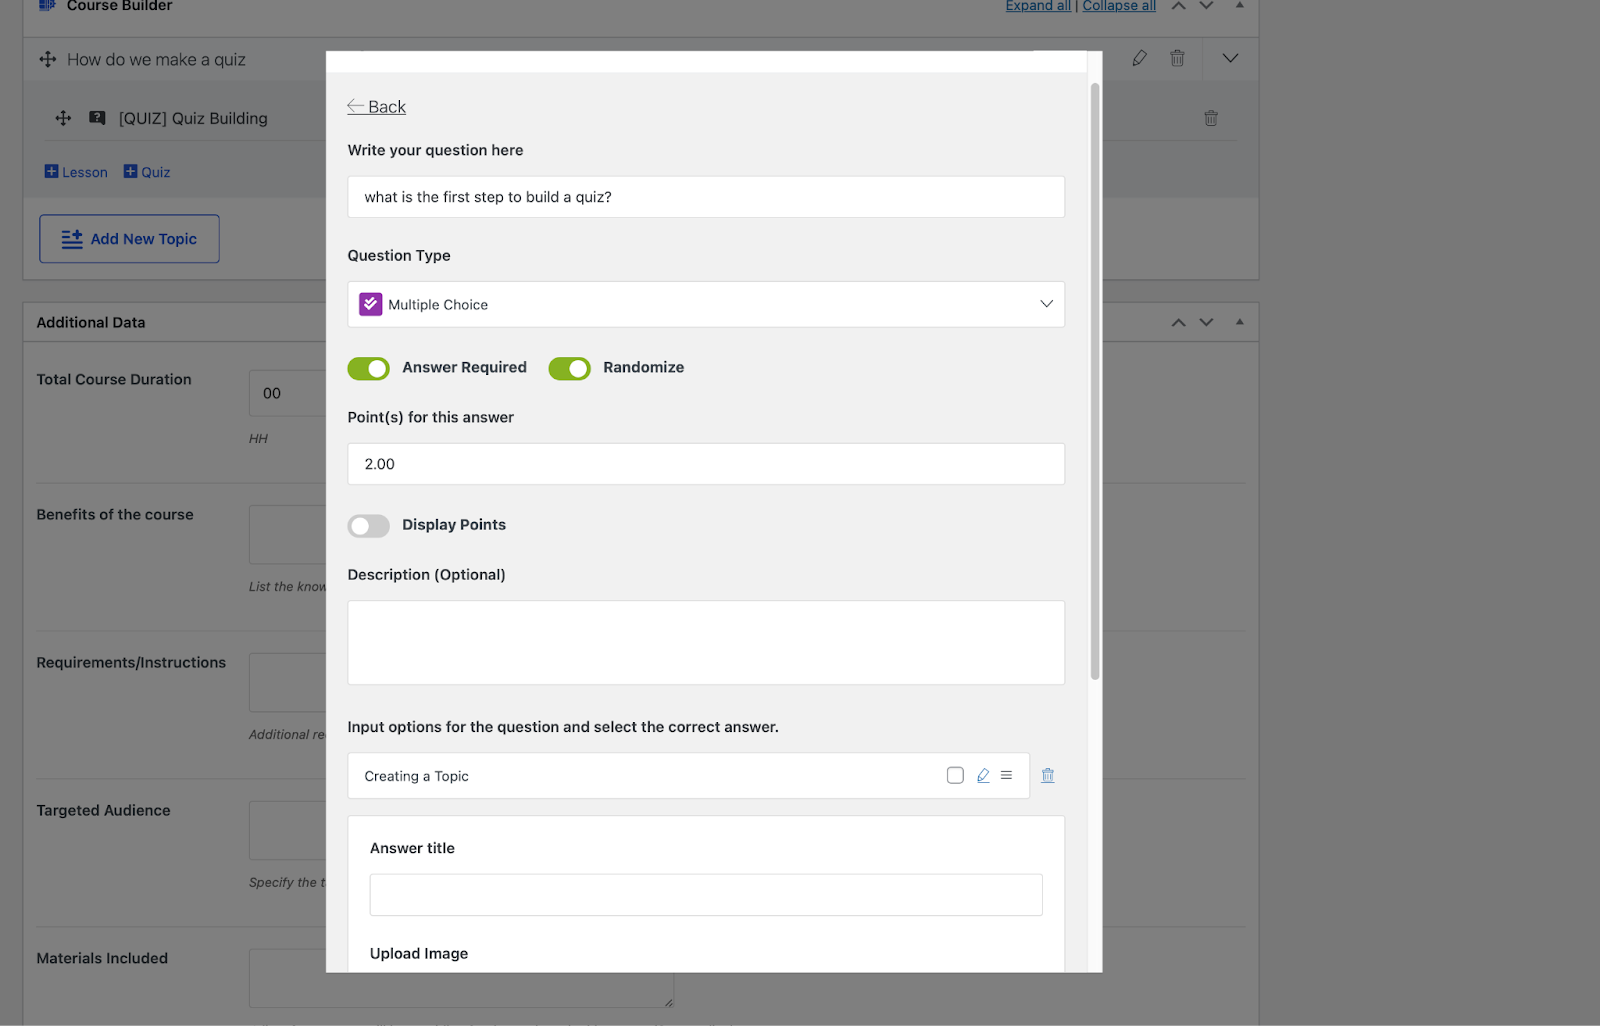
After the quiz’s initial setup, we can set the questions and grades. It’s possible to have different questions with different grade points, depending on the type of question you set.
For multiple-choice questions, there is a nifty Randomize option that jumbles up the choices.
The quiz builder has a lot of other extra settings as well for added customizability. Feel free to play around with them until you’re completely happy.
The course is now powered up and ready to go.
Rewarding the Achievements
So once our students have completed one of our courses, we must present them with a reward. The point of taking an online course is mostly for learning, but also for recognition and acknowledgment. A great way of fulfilling that is to reward our students with a certificate of completion. What better tool to use than the Tutor LMS Certificate Builder?
Remember that this tool is not included in the free version and is only available in the pro version of Tutor LMS. It is worth the investment that goes into the pro version of Tutor LMS, as we will have access to the powerful certificate builder of Tutor LMS along with many other advanced features.
Find out more about the Tutor LMS Pro Add-ons.
With the certificate builder, we can create, edit, and design incredible certificates from scratch to dazzle our students at the end of courses. Learn more about the Tutor LMS Certificate Builder.
Market Your Courses
Well, that was quite a journey. But the work does not end here, rather this is only the beginning. The second half of our journey is marketing your courses to students, making sure that your product reaches its desired customer. Ideally, you should:
- Identify your target students
- Advertise your courses efficiently for maximum outreach
- Promote your course as industry-standard material
- Offer sales to increase student
- Get affiliate personnel to promote your material elsewhere
- And much more
While this is not a comprehensive list these tips could help you get on track with marketing your course.
Wrapping Up
We are finally done with all the steps. That wasn’t too difficult now, was it? Now we embark on our eLearning site journey armed with amazing tools that set us up. Taking online classes with live meetings and webinars with a sophisticated plugin will ensure students have a better learning experience. The more students like it the bigger your business will grow.
Best of luck with your site, and as always, if we have any queries, feel free to comment below, and we will be there to assist you.

Add your first comment to this post