How to Add a Downloadable Product in WooCommerce
A downloadable product is a digital file customers buy and receive through a download link. No shipping, no physical inventory. When the payment clears, WooCommerce sends a secure download link automatically.
Typical examples: PDF guides, ebooks, software, plugins, audio samples, design templates, video courses.
Why Store Owners Use Downloadable Products
Selling digital files is one of the simplest ways to grow a WooCommerce store. You create the product once and sell it forever. No packing, no shipping, no returns on damaged goods.
It also opens up options that physical products can’t offer. You can sell access to software tools, issue license keys, restrict how many times a file can be downloaded, or set expiry dates on download links.
For store owners running a tight operation, downloadable products cut fulfillment time to zero. The customer pays, gets the file, and you never touch it manually.
Steps to Add a Downloadable Product in WooCommerce
Here is the step-by-step process using the default WooCommerce setup. No extra plugins needed for basic digital product sales.
Step 1: Create a New Product
- Go to Products in your WordPress dashboard
- Click Add New
- Give your product a name and description
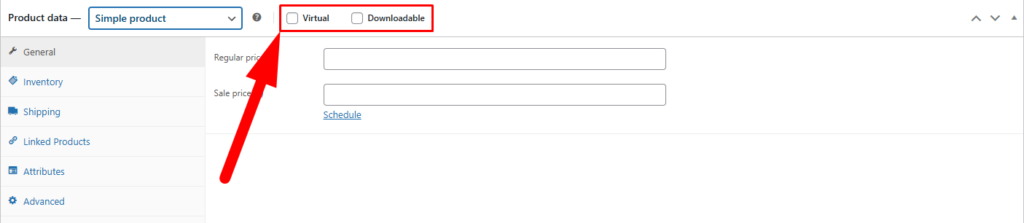
Step 2: Mark It as Virtual and Downloadable
- Scroll to the Product Data section
- Check the box labeled Virtual (removes shipping fields)
- Check the box labeled Downloadable (unlocks download settings)
Step 3: Upload Your File
You will see a new Downloadable Files section appear under the General tab.
- Click Add File
- Enter a name for the file (this is what customers see)
- Click Choose File to upload from your computer, or paste a file URL
Tip: You can add multiple files to a single product. Useful for bundles or multi-format downloads.
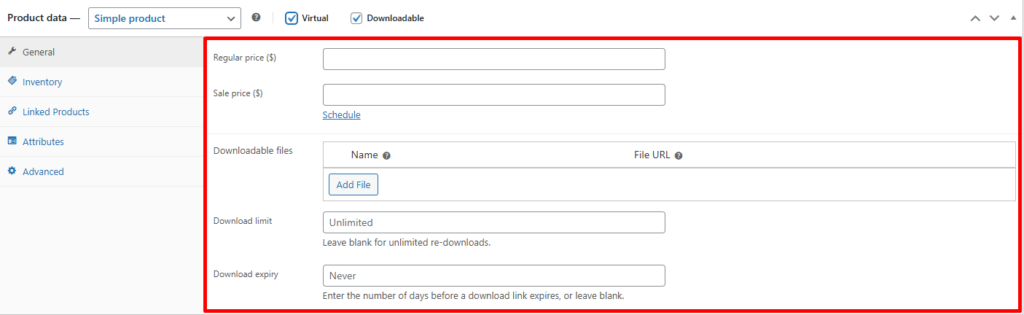
Step 4: Set Download Limits and Expiry
Still inside the General tab, you will see two optional fields:
- Download Limit: Number of times the file can be downloaded. Leave blank for unlimited.
- Download Expiry: Number of days before the link expires. Leave blank if it should never expire.

Step 5: Set Your Price and Publish
- Enter the Regular Price in the General tab
- Click Publish
That’s it. WooCommerce will now deliver the file automatically after every successful payment.
Virtual vs Downloadable: What’s the Difference?
These two checkboxes are easy to mix up. Here is how they actually work:
| Setting | What It Does | When to Use It |
| Virtual | Removes shipping fields and shipping cost from the product | Services, subscriptions, or anything that is not physically shipped |
| Downloadable | Adds download settings and sends a file link after purchase | PDF files, software, audio, videos, or any digital file the buyer needs to download |
| Both checked | No shipping and file delivery after purchase | Most digital product scenarios, like ebooks or templates |
Where the Default Setup Falls Short
WooCommerce handles simple digital product sales well. But as your store grows, you will run into a few real limitations.
- Files are stored on your hosting server by default. Large files eat storage and slow things down.
- There is no built-in way to host files on Google Drive, Dropbox, or cloud storage without a plugin.
- Managing download data across hundreds of products one by one takes a lot of time.
- License key delivery requires a separate plugin.
- There is no native drip delivery option for courses or content sequences.
For a small catalog, none of this is a problem. But once your store scales, these gaps start to show.
Where This Becomes Important in Real Operations
If you have 10 downloadable products, managing them inside WooCommerce is fine. If you have 200, it gets messy fast.
Think about tasks like auditing download limits across products, updating file URLs in bulk, or checking which products have expiry dates set. Going product by product inside the editor wastes hours.
That’s where a tool like FlexStock can quietly help by syncing your WooCommerce product catalog with Google Sheets. You can review and edit download settings, file names, and metadata across your full product list in a spreadsheet format, and push changes back to WooCommerce without touching each product page individually.
Quick Tips to Avoid Mistakes
- Always check both boxes. If you want a digital product with no shipping and a download link, check both Virtual and Downloadable. Missing one causes checkout issues.
- Set download limits for paid content. Leaving limits blank means one buyer can share the link and let others download for free.
- Keep file names clean. Avoid spaces and special characters in file names. Use hyphens instead (e.g., starter-guide-2024.pdf).
- Do not upload huge files to your server. Use a CDN or cloud storage link for files over 50 MB to protect your server performance.
- Test the download after publishing. Place a real test order and confirm the email arrives and the link works before promoting the product.
- Use short expiry dates for time-sensitive content. Workshops, limited launches, or promotional downloads can have a 30-day or 60-day expiry to add urgency.