How to Create a Variable Product in WooCommerce
A variable product lets you sell multiple versions of the same item under one listing. Each version has its own price, stock count, SKU, image, and weight. Instead of five separate product pages for a hoodie in five colors, you build one product and let customers pick.
It works for clothing sizes, shoe widths, coffee grind types, candle scents, software license tiers, basically anything with options.
Variable Product vs Simple Product
A simple product has one version. A variable product has many. The setup is also different, which is why WooCommerce treats them as separate product types.
| Simple | Variable | |
| Versions | One | Multiple |
| Pricing | One price | Per variation |
| Stock | One count | Per variation |
| SKU | One | Per variation |
| Setup time | Fast | More steps |
| Best for | Single-option items | Products with options |
Steps to Create a Variable Product in WooCommerce
The process has four stages: set the product type, add attributes, create variations, and configure each variation. Here is each one in order.
Stage 1: Create the Product and Set the Type
- Go to Products in your WordPress dashboard
- Click Add New
- Add a product title and description
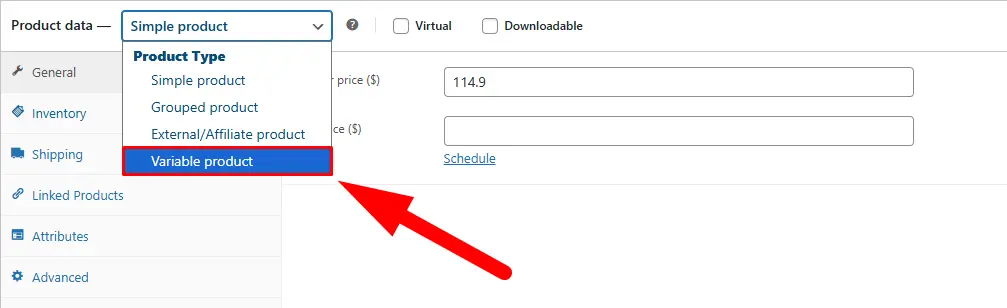
- Find the Product Data section below the editor
- Open the product type dropdown and select Variable Product
This is the step most beginners miss. If you leave it as Simple Product, you will never see the Attributes or Variations tabs.
Stage 2: Add Attributes
Attributes are the options your product comes in. Size. Color. Material. You set these up before generating variations.
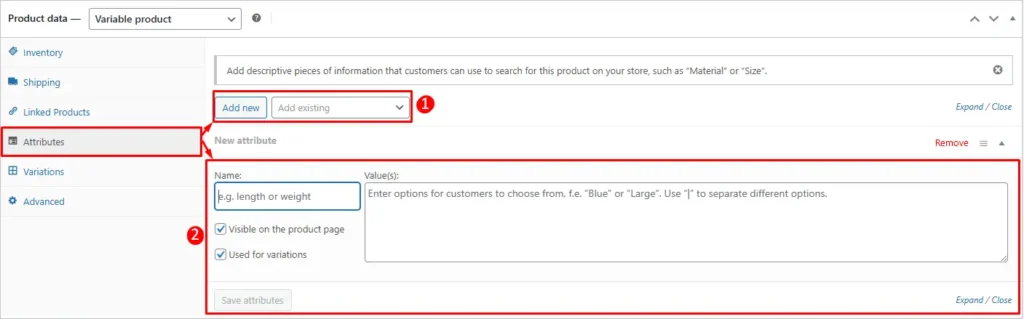
- Click the Attributes tab inside Product Data
You have two ways to add them:
- Option A: Select a global attribute from the dropdown (these are pre-created under Products > Attributes and can be reused across your whole store)
- Option B: Click Add New to create a custom attribute just for this product
After adding an attribute:
- Enter the values separated by a pipe symbol (Small | Medium | Large)
- Check Used for variations (required, or WooCommerce will not let you generate variations)
- Check Visible on product page so customers can see the options
- Click Save Attributes
If you need more than one attribute, for example both Size and Color, add both before moving to the next stage.
Stage 3: Generate Variations
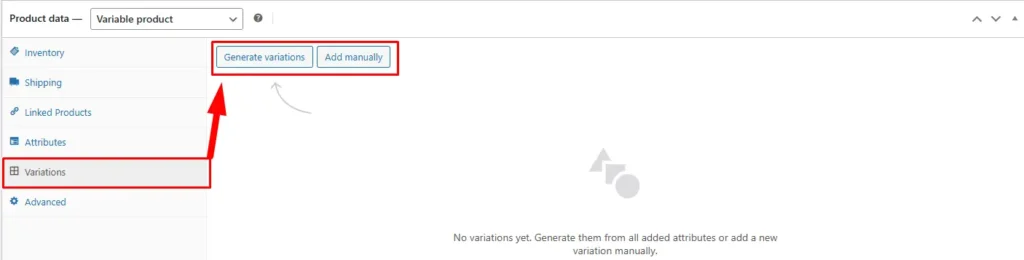
- Click the Variations tab
You will see a dropdown at the top. Two approaches work here:
- Generate all variations: WooCommerce builds every possible combination automatically. Three sizes x four colors = 12 variations created in one click.
- Add variation manually: You pick specific combinations. Use this when not every combination exists or makes sense to sell.
For most stores, generating all variations first and then disabling the ones you don’t sell is faster than adding them one by one.
Stage 4: Configure Each Variation
Click any variation row to expand it. WooCommerce will show you a set of fields for that specific version of the product.
Fields you can set per variation:
- Regular Price (required: variations without a price are hidden from customers)
- Sale Price (optional)
- SKU (recommended for inventory tracking)
- Stock quantity and stock status
- Weight and dimensions (if different from the main product)
- Variation image (each variation can show its own product photo)
- Downloadable (if this variation delivers a file after purchase)
- Virtual (if this variation has no physical shipping)
Go through every variation and set at least a price. Then click Save Changes at the bottom of the Variations tab.
Stage 5: Set a Default Variation (Optional but Recommended)
WooCommerce lets you set a default variation that pre-selects options when a customer lands on the product page. This removes friction and can improve conversions.
- In the Variations tab, find the Default Form Values section
- Select the most popular or best-selling combination as the default
- Click Save Changes
- Once everything looks right, click Publish or Update in the top right.
Using Bulk Actions to Save Setup Time
If you have a large number of variations, editing each one individually takes a long time. WooCommerce includes a Bulk Actions tool in the Variations tab that lets you apply settings across all variations at once.
- Set a price for all variations in one go
- Toggle all variations enabled or disabled
- Set the same shipping class across every variation
- Add the same download file to all downloadable variations
This is useful when most of your variations share the same price or stock policy and only a few differ.
Limitations to Know Before You Start
Variable products are powerful, but there are a few things WooCommerce cannot do natively:
- More than 30 variations: WooCommerce changes how it loads variation data once a product hits 30 variations. The dropdown behavior changes and can affect the experience for customers. Large catalogs may need a plugin.
- No variation image gallery: Each variation can display one image, not a set of photos. Showing multiple angles per variation requires a plugin.
- No swatch display: By default, WooCommerce shows variations as dropdown menus. Visual swatches (color buttons, image selectors) need an add-on.
- Bulk managing across products: You can bulk edit variations within one product. But editing variation data across 50 or 100 products at once is not possible inside WooCommerce.
Where This Gets Hard at Scale
One variable product is manageable. Eighty of them, each with 15 variations, is a different job entirely. Updating a price across all shirt sizes, fixing an SKU pattern that runs through dozens of products, auditing which variations are out of stock catalog-wide. These tasks are slow in the WooCommerce UI.
Most store owners at that scale move the work to a spreadsheet. Tools like FlexStock sync variation-level data to Google Sheets so you can filter, sort, bulk-edit, and push updates back without touching individual product pages.
Quick Tips Before You Publish
- Select Variable Product before anything else. All the fields you need only appear after you change the product type from Simple to Variable.
- Always check “Used for variations.” Without this, the Variations tab will not let you generate anything and no error is shown.
- Use global attributes for repeat properties. If Size or Color appears across multiple products, create it once under Products > Attributes. Custom attributes are single-product only.
- Price every variation. WooCommerce hides variations with no price. If a variation is not showing up on the product page, a missing price is the most common reason.
- Give each variation a unique SKU. This makes fulfillment and inventory tracking much cleaner, especially if you connect WooCommerce to any warehouse or shipping software.
- Test the product page before promoting it. Open it on mobile, select a few different variations, and check that the image, price, and stock status update correctly with each selection.
One thing to plan early: adding a new attribute value after you’ve built a large catalog is tedious. You add it globally, then revisit each product to assign it. Think through your attributes before you scale.