How to Add Custom Product Fields in WooCommerce
Custom product fields in WooCommerce are additional input fields you add to product pages beyond the standard fields like title, description, price, and SKU. These fields let you collect extra product information, display custom data to customers, or capture personalized input during purchase.
Common examples include text engraving options, custom measurements, gift messages, installation dates, or any product-specific detail that doesn’t fit WooCommerce’s default structure.
Why Store Owners Add Custom Fields
Most WooCommerce stores hit a point where the default product fields aren’t enough.
You might be selling custom t-shirts and need a “Text for Print” field. Or running a B2B store that needs internal fields like “Vendor SKU” or “Reorder Threshold.” Maybe you’re offering gift wrapping and need a message box at checkout.
Custom fields solve these gaps. They let you:
- Capture customer personalization (names, dates, custom text)
- Display technical specifications buyers actually care about
- Store internal data your team needs for fulfillment or inventory
- Add pricing adjustments based on customer choices
- Create product configurators for complex items
How to Add Custom Product Fields in WooCommerce
Method 1: Built-in Custom Fields (Free, No Plugin Needed)
WooCommerce products support WordPress custom fields by default. You can add them directly from the product editor:
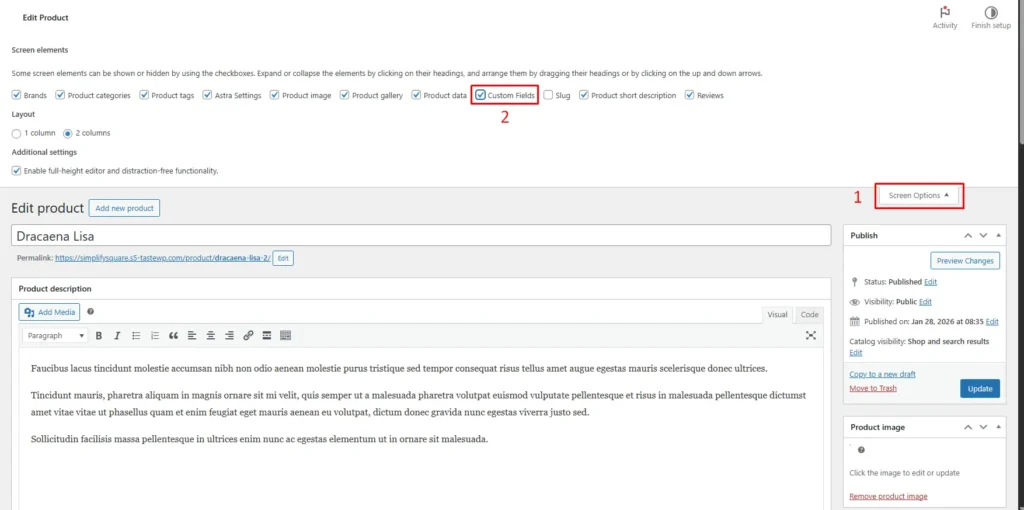
- Go to Products → Edit Product
- Scroll down and click Screen Options (top right)
- Enable Custom Fields checkbox
- Scroll to the Custom Fields section (below product editor)
- Click Enter new to add a field
- Enter:
- Name (the field key, e.g., fabric_type or warranty_period)
- Value (the actual data, e.g., Cotton or 2 years)
- Click Add Custom Field
To display these fields on the frontend, you’ll need to add code to your theme’s functions.php or create a child theme:
php
// Display custom field on product page
add_action('woocommerce_single_product_summary', 'display_custom_field', 25);
function display_custom_field() {
    global $post;
    $fabric = get_post_meta($post->ID, 'fabric_type', true);
    if ($fabric) {
        echo '<p><strong>Fabric:</strong> ' . esc_html($fabric) . '</p>';
    }
}
Best for: Internal product data, simple text specifications, or backend tracking fields. Not ideal for customer input or complex field types.
Method 2: Using WooCommerce Product Add-Ons (Official Plugin)
- Install the WooCommerce Product Add-Ons plugin
- Go to a product edit page
- Scroll to the Product Add-Ons section
- Click Add Field or Add Group
- Choose field type (text, textarea, checkbox, dropdown, file upload, etc.)
- Configure field options:
- Field label and description
- Required or optional
- Price adjustments (if applicable)
- Save the product
This method is best for customer-facing fields that affect pricing or require input at checkout.
Method 3: Using Advanced Custom Fields (ACF)
- Install Advanced Custom Fields (free or Pro)
- Create a new Field Group
- Set location rules to Product post type
- Add your custom fields (text, number, date picker, relationship, etc.)
- Display fields in your theme using ACF functions or blocks
This method is best for backend data storage or displaying custom product specs that don’t require customer input.
Method 4: Custom Code (for Developers)
Add custom meta boxes using WordPress hooks:
- add_meta_box() to create the field
- save_post hook to save field data
- woocommerce_product_options_general_product_data for simple products
- Display using get_post_meta() in your theme
This method gives you full control but requires PHP knowledge.
Quick comparison:
| Method | Cost | Ease | Customer Input | Best Use Case |
| Built-in Custom Fields | Free | Easy | No | Simple backend data |
| Product Add-Ons | Paid | Easy | Yes | Personalization + pricing |
| ACF | Free/Paid | Medium | Optional | Complex backend fields |
| Custom Code | Free | Hard | Optional | Full customization |
Where This Becomes Important in Real Operations
When you’re managing a large catalog with custom fields, keeping that data organized across hundreds of products becomes challenging.
For example, if you’ve added custom fields like “Supplier Code,” “Reorder Level,” or “Product Origin” to track internal inventory data, updating or reviewing these fields one product at a time inside WooCommerce gets slow fast.
In workflows like that, many store owners prefer managing product data in a spreadsheet format. That’s where a tool like FlexStock can quietly support the process by syncing WooCommerce products, including custom fields and metadata, with Google Sheets, allowing you to bulk edit, filter, and update custom field values alongside standard product information in a familiar spreadsheet interface.
What to Consider Before Adding Fields
- Start simple. Don’t add 10 custom fields because you might need them someday. Add fields that solve an immediate problem.
- Think about who fills them out. Customer-facing fields need clear labels and validation. Internal fields can be more technical.
- Test on mobile. A five-field product configurator that works on desktop might be unusable on a phone.
- Document your fields. If multiple people manage products, create a simple guide explaining what each custom field is for and when to use it.
- Watch performance. Heavy custom field queries can slow down product pages. Use caching if you’re displaying lots of custom data on the frontend.
Pro tip: For customer input fields, always show a live preview or example. “Enter text for engraving” works better with a visual showing where the text will appear.