Wppool
  • Home
  • Products
    • Privacy Policy
  • DreamLab
  • Bundle
  • Offer
  • Help Center
    • Support
Log In
Site Logo
  • Home
  • Products
    • Privacy Policy
  • DreamLab
  • Bundle
  • Offer
  • Help Center
    • Support
My Account
  • WP Dark Mode
    WP Dark Mode

    A stunning WordPress Dark Mode experience

  • FlexTable
    FlexTablehot Wppool

    Automatically sync Google Spreadsheets with WP tables

  • FormyChat
    FormyChat

    Send contact form leads to WhatsApp

  • Stock Sync
    FlexStock hot Wppool

    Sync WooCommerce stock with Google Sheet and manage easily

  • Order Sync
    FlexOrder new ⚡

    Manage WooCommerce orders from Google Sheets

  • Easy Video Reviews
    Easy Video Reviews

    Get powerful video testimonials with ease and boost sales

  • EchoRewards
    EchoRewards new ⚡

    Referral Plugin for WooCommerce

  • Jisi Meet
    Jitsi Meet

    Webinar & video conferences within WordPress

  • FlexSync for Shopify
    FlexSync for Shopify new ⚡

    Manage Shopify inventory from Google Sheets

  • ArchiveMaster
    ArchiveMaster new ⚡

    Speed up your WooCommerce store by archiving old orders.

  • Chat Widgets
    OMG Chat Widget

    Let customers contact via any social channel

  • Stock Notifier
    Stock Notifier for WooCommerce

    Send alerts to customer when product is back in stock

  • Docs
  • Blogs
  • Video Tutorials
  • Join Community
  • Support & Contact

.

WP Dark Mode Documentation

24
  • How to enable Show Switch Delay and Auto-hide Switch on Idle
  • How to Get Started with WP Dark Mode (Free & Ultimate)
  • How to add a floating dark mode switch to your site
  • How to adjust your dark mode color scheme
  • How to Use a Dark Mode Color Preset
  • How to Build Your Custom Color Preset in Dark Mode
  • How to Use a Custom Dark Mode Switch
  • How to Use a Custom Dark Mode Switch (Advanced)
  • How to a Use Dark Mode Switch in Your Website Menu
  • How to Enable Content Switches Using WP Dark Mode
  • How to Exclude/Include Specific Elements in Dark Mode
  • How to Exclude Dark Mode on Specific Pages
  • How to Use Custom CSS Support in Dark Mode
  • How to Use the Image Replacement Feature of WP Dark Mode
  • How to Use the Video Replacement Feature of WP Dark Mode
  • How to Display Dark Mode Switch Using Elementor Widget
  • How to Display Dark Mode Switch Using Gutenberg Block
  • How to Adjust the Font Size on Your Website
  • How to Display Dark Mode Switch Using Shortcode
  • How to Change Your Website Background in Dark Mode
  • How to Display Social Sharing Buttons in Dark Mode
  • WP Dark Mode for Developers (Methods and Hooks)
  • How to Rollback Your WordPress Plugin to An Older Version
  • Use of Cookies in WP Dark Mode and their Applications

FlexTable - Sheets to WP Table Live Sync

23
  • How to Enable Smart Caching in FlexTable
  • How to add buttons in WordPress tables
  • What is FlexTable – Sheets to WP Table Live Sync?
  • How to install and use Google Sheets to WP Table Live Sync
  • How to create a new table with Google Sheets to WP Table Live Sync
  • How to use shortcode to create tables in WordPress with Sheets to WP Table Live Sync
  • How to use Google Sheets to WP Table Live Sync with Gutenberg block
  • How To Display Tables Directly From Elementor With Google Sheets To WP Table Live Sync
  • How to create a new table theme with Sheets to WP Table
  • How to Customize Table Theme with Sheets to WP Table Live Sync
  • How to hide table rows and columns of Google Sheets table
  • How to use custom CSS support in Google Sheets to WP Table Live Sync
  • How to use the multiple tab feature on Google Sheets to WP Table Live Sync
  • How to import background and font color on Google Sheets to WP Table Live Sync
  • How to import images from Google Sheets to WordPress table with Sheets to WP Table Live
  • How to sync Google Sheets links with WordPress tables
  • How to customize table pagination in WordPress
  • How to Sort and Merge Cells in WordPress Tables.
  • How to Enable Optimized Loading (Pro)
  • How to change table styles (theme customization)
  • FlexTable Advanced Use-Cases (Importing Codes, Sticky Header, Line Break and More)
  • What impact does FlexTable have on SEO and Performance?
  • Why Does the Page Need to be Refreshed to Display Updates on the Website?

Stock Sync for WooCommerce with Google Sheet

9
  • How To Install Stock Sync for WooCommerce with Google Sheets
  • How To Install & Setup Stock Sync for WooCommerce with Google Sheets Ultimate
  • How to sync WooCommerce stock with Google Sheets
  • How to manage WooCommerce product details from Google Sheets
  • How to Bulk Edit WooCommerce products from Google Sheets
  • How to Add WooCommerce products from Google Sheets
  • How to Sync WooCommerce Product Image with Google Sheets
  • How to Sync WooCommerce Custom Fields with Stock Sync with Google Sheet for WooCommerce
  • Possible Errors and Solutions

Order Sync with Google Sheets for WooCommerce - FlexOrder

11
  • How to Install FlexOrder – Free & Ultimate
  • How To Setup FlexOrder
  • How to Sync Custom Order Statuses with Google Sheets
  • How to Sync Order Notes from Google Sheets
  • How to Display Products in Separate Rows in FlexOrder
  • How to Bulk Edit WooCommerce Orders Using Google Sheets
  • How to export WooCommerce orders to Google Sheets
  • How to manage WooCommerce orders from Google Sheets
  • How To Update WooCommerce Orders from Google Sheets
  • How To Sync WooCommerce Custom Order Fields
  • Known Errors & Solutions

Webinar and Video Conference with Jitsi Meet

19
  • How to Enable Meeting from Frontend with Jitsi Meet
  • How to install and use Jitsi Meet
  • How to activate Jitsi Meet PRO
  • How to get the app ID, API key, and private key in Jitsi Meet
  • How to create a meeting on Jitsi Meet Pro
  • How meeting registration works in Jitsi Meet
  • How recurring meeting works in Jitsi Meet
  • How to use shortcode to display meeting with Jitsi Meet
  • How to display Meeting directly from Gutenberg block and Elementor with Jitsi Meet
  • How to Use Jitsi Meet Free, JaaS 8×8 & Self Hosted Server
  • How to record meeting on Jitsi Meet
  • How to Add Jitsi Meeting in Dokan Multivendor Plugin with Jitsi Meet Multivendor Addon
  • How to Add Jitsi Meeting in MultiVendorX with Jitsi Meet Multivendor Addon
  • How to Add Jitsi Meeting in WCFM Marketplace with Jitsi Meet Multivendor Addon
  • How to do live streaming in Jitsi Meet
  • How to Add a Jitsi Meeting in Tutor LMS
  • How To Add a Jitsi Meeting in LearnPress
  • How to add Meeting in LearnDash LMS with Jitsi Meet
  • How to use LearnDash and Tutor LMS in Jitsi Meet

FormyChat Documentation

11
  • How to add Ninja Form to WhatsApp with FormyChat
  • How to Modify FormyChat Form Fields with the “formychat_form_fields” Hook
  • How to Customize FormyChat Widget
  • How to create Multi-Agent Chat Support Widget
  • How to create multiple floating chat widgets
  • How to install and setup FormyChat Ultimate
  • How to send contact form data to WhatsApp
  • How to install and setup FormyChat
  • How to send Contact Form 7 data to WhatsApp
  • How to send contact form leads to email
  • How to setup and customize the welcome popup (greetings widget)

Easy Video Reviews Documentation

14
  • How to get started with Easy Video Reviews (Onboarding steps)
  • How to collect a testimonial from customers
  • How to add testimonials on your website
  • How to update your Easy Video Reviews settings
  • How to create a Wall of Love testimonial page using Review Gallery
  • How to use Gutenberg for collecting and displaying video testimonials
  • How to use Elementor for collecting and displaying video testimonials
  • How to collect testimonials with a floating review widget
  • How to download testimonials with Easy Video Reviews
  • How to translate testimonial fields in Easy Video Reviews
  • How to create and edit review form fields
  • How to collect customer testimonials on WooCommerce
  • How to collect video testimonials on Easy Digital Downloads (EDD)
  • Advanced customizations: Javascript triggers, dynamic tag for testimonial recorder, HTML attribute for recorder button

EchoRewards

1
  • EchoRewards Documentation

OMG Chat Widget

4
  • How to use OMG Chat Widget in any WordPress website
  • How to use OMG Chat Widget in WooCommerce Multivendor Marketplace (WCFM Marketplace)
  • How to use OMG Chat Widget in Dokan – Best WooCommerce Multivendor Marketplace Solution
  • How to use OMG Chat Widget in MultiVendorX (Formerly WC Vendor Marketplace)

ArchiveMaster Documentation

10
  • How to Enable the PDO SQLite Extension in Your Server’s PHP Configuration
  • What is ArchiveMaster
  • How to Install & Use ArchiveMaster
  • How to Create an Amazon RDS Database for ArchiveMaster
  • How to Connect Amazon RDS Remote Database with ArchiveMaster
  • How to Enable Automatic Archiving for Old Orders
  • How to Archive Old order with ArchiveMaster
  • Choosing the Right AWS RDS Plan
  • How to Reset and Recover Your RDS Database Password
  • How to Export Old Orders Using ArchiveMaster

Revio Documentation

1
  • How to get started with Revio (Onboarding steps)
  • Home
  • Documentation
  • ArchiveMaster Documentation
  • How to Create an Amazon RDS Database for ArchiveMaster
View Categories

How to Create an Amazon RDS Database for ArchiveMaster

Follow these steps to create an Amazon RDS database. This guide will help you choose the right instance type and storage options based on your needs.

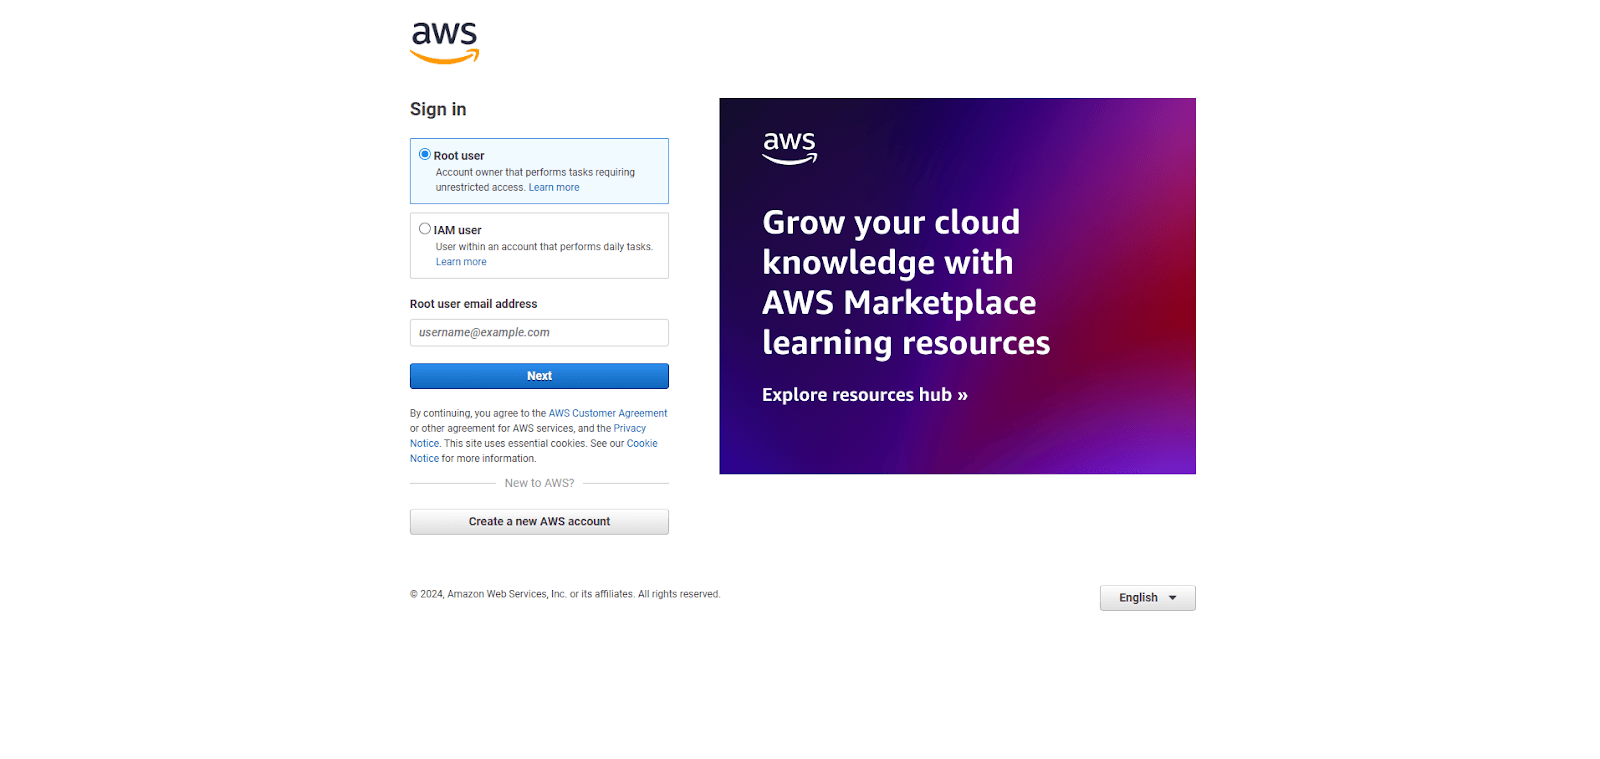
Login to your RDS Console. To log in to the RDS Console, you need to have an AWS account. There are two types of accounts that you can use to log in:

  • Root Account: If you’re using the root account (the account created when signing up for AWS), log in using your root email and password. This account has full administrative privileges across all AWS services. Or refer to How to Create an Amazon RDS Console Account
How to Create an Amazon RDS Database for ArchiveMaster
  • IAM User Account: If you’re using an IAM (Identity and Access Management) user account (which is a more secure practice for day-to-day operations), log in using the IAM username and password. If you don’t have an IAM user set up, you may need to create one (you’ll need administrative privileges to do so). For more details on creating and managing IAM users, refer to AWS IAM Documentation.

Please note, if you don’t already have an IAM user with the necessary permissions to access RDS, you will need to either create one or grant the required permissions to an existing user.”

How to Create an Amazon RDS Database for ArchiveMaster

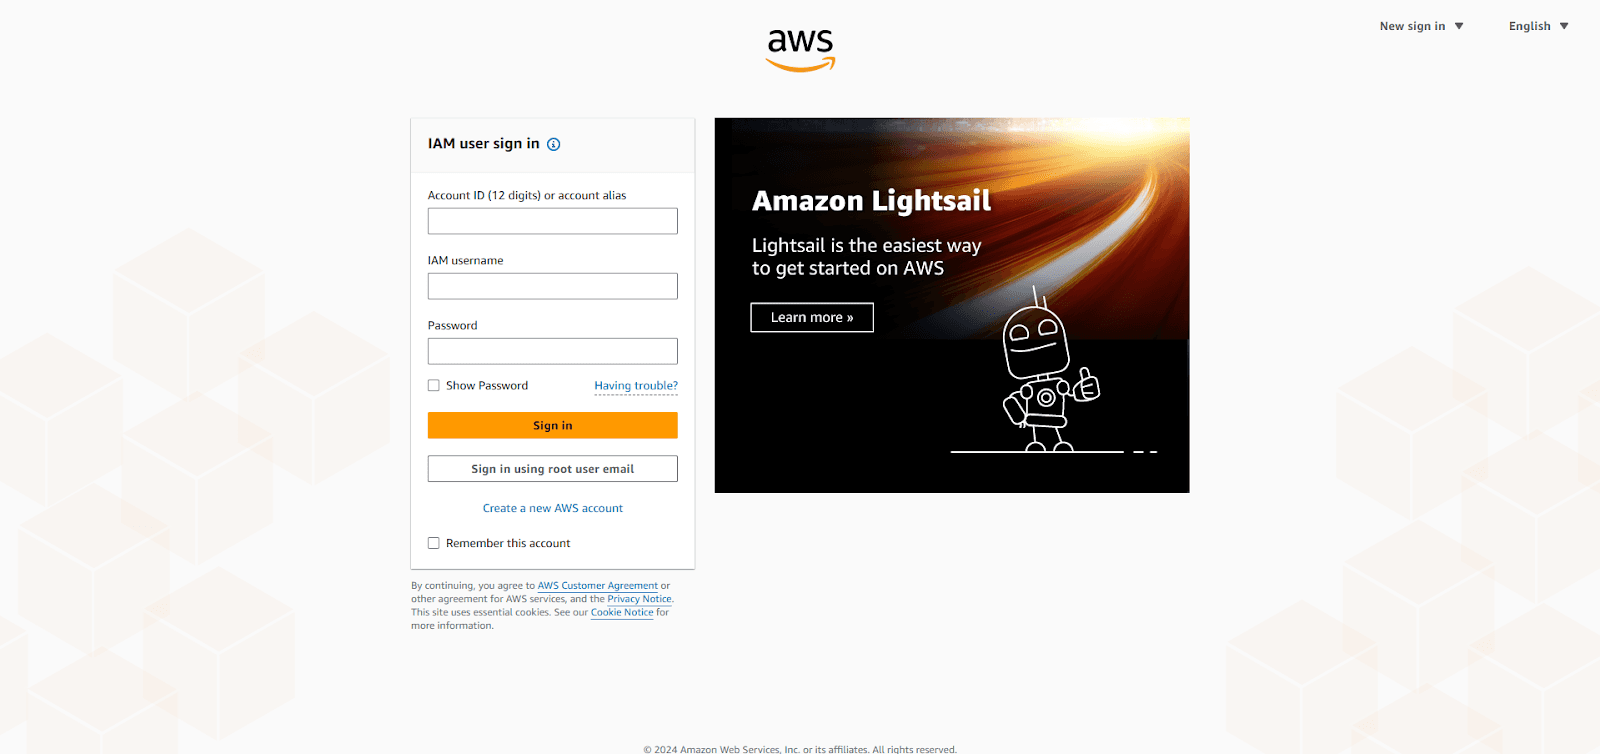
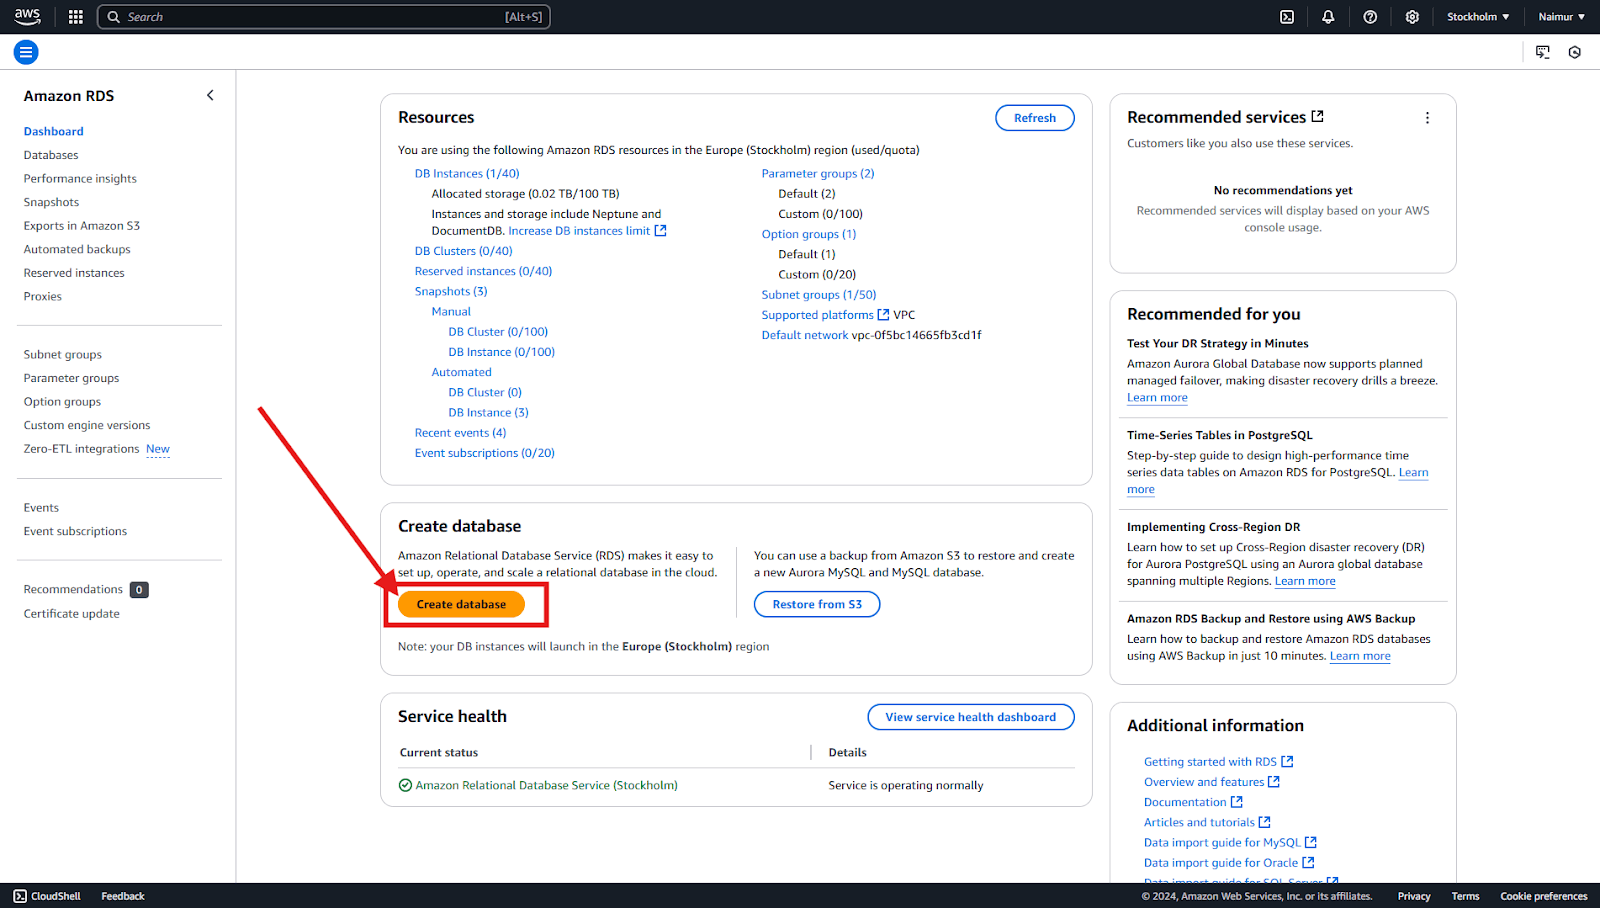
We are going to continue with root user, In the Amazon RDS Console, click Create database.

Note that not all AWS regions support RDS services. To see the full list of supported regions, visit AWS Regional Services List.

How to Create an Amazon RDS Database for ArchiveMaster

You will be prompted to select a Database Creation Method. Choose the Standard Create option for more configuration options.

Select the database engine that best suits your needs, such as MySQL, PostgreSQL, MariaDB, or others supported by Amazon RDS. We recommend MySQL and will continue with it.

How to Create an Amazon RDS Database for ArchiveMaster

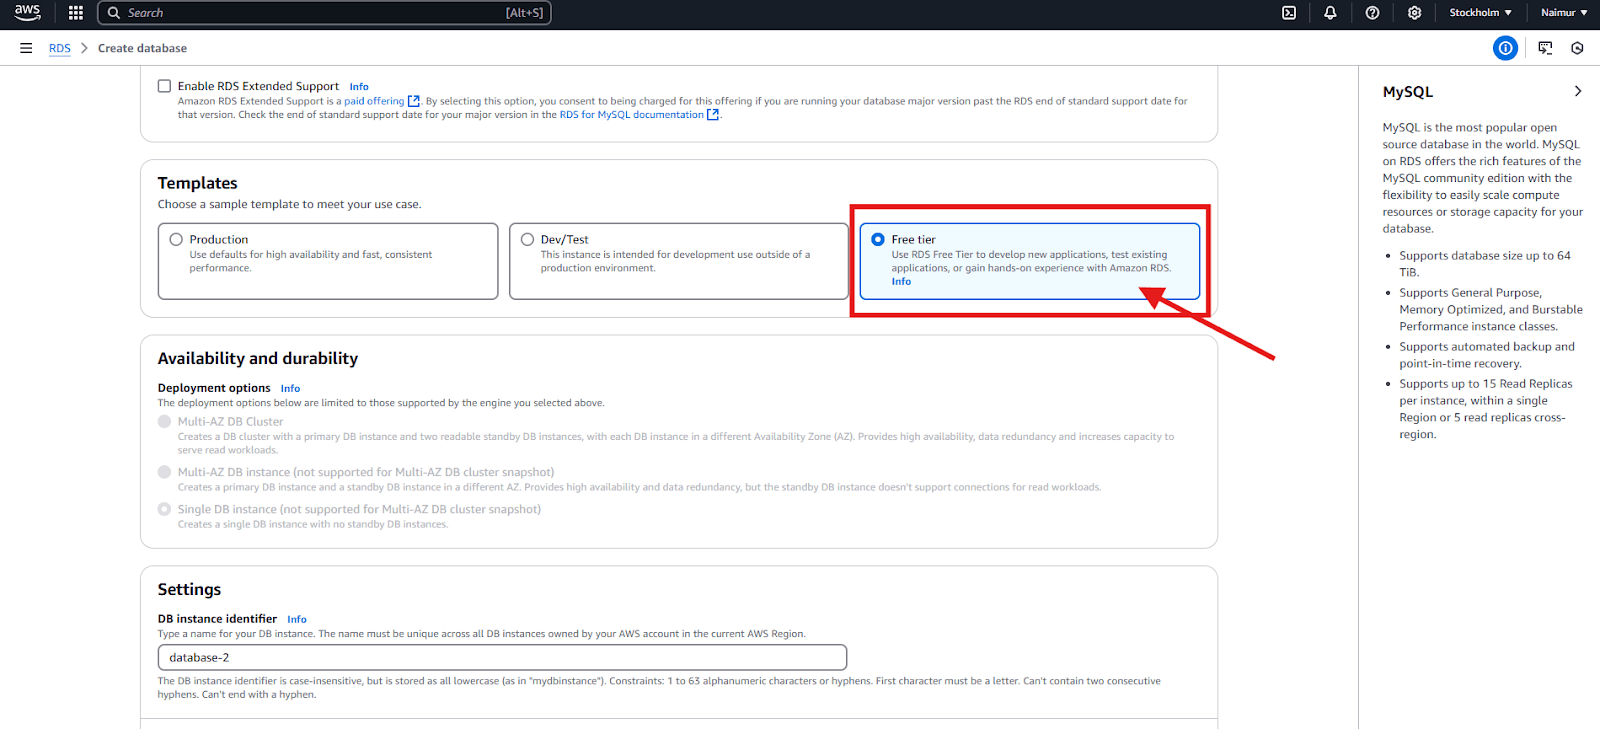
Choose a Database Plan

  • Free Tier: The Free Tier offers up to 20 GB of storage, making it ideal for small, non-production databases or development environments. However, due to the complexities of Amazon’s pricing structure, there may be occasional charges depending on your usage.
  • Production Plan: If you need more resources for a production environment, choose a more powerful instance type that can handle increased traffic and data storage depending on your site’s requirements.
    Tip: To help you decide on the right instance and storage for your production environment, refer to this guide on choosing the right AWS RDS plan.

Let’s continue with the Free Tier for now.

How to Create an Amazon RDS Database for ArchiveMaster

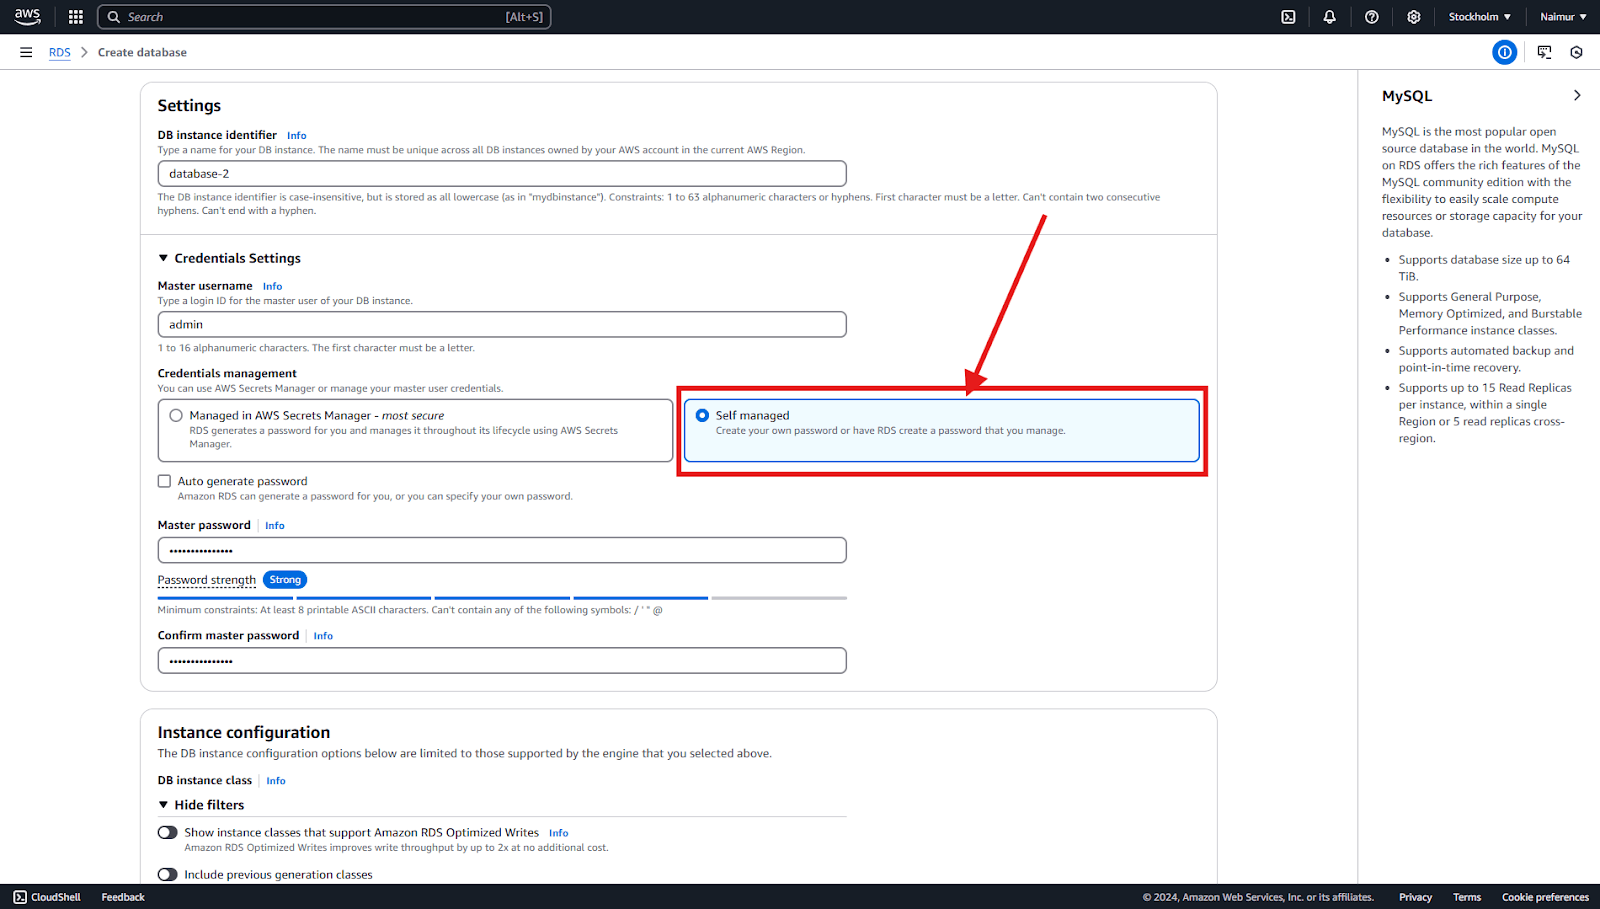
Configure the Database Settings such as DB Instance Identifier, Master Username and Master Password. And do ensure a secure password.

Also, you can choose between Managed and Self-Managed credentials.

  • Managed Credentials: This option involves AWS handling the credentials management for you, but it can be costly due to ongoing fees for the service.
  • Self-Managed Credentials: This option is free, allowing you to handle the credentials on your own, which can help reduce costs but may require more manual configuration and maintenance.
How to Create an Amazon RDS Database for ArchiveMaster

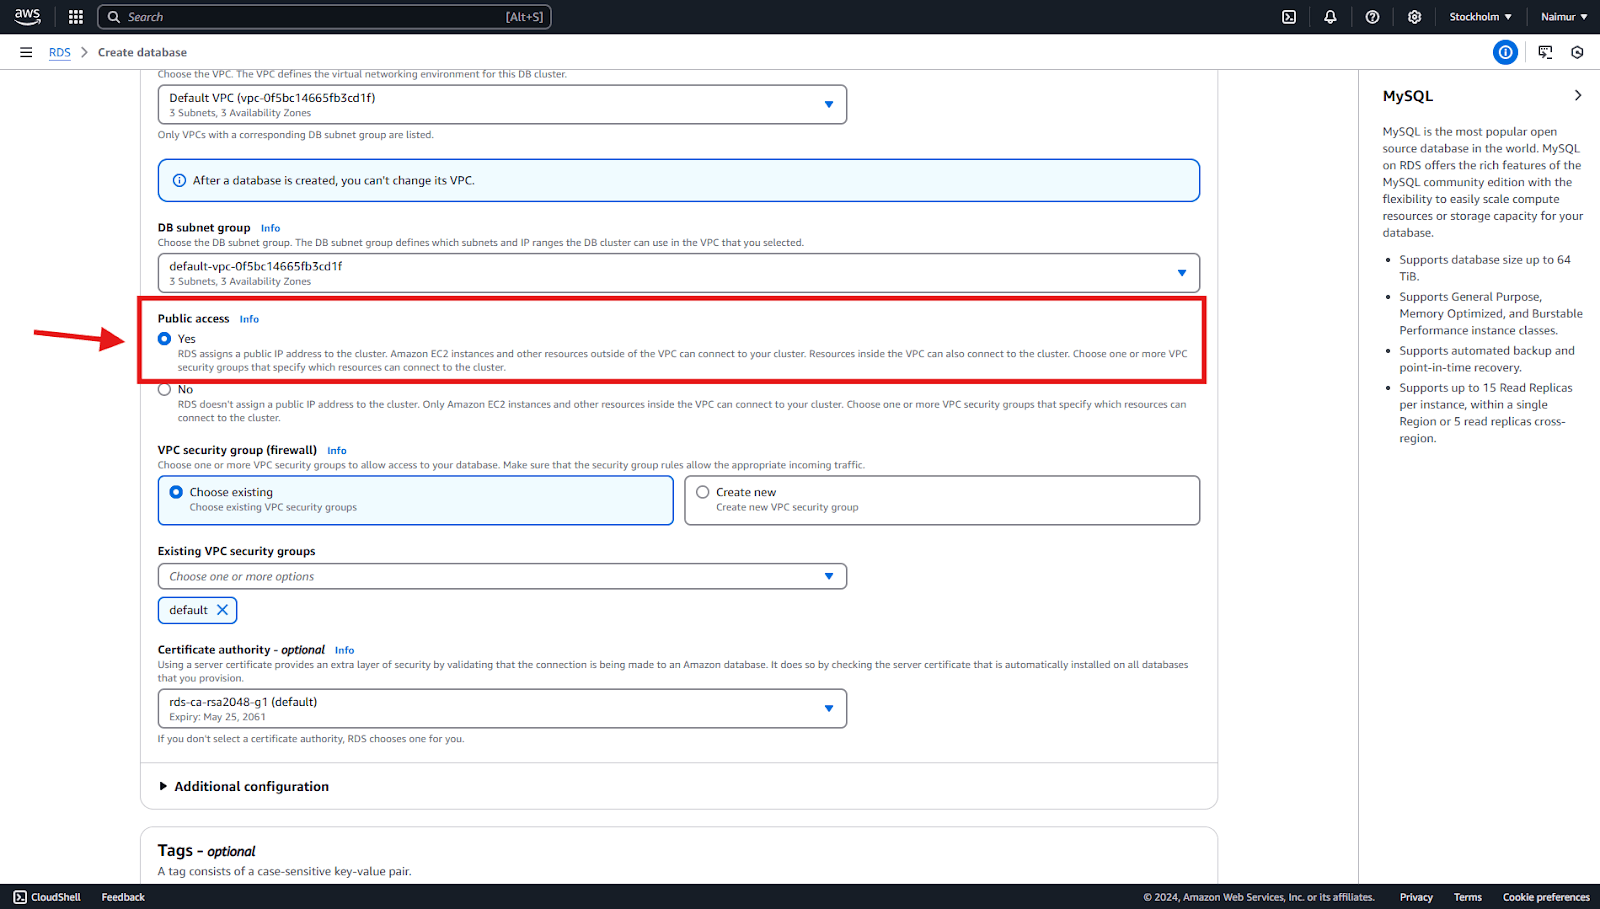
Make sure to select Yes for the Public access.

How to Create an Amazon RDS Database for ArchiveMaster

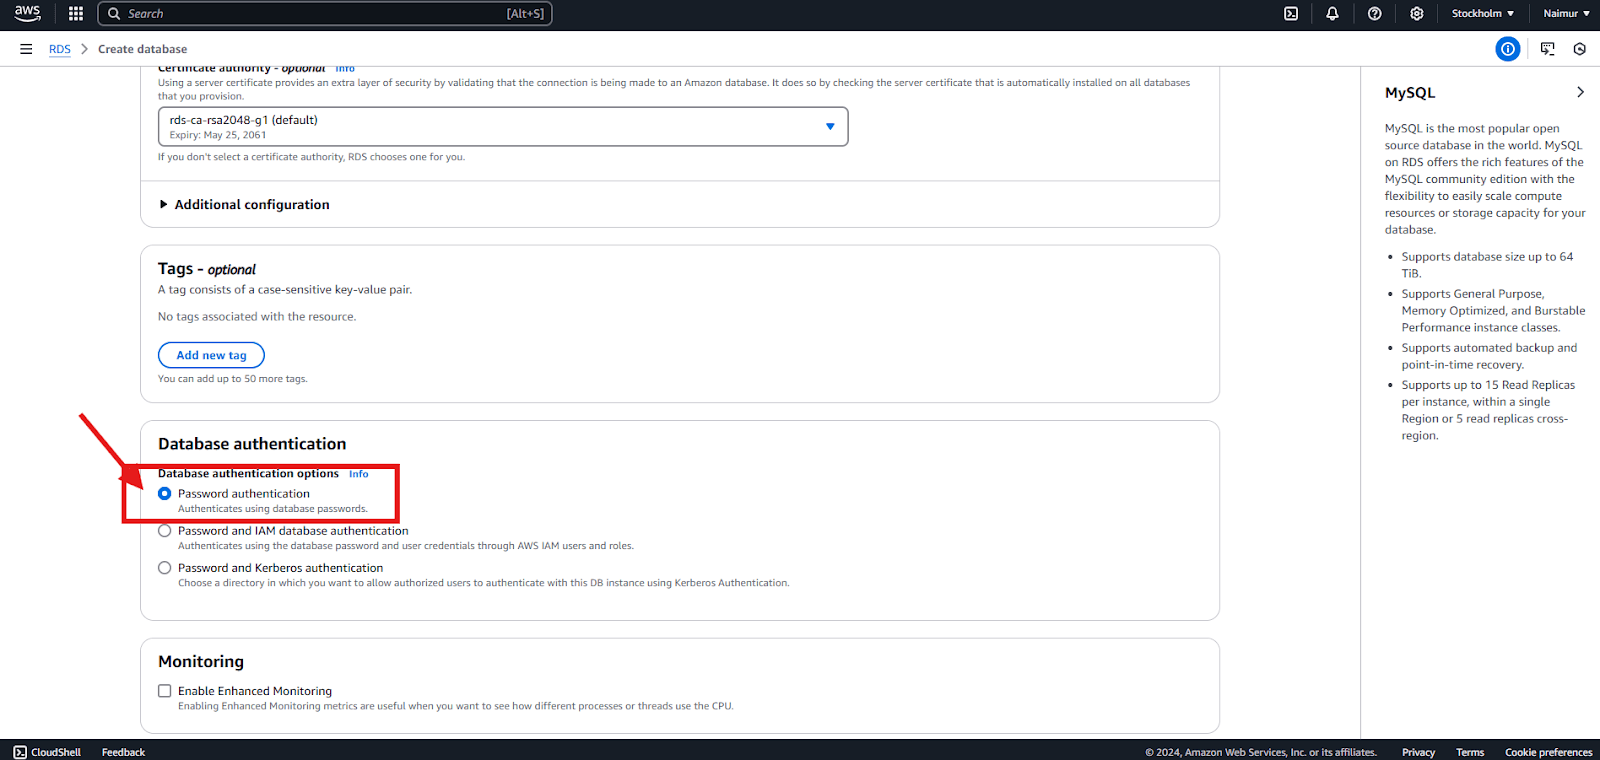
For Database Authentication, choose Password Authentication as your authentication method. This is the most common and secure method for managing access to your database and ensures that your database is protected with a strong password. This is required for ArchiveMaster to securely connect to your database.

How to Create an Amazon RDS Database for ArchiveMaster

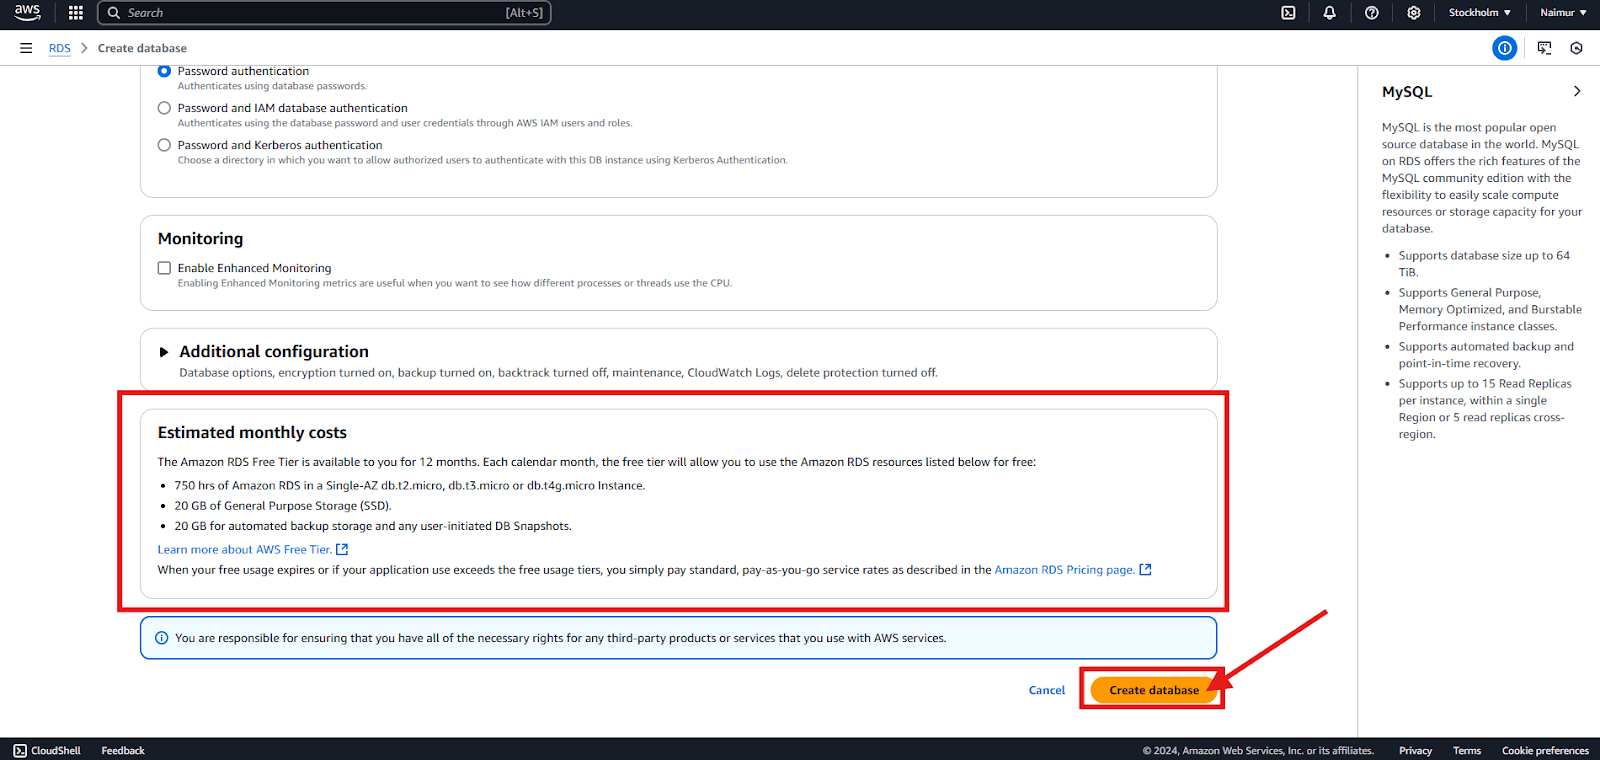
At the end of the setup screen, you will see an Estimated Monthly Cost based on your selected database configuration. If you’re using the Free Tier, you will be eligible for 12 months of free usage, which includes up to 20 GB of storage and the db.t2.micro instance type. After the first 12 months, charges may apply depending on your usage.

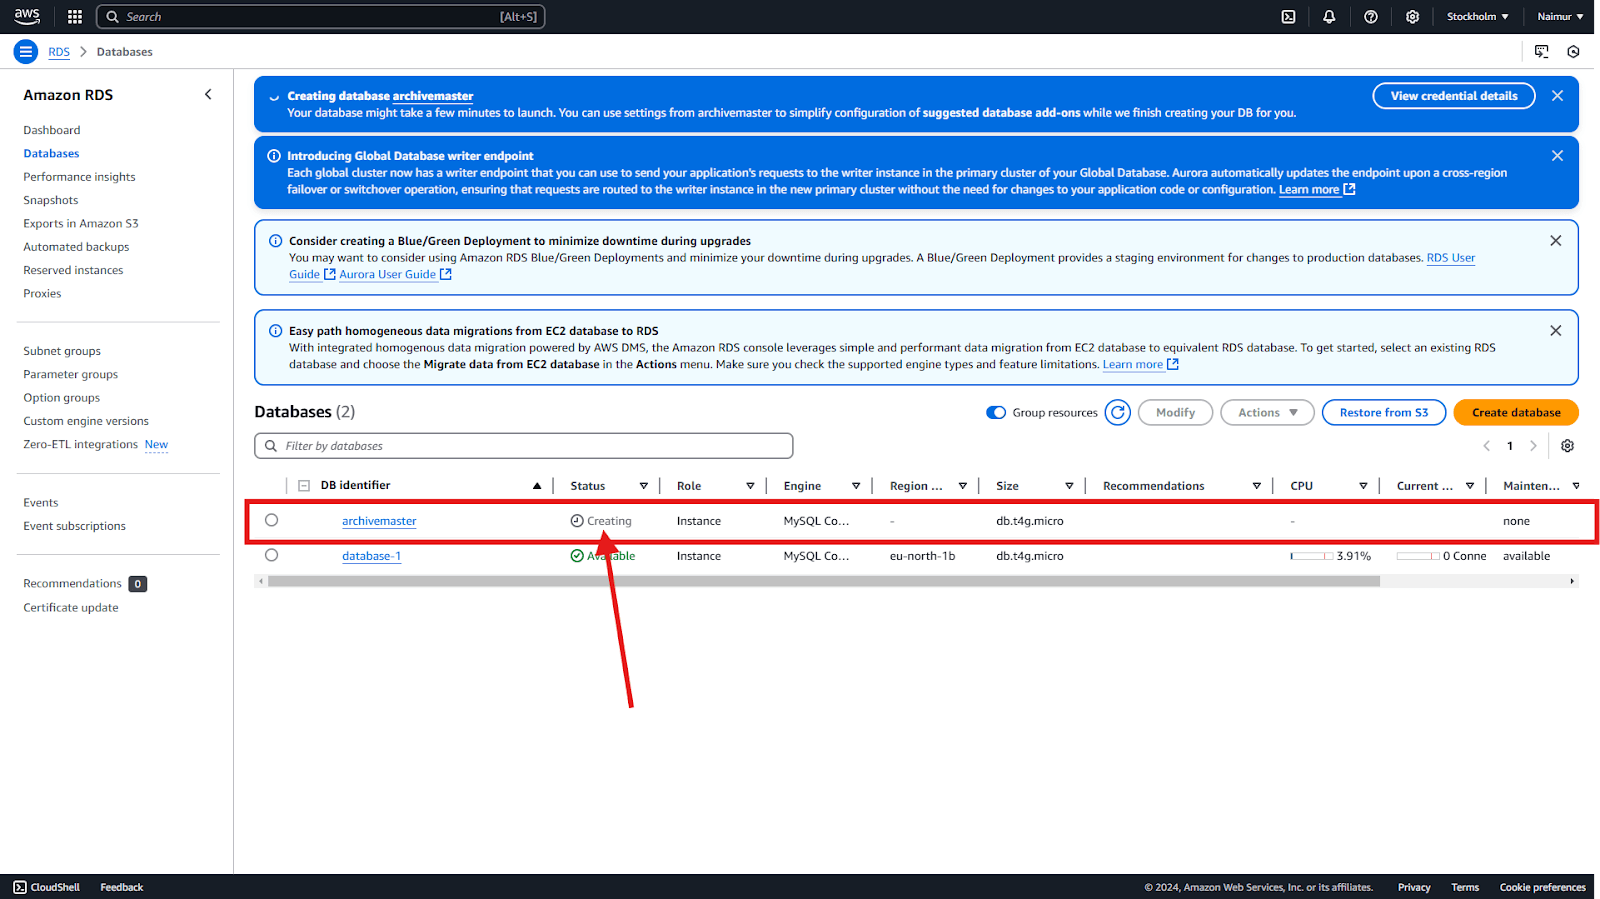
Finally, click Create Database to launch your new RDS instance.

How to Create an Amazon RDS Database for ArchiveMaster

Please note that after creating the database, it may take some time for the instance to become fully provisioned and available for connection while in ‘Creating’ status. 

How to Create an Amazon RDS Database for ArchiveMaster

Once the status changes to Available, the database will be ready for use. But there’s one last step.

How to Create an Amazon RDS Database for ArchiveMaster

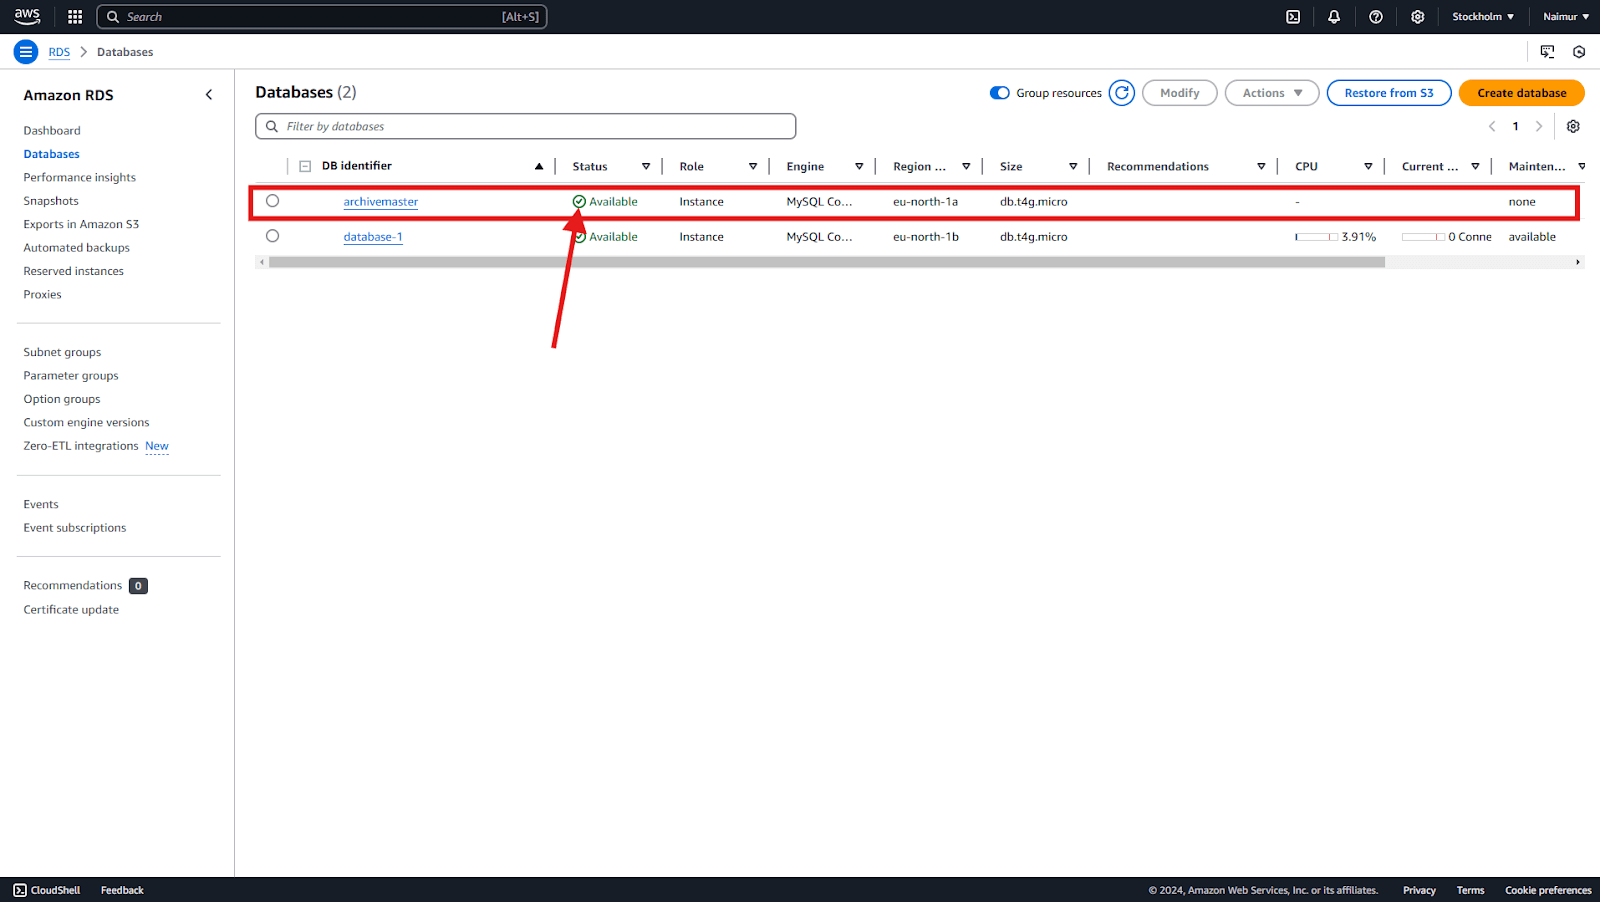
Before connecting, however, you must set the inbound rules for the security group associated with your RDS instance to allow public access.

In the left hand corner, click on the menu option. Under Compute click on the EC2.

How to Create an Amazon RDS Database for ArchiveMaster

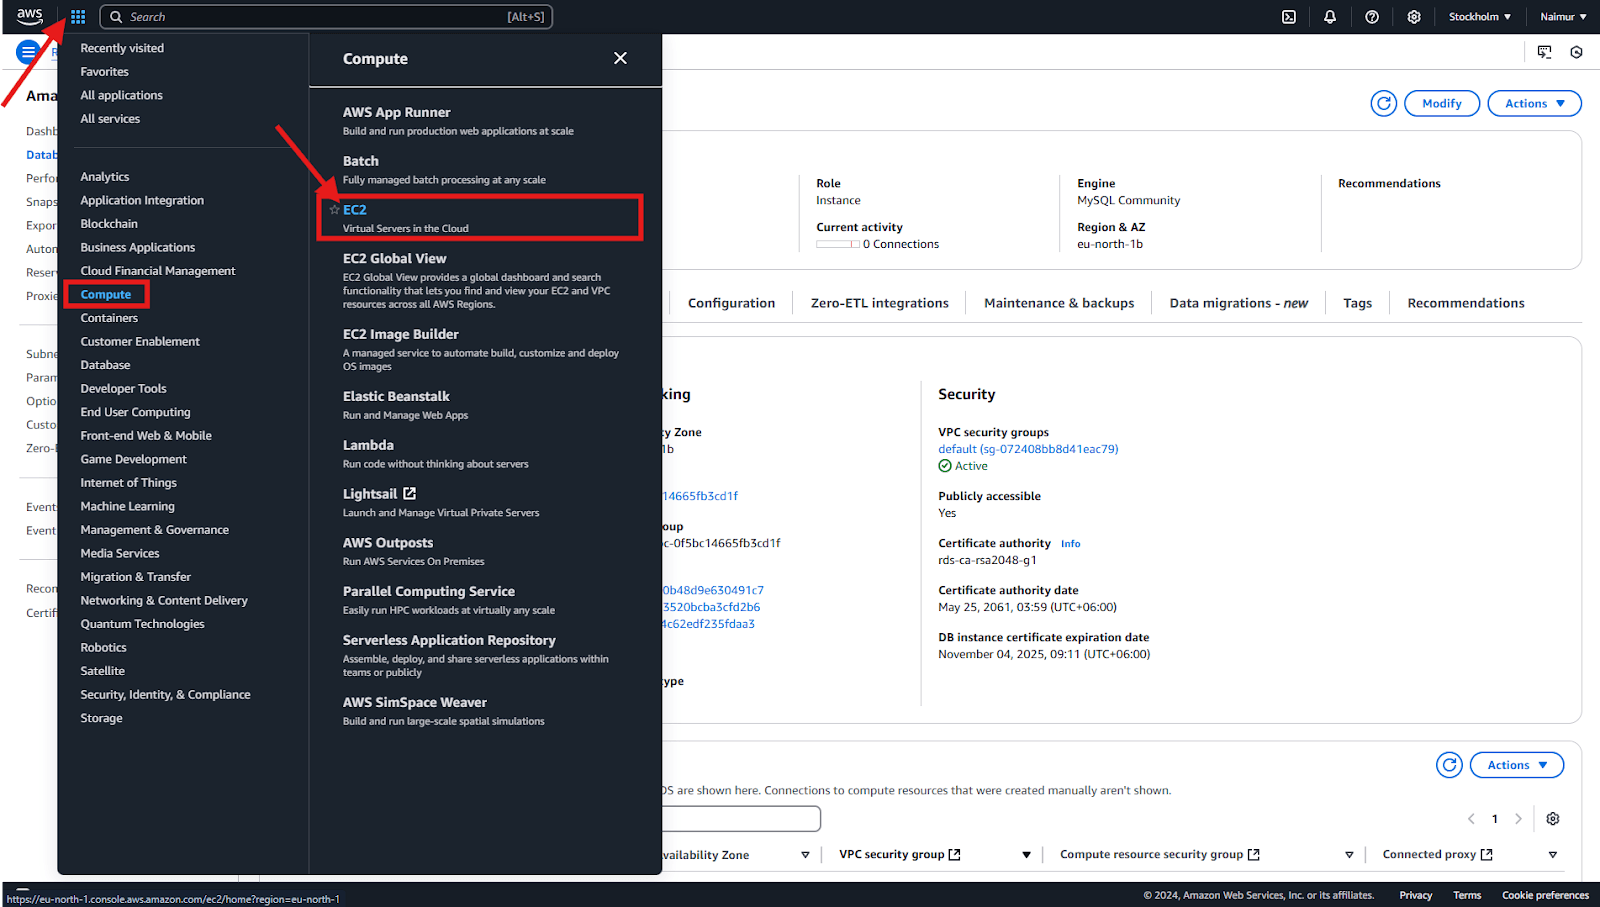
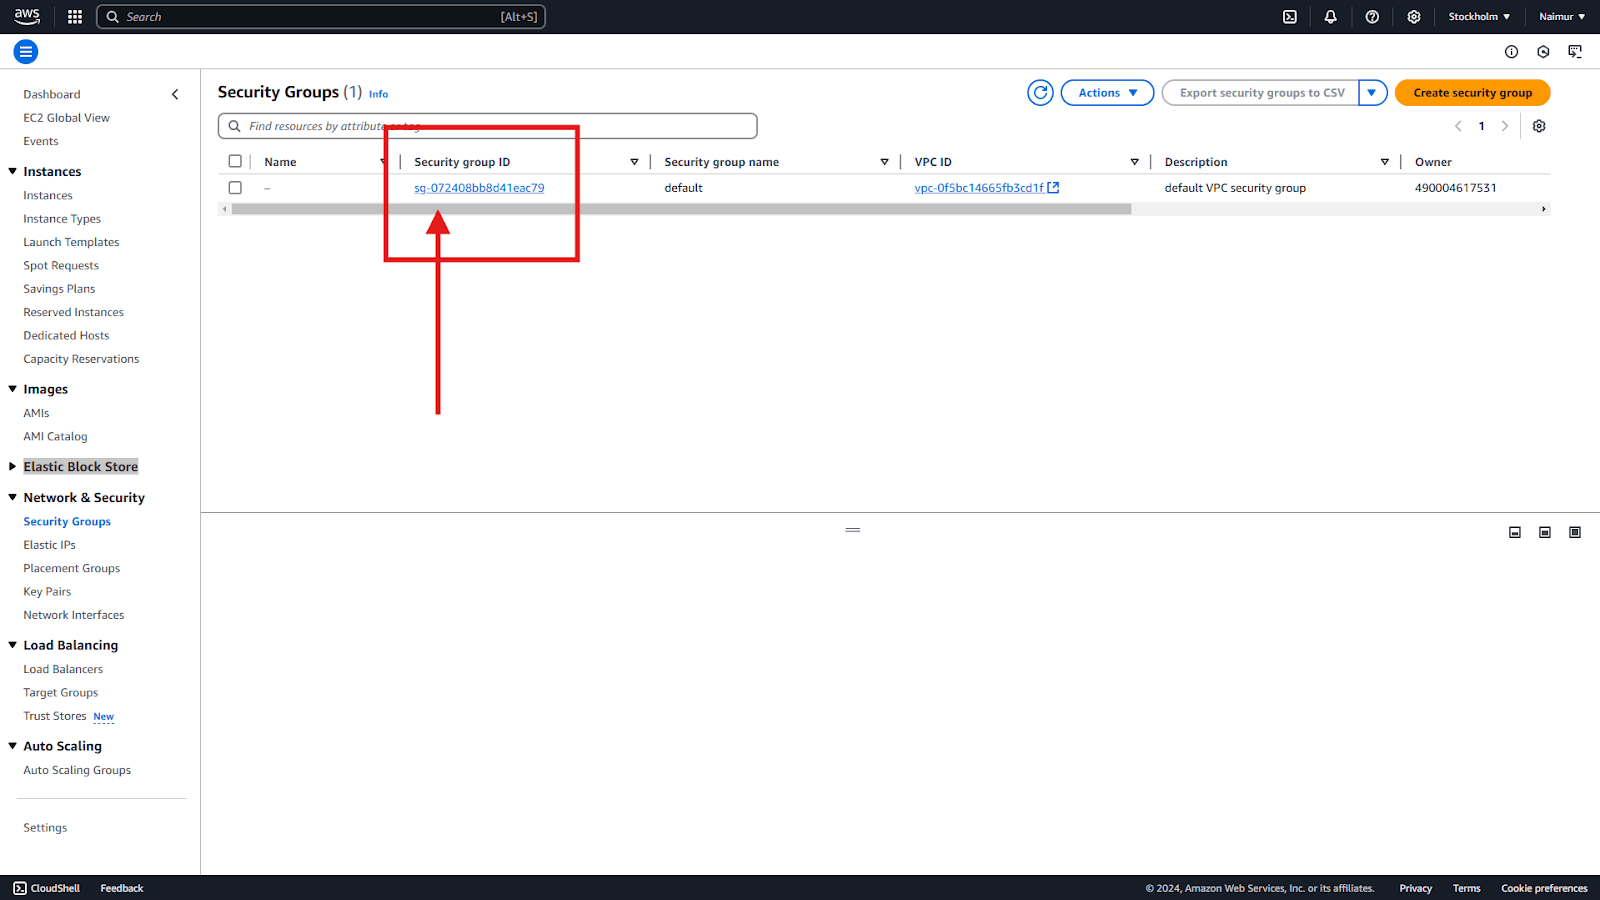
In the Network & Security section, click on the Security Groups link. This will take you to the Security Groups section in the EC2 Console.

How to Create an Amazon RDS Database for ArchiveMaster

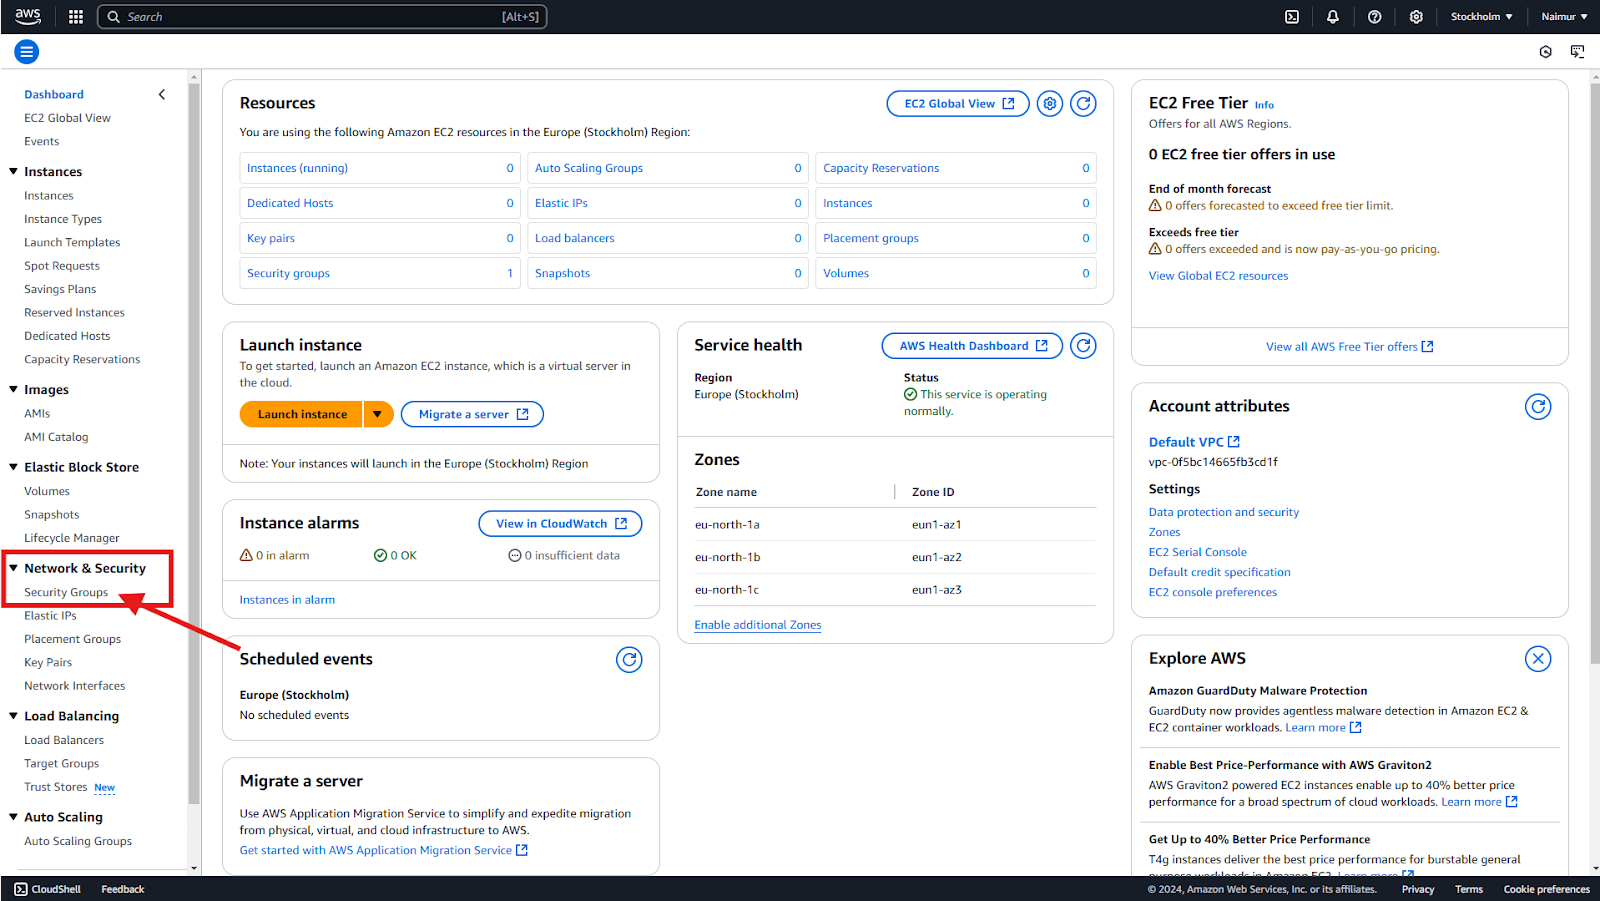
Select the security group associated with your RDS instance.

How to Create an Amazon RDS Database for ArchiveMaster

Then click on the Inbound rules tab, Click Edit inbound rules.

How to Create an Amazon RDS Database for ArchiveMaster

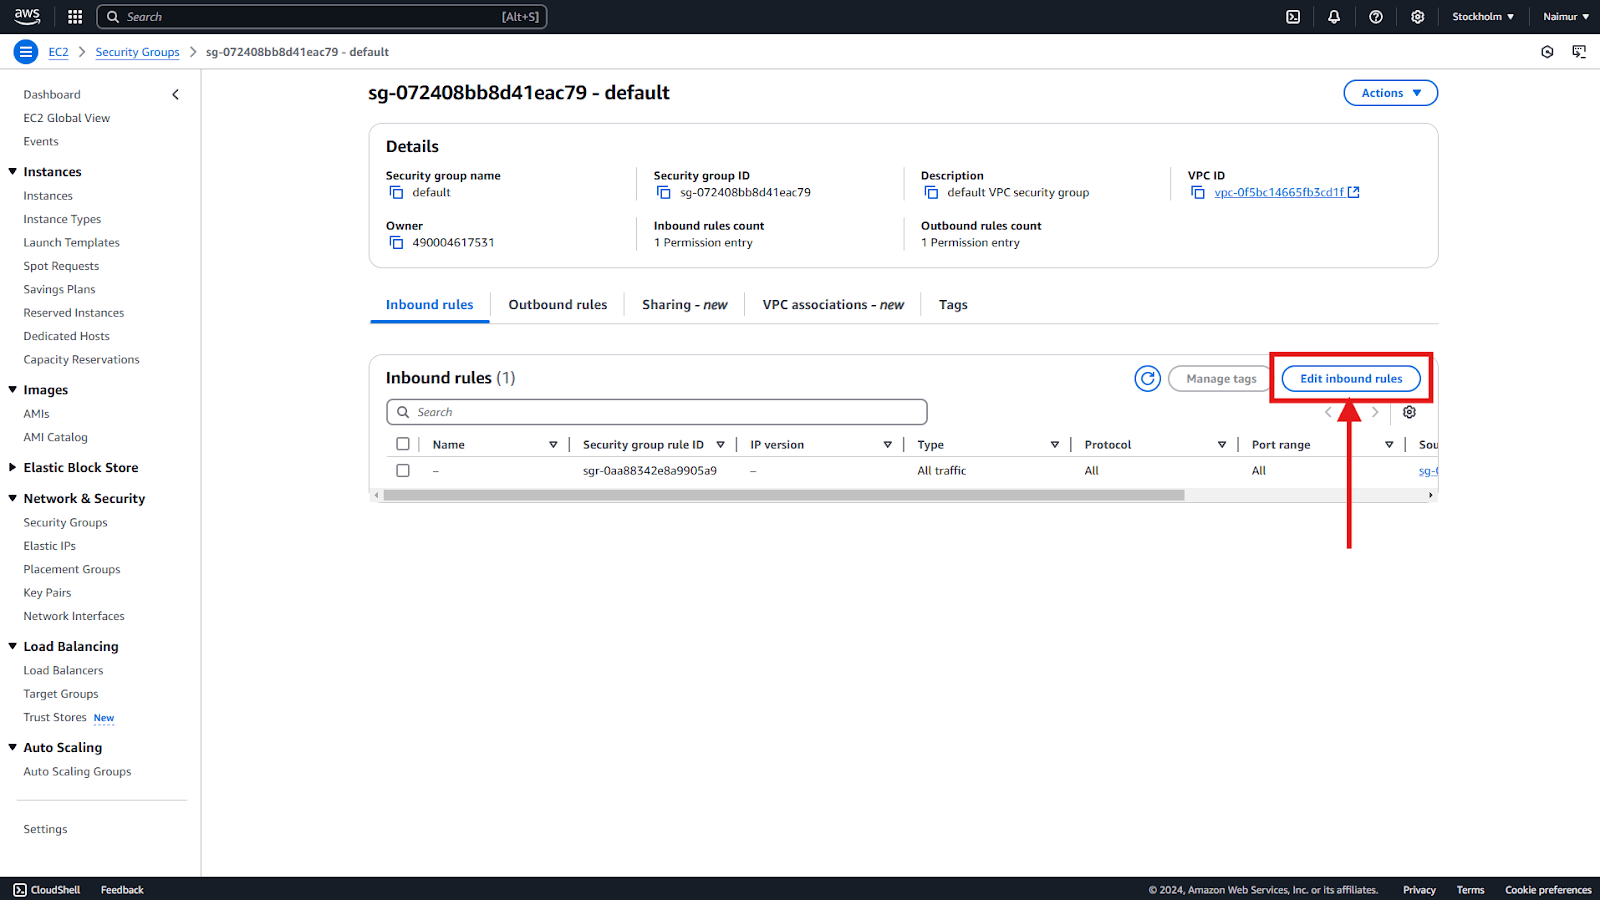
Add a new rule to allow access to the database:

  • Type: MySQL/Aurora (or the appropriate database type, such as PostgreSQL).
  • Protocol: TCP.
  • Port Range: Use the default port for your database (e.g. 3306 for MySQL).
  • Source: Set this to Anywhere (0.0.0.0/0).

Click Save rules to apply the changes.

How to Create an Amazon RDS Database for ArchiveMaster

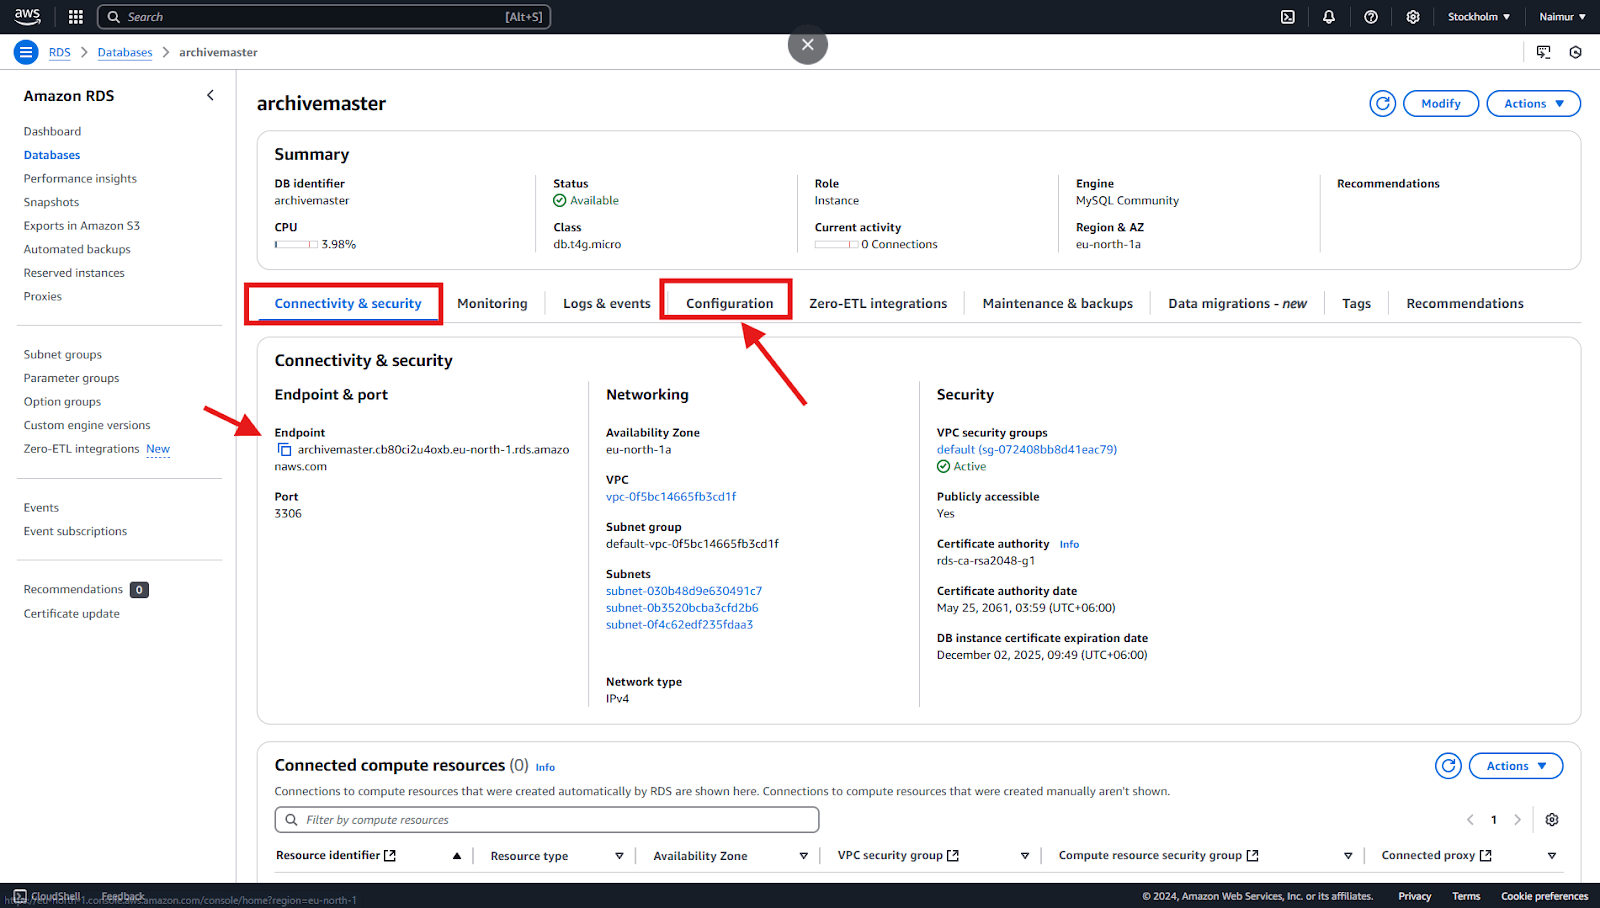
After setting the inbound rules to allow public access, you can return to the Connectivity & Security tab of your RDS instance to find the Endpoint and Port, And to connect ArchiveMaster to your database successfully.

How to Create an Amazon RDS Database for ArchiveMaster

For more information, check out our guide on How to Connect Amazon RDS Remote Database with ArchiveMaster.

What are your Feelings
Share This Article :
  • Facebook
  • X
  • LinkedIn
  • Pinterest
Still stuck? How can we help?

How can we help?

Updated on December 5, 2024
How to Connect Amazon RDS Remote Database with ArchiveMaster

Leave a Reply Cancel reply

Your email address will not be published. Required fields are marked *


Products

  • WP Dark Mode
    WP Dark Mode
  • FlexTable
    FlexTable
  • FormyChat
    FormyChat
  • Stock Sync
    FlexStock
  • FlexOrder
    FlexOrder
  • Easy Video Reviews
    Easy Video Reviews
  • EchoRewards
    EchoRewards
  • Jisi Meet
    Jitsi Meet Video Meeting
  • FlexSync for Shopify
    FlexSync for Shopify
  • ArchiveMaster
    ArchiveMaster
  • Chat Widgets
    OMG Chat Widget
  • Stock Notifier
    Stock Notifier for WooCommerce

Links

  • Home
  • Blog
  • About Us
  • Support
  • Affiliates
  • Influencer Program
  • Careers
  • Privacy Policy
  • Terms of Service

Our Blog

Ninja Chat integrations with FormyChat
May 22, 2025
How to Connect Ninja Forms to WhatsApp: A Simple Guide to Instant Lead Notificat
How to Export WooCommerce Products with FlexStock
May 22, 2025
How to Export WooCommerce Products with FlexStock
Mastering FlexTable: How to Make a Responsive WordPress Table
May 15, 2025
Mastering FlexTable: How to Make a Responsive WordPress Table

Logo

Experience remarkable WordPress products with a new level of power, beauty, and human-centered designs.

© 2025 WPPOOL . All Right Reserved.

Our site uses cookies to give you a personalized experience through curated contents, and suggestions. More information