PDO SQLite is a lightweight PHP extension that allows your scripts to work with SQLite databases using a consistent interface. If you’re seeing errors like “could not find driver” or “Class ‘PDO’ not found”, you may need to enable this extension.
Section 1: Quick Solution: Contact Your Hosting Provider (Recommended) #
If you’re not comfortable dealing with server configuration or file editing, the fastest and safest approach is to contact your hosting provider.
- Message template you can use:
“Hi, I need to enable the pdo_sqlite and sqlite3 extensions in my PHP configuration. Could you please assist me with this?” - They’ll usually take care of it for you within minutes.
Section 2: Manual Setup — Enable PDO SQLite Yourself #
If you’re a technical user or managing your own hosting environment, follow the appropriate steps below for your setup. Based on your type of hosting, follow the instructions.
A. Enable PDO SQLite extension on cPanel (Shared Hosting Providers) #
- Log in to your cPanel account
- Navigate to PHP settings:
- Scroll down to the Software section
- Click on “Select PHP Version” (sometimes called “PHP Selector” or “PHP Configuration”) screenshot
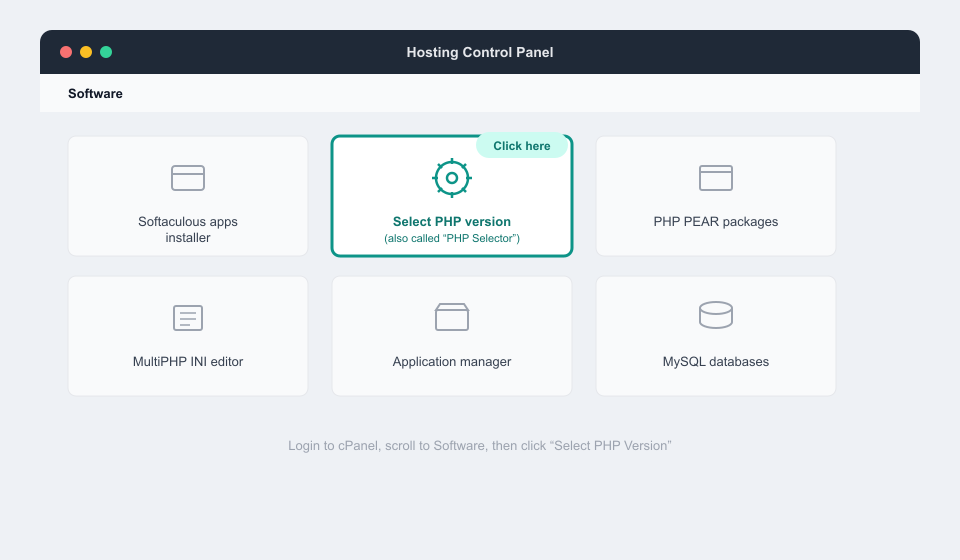
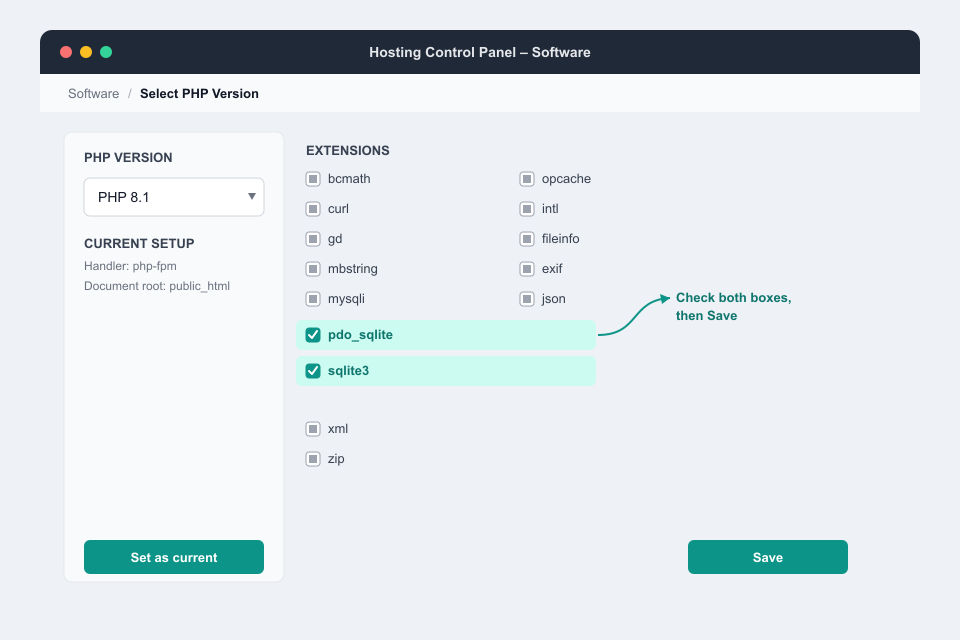
- In the list of available PHP extensions, check the boxes for:
- ✓ pdo_sqlite
- ✓ sqlite3
How to verify if the PDO extension is enabled #
Create a phpinfo.php file in your public HTML directory:
- add this code “<?php phpinfo(); ?>” in the file and save
- Open the file in your browser (e.g., yourdomain.com/phpinfo.php)
- Search for pdo_sqlite on the page
Enable PDO SQLite extension on Linux/Unix (VPS or Dedicated Server) #
If you are managing your own VPS or dedicated server (e.g., DigitalOcean, AWS EC2, Linode, etc.), you will typically use SSH (Secure Shell) to access your server’s command line.
Step 1: Open a Terminal Window (on Your Local Computer) #
- On macOS or Linux: Open the Terminal app
- On Windows: Use a terminal program like:
- Command Prompt
- PowerShell
- PuTTY (recommended)
- Windows Terminal with SSH support
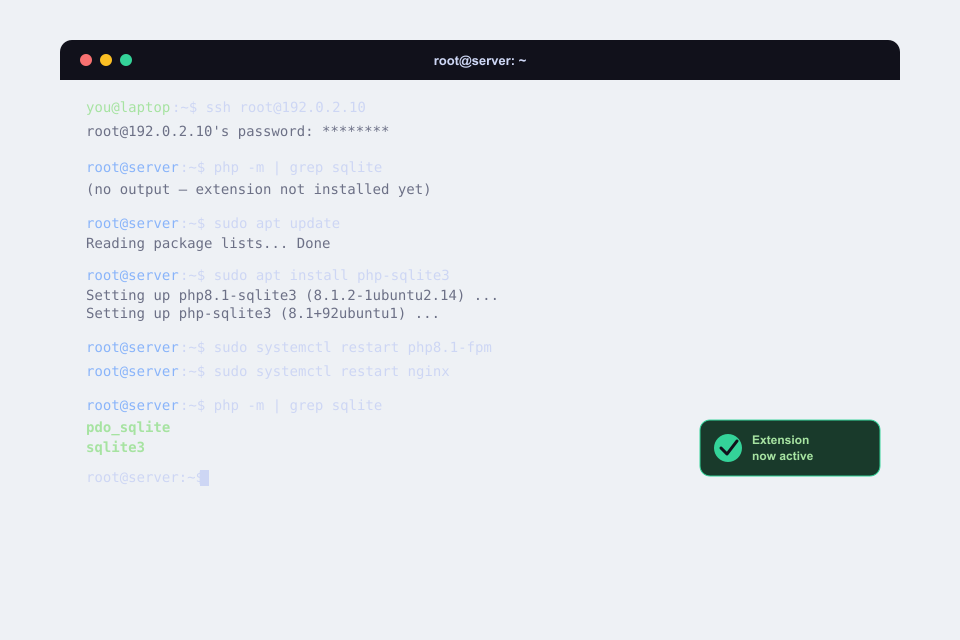
Step 2: Connect to Your Server Using SSH #
- In the terminal, connect to your server using the SSH command:
ssh username@your-server-ip- Replace the bash command with the following:
- username with your server’s login name (commonly root or ubuntu)
- your-server-ip with your server’s IP address
Example:
ssh root@192.0.2.10If this is your first time connecting, you may be asked to confirm the server’s fingerprint. Type yes to continue.
Step 3: Run the Commands to Enable PDO SQLite #
- Check if PDO SQLite is already enabled:
php -m | grep sqlite- Install the SQLite extension (if not installed):
- On Ubuntu/Debian:
sudo apt update

sudo apt install php-sqlite3- On CentOS/RHEL:
sudo yum install php-sqlite3- Note: If you’re using a specific PHP version (like PHP 8.1), the package name might be version-specific, such as php8.1-sqlite3.
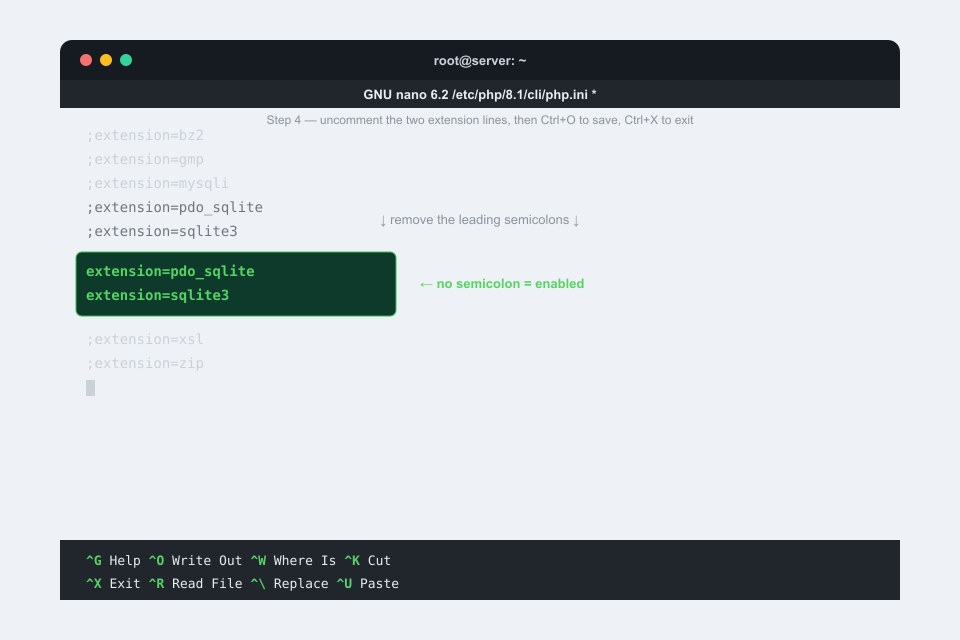
Step 4: Modify php.ini (if necessary) #
- Open the PHP config file in a text editor like nano:
sudo nano /etc/php/8.1/cli/php.ini - Make sure these lines are added or uncommented:
extension=pdo_sqlite

extension=sqlite3- Press Ctrl + O to save, then Ctrl + X to exit
Step 5: Restart Your Web Server #
- Depending on your stack, restart the relevant services:
- For Apache
sudo systemctl restart apache2- For Nginx with PHP-FPM
sudo systemctl restart php8.1-fpm

sudo systemctl restart nginx
C. On Windows (e.g., XAMPP, WAMP, IIS) #
- Open your php.ini file:
- Example path: C:\xampp\php\php.ini. If you install XAMPP or WAMP in another drive on your computer, then go to the same path inside this drive
- Another way to open php.ini from the XAMPP control panel
- Enable the extensions:
- Find these lines and remove the semicolon (;) in front of them:
- extension=pdo_sqlite
- extension=sqlite3

Restart your server (Apache/IIS)
Verify by visiting a phpinfo() page
D. On Plesk or Other Control Panels #
- Log in to the control panel. Navigate to PHP Settings, PHP Extensions, or Select PHP version. Example server’s screenshot from Host White Label: Locate and enable:
- ✓ pdo_sqlite
- ✓ sqlite3
- Save changes
- Restart Apache or PHP (if an option is provided), or wait a few minutes for changes to take effect
- Use phpinfo() or php -m to confirm the extension is now active
Final Check #
After enabling the extension, confirm it’s working:
- Run this command:
php -m | grep sqlite- Or check your phpinfo() page and look for:
- PDO
- pdo_sqlite
- sqlite3
You should now be able to use PDO with SQLite in your PHP applications without the “could not find driver” or “Class ‘PDO’ not found” errors.


Add your first comment to this post