Asynchronous Loading #
What is Asynchronous Loading? #
Asynchronous Loading is a performance-focused feature in FlexTable that loads your tables after the rest of your webpage content is fully rendered. Instead of loading with the page’s initial HTML, the table appears shortly after, using a smooth preloader animation in the background.

How It Works #
When enabled, FlexTable waits until your entire page content has finished loading, then triggers the table to fetch and render. This reduces the load time perceived by users and avoids blocking other important content like text, images, or headers. The table loads independently, improving the page’s responsiveness.
If disabled, the table will load only during full page reloads, which may delay rendering, especially if the Google Sheet takes time to respond.
Why Enable It? #
- ✅ Faster Page Load Speed – Prioritizes visible content first.
- ✅ Improved User Experience – Content appears quickly while table loads smoothly in the background.
- ✅ Reduced Load Bottlenecks – Useful for large or complex tables linked to big Google Sheets.
When Should You Use This? #
- Your table pulls a lot of data from Google Sheets.
- You want the rest of the site (text, images, buttons) to load fast.
- You’re aiming for better performance scores on tools like Google PageSpeed or GTmetrix.
Choose How to Load Table Scripts #
If you want to reduce unnecessary script loading and improve page speed, FlexTable gives you full control over it, helping you balance performance and compatibility based on your setup.
You have two options:
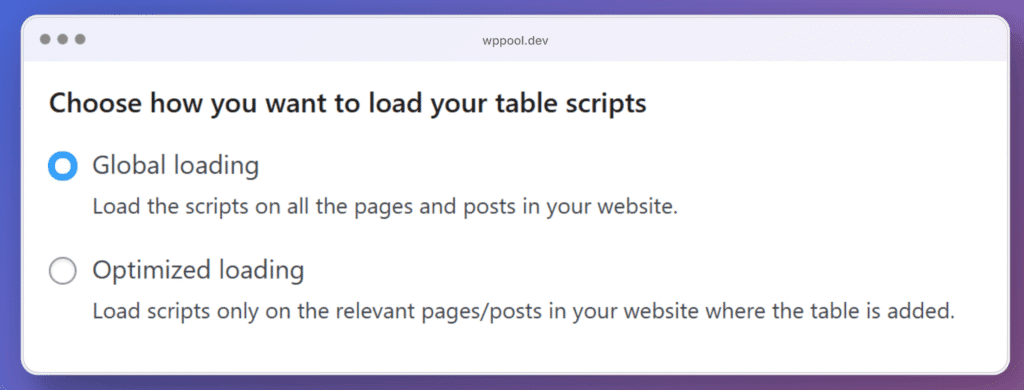
1. Global Loading #
What It Does: #
Loads all necessary FlexTable scripts on every page and posts across your entire site, whether or not a table is used on those pages.
When to Use It: #
- You are using tables on multiple pages.
- Your tables are dynamically loaded via custom code.
- You want to ensure compatibility without worrying about missing scripts.
⚠️ Considerations: #
- May slightly impact performance on pages without tables since scripts are still loaded.
- Best for users who prioritize functionality and consistency across many pages.
2. Optimized Loading #
What It Does: #
Only loads FlexTable scripts on pages or posts where a table is actually embedded.
When to Use It: #
- You use tables on just a few specific pages.
- You want to reduce unnecessary script loading and improve page speed.
- Your site structure is straightforward and predictable.
⚠️ Considerations: #
- If you move tables dynamically (e.g., through AJAX or templates), the script might not load automatically. Use with care in advanced setups.
- Always test your pages after switching to ensure tables display as expected.
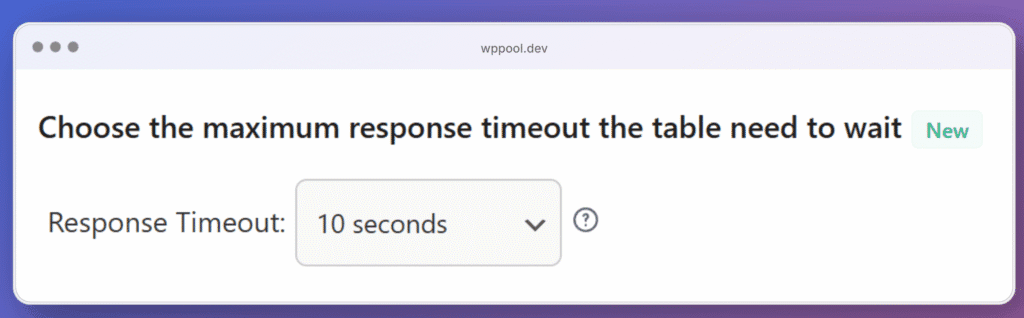
Response Timeout #
What Is Response Timeout? #
The Response Timeout setting controls how long FlexTable will wait for a response from the Google Sheets API before it stops trying to load the table data.
How It Works #
When a table loads, the FlexTablle requests data from the linked Google Sheet. If the sheet takes too long to respond (due to size, internet speed, or Google server delay), this timeout defines how long the plugin will wait before considering the request “failed.”
Why It Matters #
- Higher timeout values (e.g., 15 seconds) allow more time for large or complex spreadsheets to fully load, reducing the chance of incomplete tables.
- Lower timeout values (e.g., 5–10 seconds) improve perceived speed, especially on fast connections, but may result in missing data if Google Sheets responds slowly.
Recommended Usage #
- Use 10–15 seconds if you work with large datasets or notice inconsistent loading.
- Use 5–10 seconds for small, lightweight tables where speed is a priority.
Adjust this setting based on the size of your spreadsheet and the stability of your internet connection or hosting server.
How to Set It #
- Go to the Performance tab in the FlexTable Dashboard.
- Find the response timeout setting as “Choose the maximum response timeout the table need to wait”.
- Choose a value (e.g., 5s, 10s, 15s) from the dropdown menu.
- Click Save Settings to apply
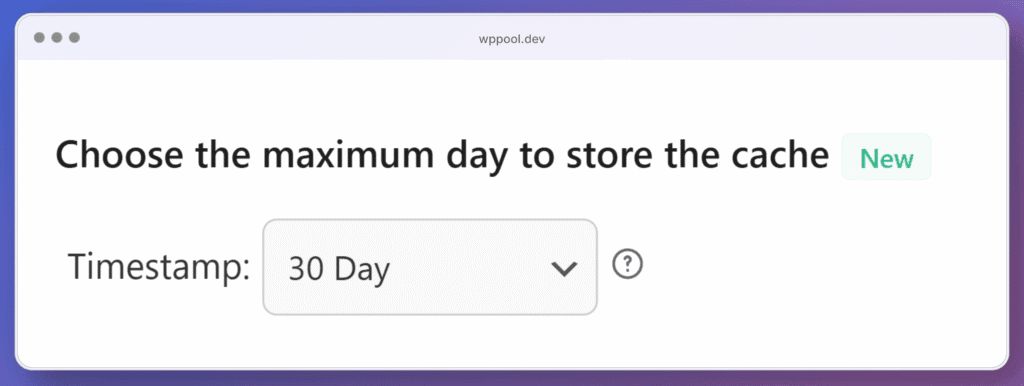
Cache Duration #
What Is Cache Duration? #
This feature allows you to set how long your table data should be cached in days before FlexTable checks for new updates from your connected Google Sheet.
How It Works #
Once enabled, FlexTable will store your table’s data locally (in WordPress transients) for the duration you select (e.g., 1 day, 7 days, 30 days).
During this period, the plugin will not re-fetch data from Google Sheets, helping reduce API calls and speed up table loading times.
After the selected cache period ends, the plugin will automatically refresh and display the latest data from your spreadsheet.
Why Use It? #
- Improves loading speed by skipping unnecessary data checks.
- Reduces server/API load, especially for tables that don’t change frequently.
Use Case Examples #
- 30 Days: Ideal for static content like pricing plans, quarterly performance data, or archived records.
- 7 Days: Works well for weekly updates, event schedules, or class timetables.
- 1 Day: Best for active spreadsheets that are updated daily, like shift rosters or student grade tables.
⚠️ Things to Keep in Mind #
- Live updates from Google Sheets will not appear until the cache expires.
- If you need to see changes immediately, simply disable the caching feature by unchecking it in the plugin settings. Once disabled, FlexTable will resume live syncing with your Google Sheet and display the most recent data instantly.
- The feature is most effective when paired with “Prevent frequent cache updates for faster table loading.“ under the Utility section.
How to Set It #
- Go to the Performance tab in the FlexTable Dashboard.
- Scroll to “Choose the maximum day to store the cache.”
- Select your desired cache duration from the dropdown (1 to 30 days).
- Click Save Settings.


