







- Before You Start
- Install FlexStock
- Install the Multi-Store Add-on
- How Synchronization Works
- Choose how your stores should behave
- Configure Your Store Role
- Setting Up a Source Store:
- Set sync permissions (which fields to sync)
- Choose Which Columns/Fields to Sync
- Setting Up a Destination Store
- FAQ
- Use Cases
- Tips
- Troubleshooting
Manage multiple WooCommerce stores from one Google Sheet and keep products, inventory, pricing, and data synced automatically in real time.
Instead of managing each store separately, you can connect your stores together and keep product information synchronized automatically. This is especially useful if you operate multiple online stores that sell the same products.
Before You Start #
Make sure you have:
- FlexStock is installed and activated.
- FlexStock connected with Google Sheets.
- Multi-Store Sync Add-on installed.
Install FlexStock #
Install and activate FlexStock on every WooCommerce store you want to connect.
Complete the normal Google Sheets setup first. Quick setup: Documentation.
Install the Multi-Store Add-on #
Install and activate the Multi-Store Sync Add-on from your WordPress dashboard.
Just click on the Get Now button from the Add-ons option.

Click on Install Now and the press Activate once the plugin is installed.

Once activation is complete, you can configure and manage your multi-store synchronization settings.

Next up, click Settings → Multi-Store Sync; the setup wizard will automatically open and guide you through the configuration process.

How Synchronization Works #
After both stores are connected:
- Product updates sync automatically.
- Stock changes sync automatically.
- Product information updates across connected stores.
- Orders reduce stock across all connected stores.
- Changes made in one store will reflect across all stores and product catalogs.
- Multi-store currently supports two-way sync. One-way sync is in development.
Example #
Store A (Source)
Product: Red Cap | Stock = 10
Store B (Destination)
The same product automatically becomes:
Product: Red Cap | Stock = 10
If someone buys 3 caps in Store B, it will sync simultaneously with Store A. Eg:
Store A = 7
Store B = 7
Likewise, if stock is updated from the Source Store, the Destination Store is updated automatically.
So, if you have 100 units of a product to sell across 5 stores, set the stock to 100 on every store – not 20 per store.
This keeps inventory consistent everywhere.
Choose how your stores should behave #
- Sync stock across stores
- Independent inventory (Upcoming)

Configure Your Store Role #
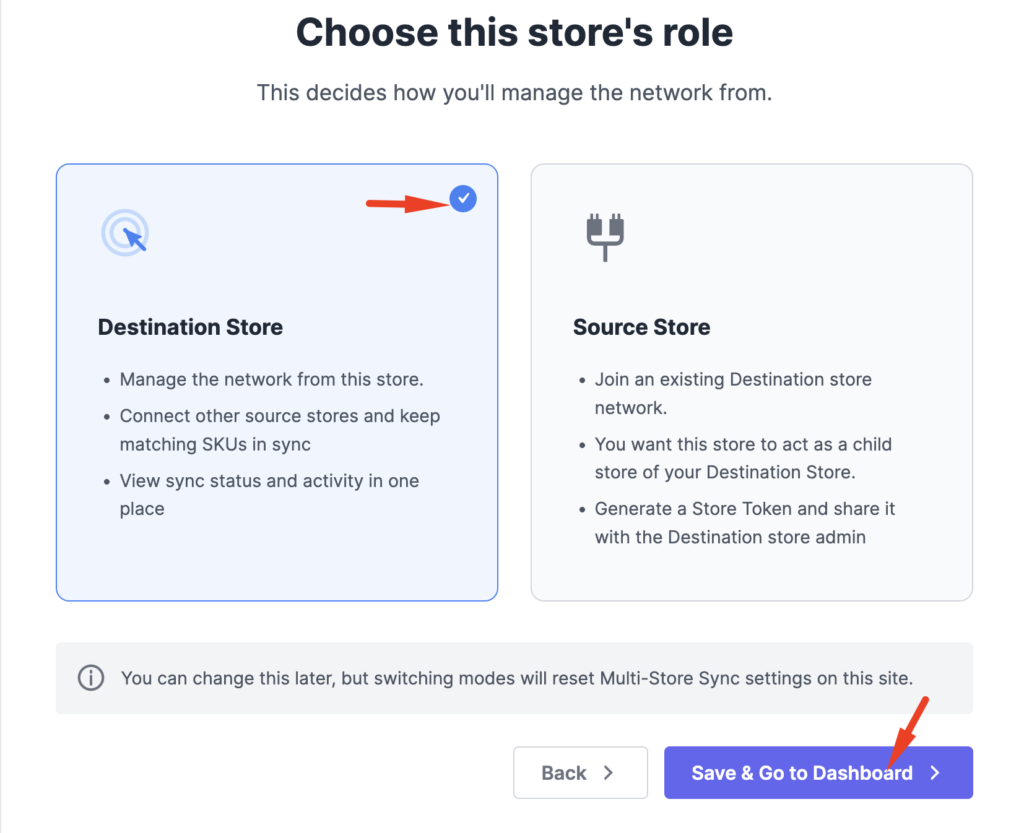
The first time you open the settings, you’ll see a welcome screen asking you to choose a mode. By default, Destination Store is pre-selected.
Choose one of the following:

- Source Store
- Join an existing Destination Store network.
- You want this store to act as a child store of your Destination Store.
- Generate a Store Token and share it with the Destination store admin
- Destination Store
- Manage the network from this store.
- Connect other source stores and keep matching SKUs in sync
- View sync status and activity in one place
This setting determines how the store behaves.
You can change this later, but switching modes will reset Multi-Store Sync settings on this site.
Setting Up a Source Store: #
The Source Store shares products with other stores. Choose Source Store during setup. Save & Go to Dashboard.

Create Your Connection Token (If you have more than 1 site/store): #
If you have more than one store, then you will need to create connection token from source store. Follow this:
- Click Create Token.
- Then the add-on creates a secure connection token.
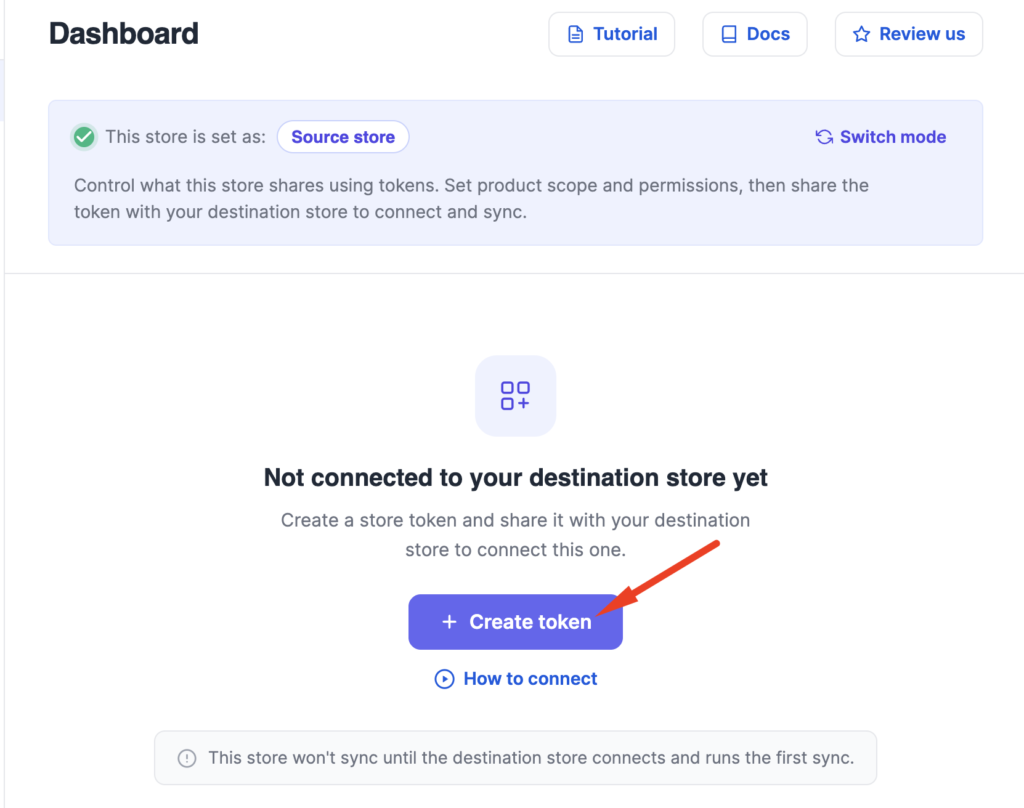
Click on the Generate Token option to create a one-time store token.

Generate a store token. Then press “Save & continue”

Set sync permissions (which fields to sync) #
Choose which products and product data this token can sync with connected stores.
The add-on allows several filtering options.
Option A: All Products #
Sync every WooCommerce product from your stores.

Best for:
- Multiple stores sell the same catalog.
- Complete inventory synchronization.
Option B: Filtered Products #
Only products within those categories/tags/attributes will be synced/shared.

B.1: Products by category #
Sync products that contain the selected WooCommerce category.
Example:
- Clothing
- T-shirt
- Music
B.2: Products by Tag: #
Sync products that contain selected WooCommerce tags.
Example:
- Featured
- Sale
- Summer Collection
B.3: Products by Attribute: #
Sync products matching selected attributes.
Example:
- Color = Black
- Size = XL
- Brand = Nike
Only matching products will sync.
Option C: Specific SKUs #
Only selected SKU products will be synced.

You can manually enter product SKUs.
Separate multiple SKUs using:
- comma (,)
- new line (by pressing the Enter key)
Example:
- woo-cap
- woo-sunglasses
Choose Which Columns/Fields to Sync #
You also control which product information should synchronize.


Only selected columns will be updated on connected stores.
Examples include:
- Stock
- Price
- Regular Price
- Sale Price
- Product Name
- SKU
- Images
- Other supported FlexStock columns
The available options vary based on FlexStock or FlexStock Premium. FlexStock Premium unlocks all available options. This allows you to sync only the information you actually need. Then click on Save & Get Token.

Share the following with the Destination Store administrator:
- Source Store URL
- Generated Store Token
You can copy it manually or send it via email. Your Source Store setup is now complete.
Setting Up a Destination Store #
The Destination Store receives products from the Source Store.
Go to: FlexStock → Settings → Multi-Store Sync
Choose Destination Store. and then Save & Go to Dashboard
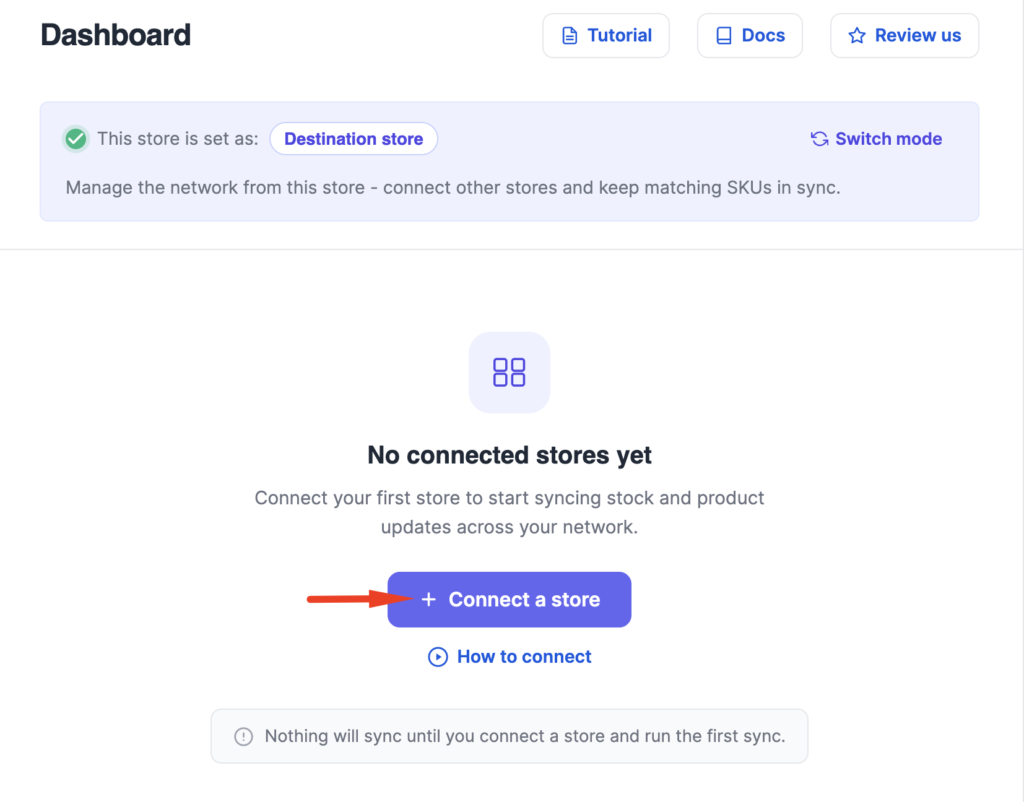
Connect your store to start syncing products and stock updates across your connected stores.
From your dashboard, click the “Connect a Store” button to begin the connection process.
Enter:
- Source Store URL
- Store Token
Click Verify Connection & Continue

If successful, the two stores become connected.
Choose the Google Sheet tab that should receive the synchronized products.
N.B: If you are using an existing tab for FlexStock, it is ideal to create a new tab for multi-store sync
You can:
- Select an existing sheet
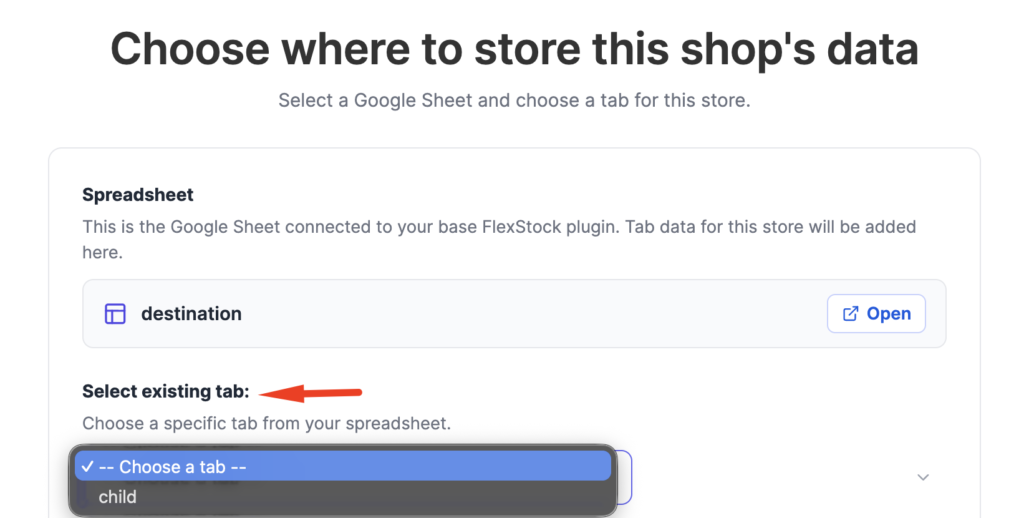
- Or, Create a new sheet

Ready to Sync #
Review the changes that will be applied during the first sync. Once you’ve confirmed everything looks correct, check the box below to continue.
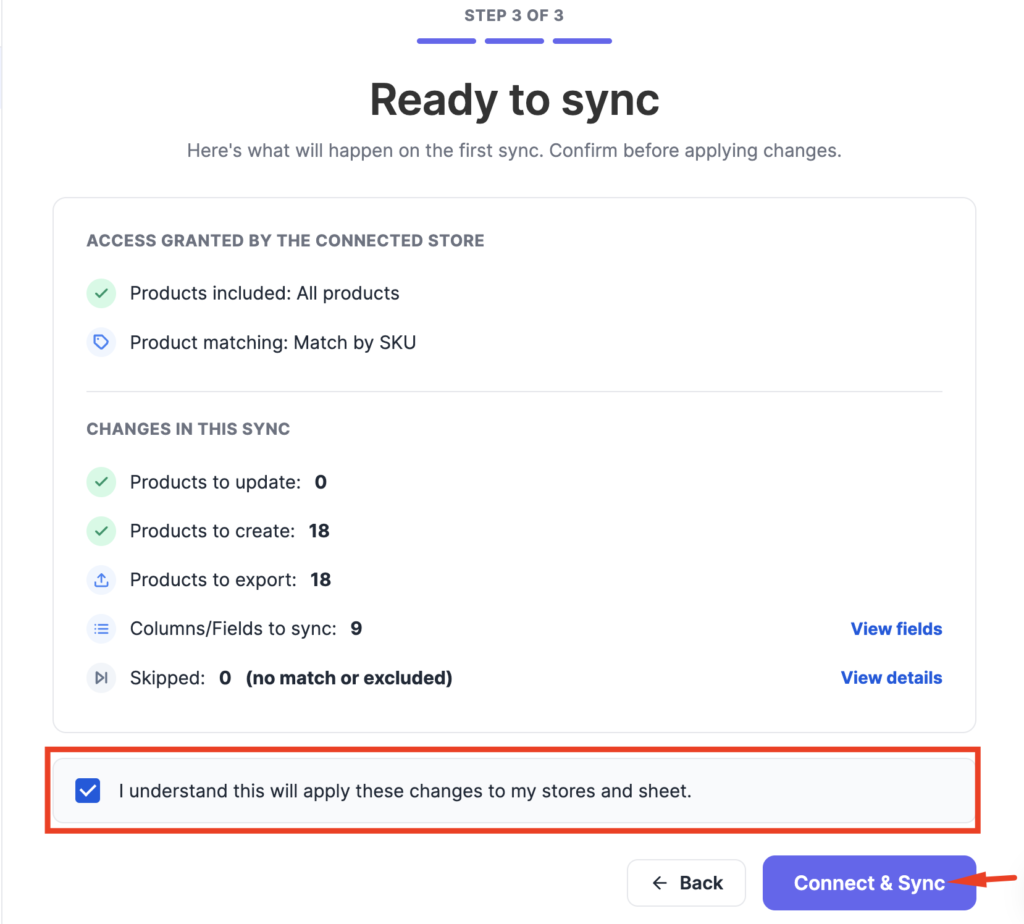
☑ I understand that the first sync will apply these changes to my connected stores and Google Sheet.
Your store has been connected successfully, and the initial sync is complete. You can now start syncing products and inventory between your connected stores.
Use the Open Sheet button to view your synced data in Google Sheets, or return to the Dashboard to manage connections, update sync settings, and run future synchronizations at any time.

FAQ #
1. Do I need a FlexStock Premium license to use the multi-store sync add-on?
Ans: No, you can comfortably use both the plugin & the add-on with the free or premium version, according to your needs.
Use Cases #
1. Multiple Brand Stores #
Manage multiple WooCommerce stores selling shared products from one central store.
Instead of updating each store separately, sync products, stock, and selected product information automatically across all connected brand stores.
Example:
A company manages separate stores for clothing, footwear, and accessories but shares the same inventory.
2. Wholesale & Retail Stores #
Keep wholesale and retail inventory synchronized automatically.
When a product is sold from one store, the stock updates across the other connected stores to prevent overselling and manual inventory management.
Example:
A business sells products through a customer-facing retail store and a separate wholesale portal using the same stock.
3. Regional or Multiple Location Stores #
Run multiple regional or branch-based stores while maintaining a centralized inventory system.
Sync products between different locations and keep stock availability consistent across all stores.
Example:
A business operates separate stores for different countries or cities, but manages products from one main store.
Tips #
- Configure the Source Store before connecting Destination Stores.
- Share your connection token only with trusted administrators.
- Use product filters to reduce unnecessary synchronization.
- Sync only the columns you need for better performance.
- Keep FlexStock updated on every connected store.
Troubleshooting #
Connection cannot be verified #
- Make sure the Source Store URL is correct.
- Check that the connection token is valid.
- Confirm both websites are online.
- Ensure FlexStock and the Multi-Store Add-on are activated on both stores.
Products are not syncing #
- Verify the product matches your selected filter.
- Check whether the required product columns are enabled for synchronization.
- Make sure both stores are still connected.
Stock is not updating #
- Verify that stock management is enabled for the product.
- Confirm the product exists on both connected stores.
- Check that the Stock column is included in the selected sync fields.


Add your first comment to this post