









FlexTable’s Conditional Table View lets you control what users see in a table based on how the table is intended to be accessed.
It is especially useful when you don’t want to display the entire dataset immediately or when table data should be limited to a specific user or use case.
FlexTable provides three approaches for conditional table views:
- Search Only Display – Show the table results only when a visitor performs a search.
- User-Specific Display – Show only the records associated with the currently logged-in user.
- Protected View – Restrict table data from being openly exposed and control how the data can be accessed.

Search Only Display #
Search Only Display lets you create a search-first table experience. Instead of displaying the complete table immediately, FlexTable allows visitors to search the connected data and displays the matching results.
This is especially useful for large datasets, lookup systems, verification pages, and situations where users already know what information they are looking for. You can watch a quick video tutorial of this feature here:
To configure this feature:
- Open your FlexTable table editor
- Go to Step 5: Conditional Table View
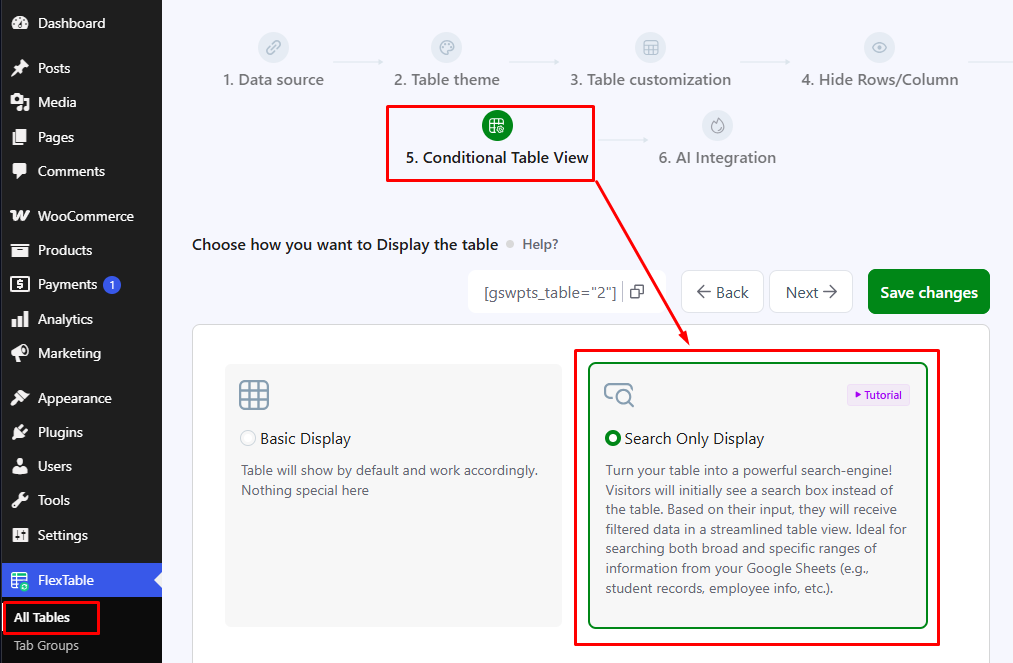
How to Configure Search Only Display #
After enabling Search Only Display, you can further control how the search works using the available options.
1. Enable Column-Specific Search #
The Enable Column-Specific Search option allows you to limit the search to a particular column in your table.
When enabled, you can select a specific column from the Select a column dropdown.
For example, if your table contains:

You can select Certificate ID as the search column.
When a visitor searches for CERT-10002, FlexTable will look for matches only in the Certificate ID column.

This is particularly useful when your search should be based on a unique identifier rather than the entire dataset.
If no column is selected:
The search will apply to all data in the connected Google Sheet.

When to Use Column-Specific Search #
Use this option when you want users to search using a specific field, such as:
- Certificate ID
- Student ID
- Employee ID
- Order ID
- Product SKU
- Registration Number
- Membership ID
Recommended: For lookup or verification systems, selecting a unique identifier as the search column usually provides a more precise search experience.
2. Choose Search-Result Trigger Option #
FlexTable provides two ways to determine when search results should appear:

Show Search Result Once Typing #
When this option is selected, FlexTable starts displaying matching results as the user types in the search field.
For example:
User types CERT-1 → matching results appear
User types CERT-10 → results update
User types CERT-100 → more specific results appear
This provides a live search experience without requiring the user to click a Search button.
Best for:
- Quick lookups
- Interactive directories
- Product searches
- Datasets where users benefit from seeing results immediately
Show Search Result After Pressing Search Button #
When this option is selected, FlexTable waits until the user finishes entering their search term and clicks the Search button before displaying the matching results.
For example:
User enters CERT-100 → clicks Search → matching result appears

This is useful when you want users to complete their search query before FlexTable processes and displays the results.
Best for:
- Certificate verification
- Student result lookup
- Order lookup
- ID-based searches
- Search forms where users typically enter a complete identifier
Why Search-Only Display Is Better for Large Datasets #
Consider a table with 25,000 records.
Displaying all 25,000 records isn’t necessarily useful if the visitor only needs one record.
Search Only Display changes the interaction from:
Browse 25,000 records
to:
Search for the record you need
This can make the page significantly more focused and easier to use.
User-Specific Display #
User-Specific Display is another Conditional Table View option specifically designed for personalized data.
It allows you to display table records based on the currently logged-in WordPress user.
For example, if a table contains records for multiple employees, each employee can be shown only the records associated with their account.
Use User-Specific Display when: #
- Each user should see their own records.
- Table data needs to be matched with a logged-in WordPress user.
- You are building a dashboard or portal.
- Different users should see different rows from the same table.
Detailed Configuration #
For the complete setup process, read the setup guide:
How to Use User-Specific Display in FlexTable
Or watch this Video Tutorial instead:
Which Conditional Table View Should You Use? #
The easiest way to decide is to start with the question:
“Who should be able to see the data, and how should they find it?” #
Choose Search Only Display if: #
- The data is intended to be searched.
- Visitors know a value they can search for.
- You don’t want to show the complete dataset initially.
- You are building a public lookup/verification page.
Example:
Certificate verification by Certificate ID.
Choose Protected View if: #
- The data shouldn’t be openly exposed.
- You need a more controlled table experience.
- The table contains private or internal information.
Example:
An internal employee information table.
Choose User-Specific Display if: #
- The data belongs to individual users.
- Users should see only their own records.
- The table is part of a personalized dashboard or portal.
Example:
A student dashboard showing the logged-in student’s academic records.


Add your first comment to this post